 Bank payments
 Card payments
 Apple Pay / Google Pay
 POS terminals
 Buy Now, Pay Later
 Shipping+ and Shipping+ Pro
 Refunds
 Recurring payments
 Payment link
 Payments for accommodation businesses
 Payments for service businesses
 Donations
 Kniks gift card
 Merchant financing
Shopify Shipping+ module setup
By using our module, you can add parcel locker and courier delivery menus and create automatic shipment registration with Omniva, DPD, Unisend, and Venipak.
✅ Preparation
Before installation, make sure that:
- You have an active MakeCommerce account
- Your Shopify store is active
- Your store currency in Shopify settings is set to EUR
- Your store location in Shopify settings is in Europe
If you are not yet a MakeCommerce client, contact us or fill in the application form.
🧩 App installation
1. Install the app
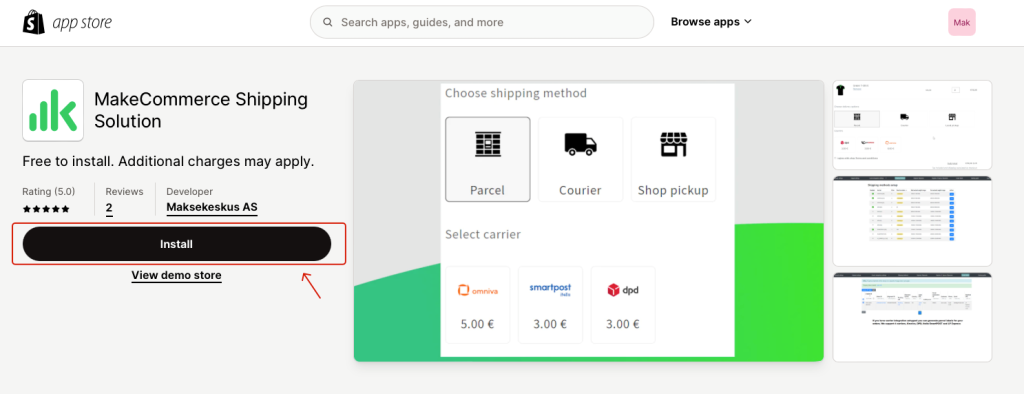
- To install the MakeCommerce Shipping+ app, go to this link: https://apps.shopify.com/makecommerce-shipping-solution
- The Shopify page will open, where you need to click ‘Install’:
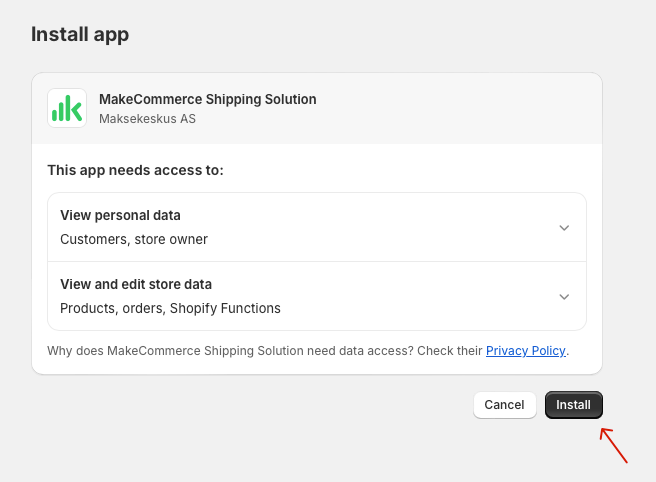
- Next, click ‘Install’ again:
2. Enter API keys
After installing the module, it should open automatically. Here you need to enter your MakeCommerce API keys:
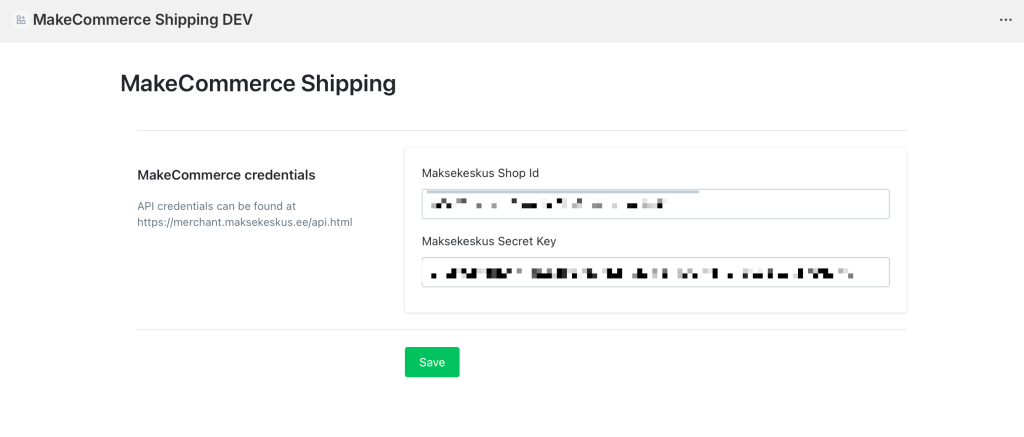
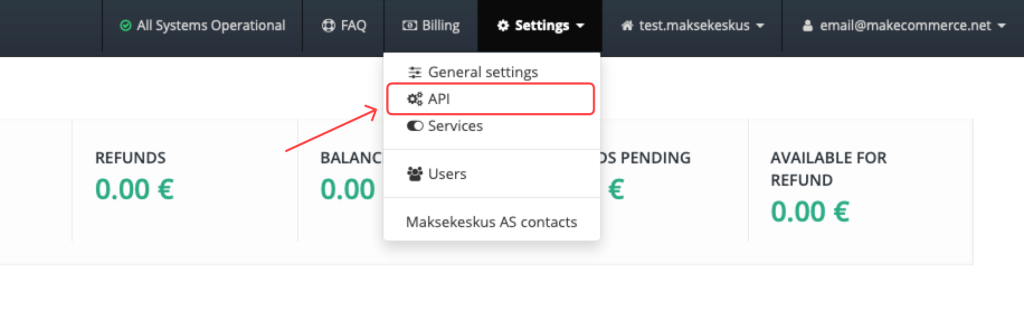
To get your LIVE production API keys, you must be our client and retrieve them from the merchant portal under Settings -> API:
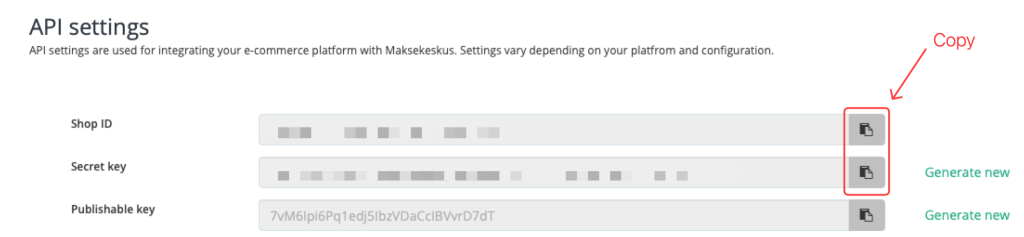
* If you want to make test payments using your individual test account, you can request access from the MakeCommerce team. Test API keys are different from live environment keys.
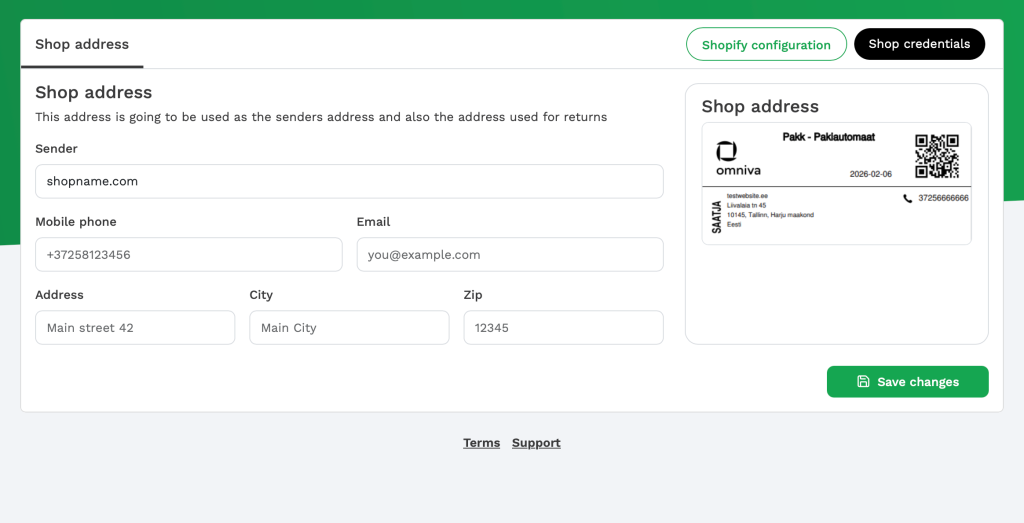
3. Complete store details
Next, you need to enter the store name, phone number, email address, and address.
The module has been installed successfully if you reach this screen:

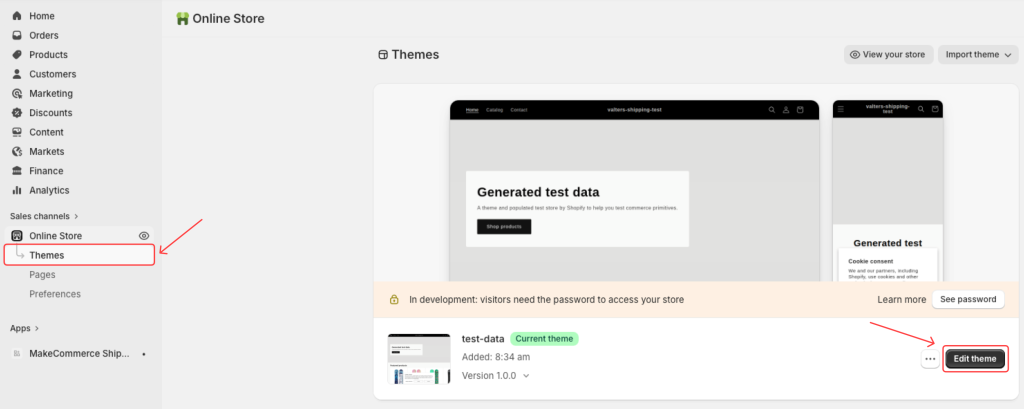
4. Enable theme integration
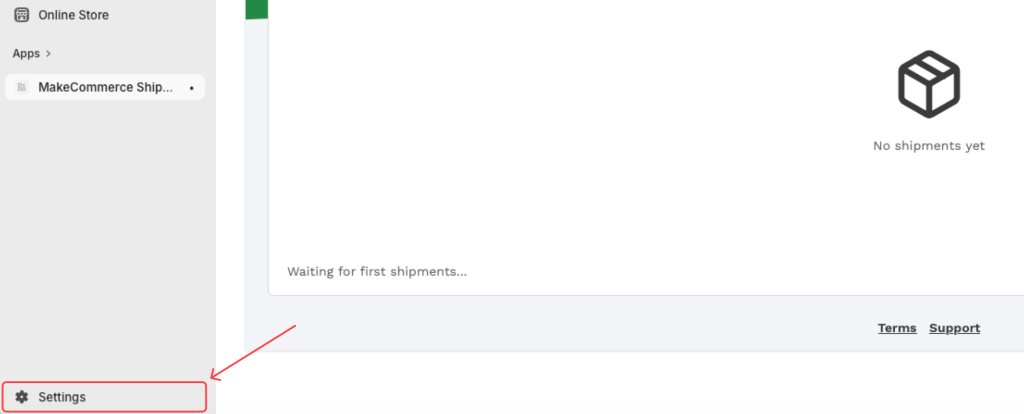
The last step is to configure the Shopify Theme settings. Go to Online Store -> Themes and click Edit theme:
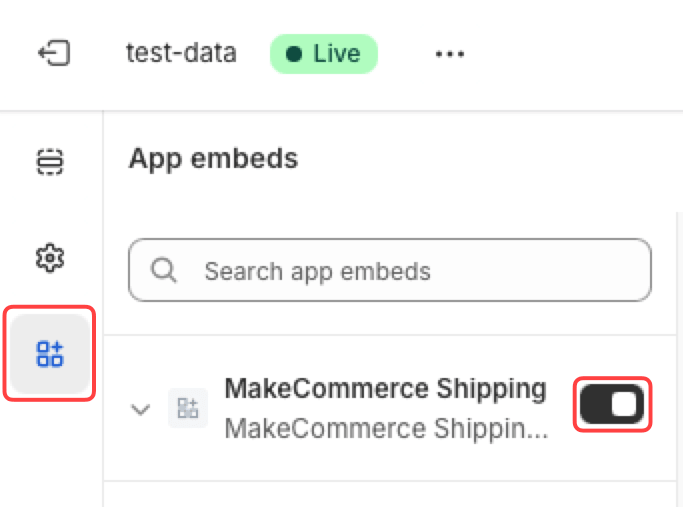
In the App Embeds section, enable MakeCommerce Shipping and save the changes:
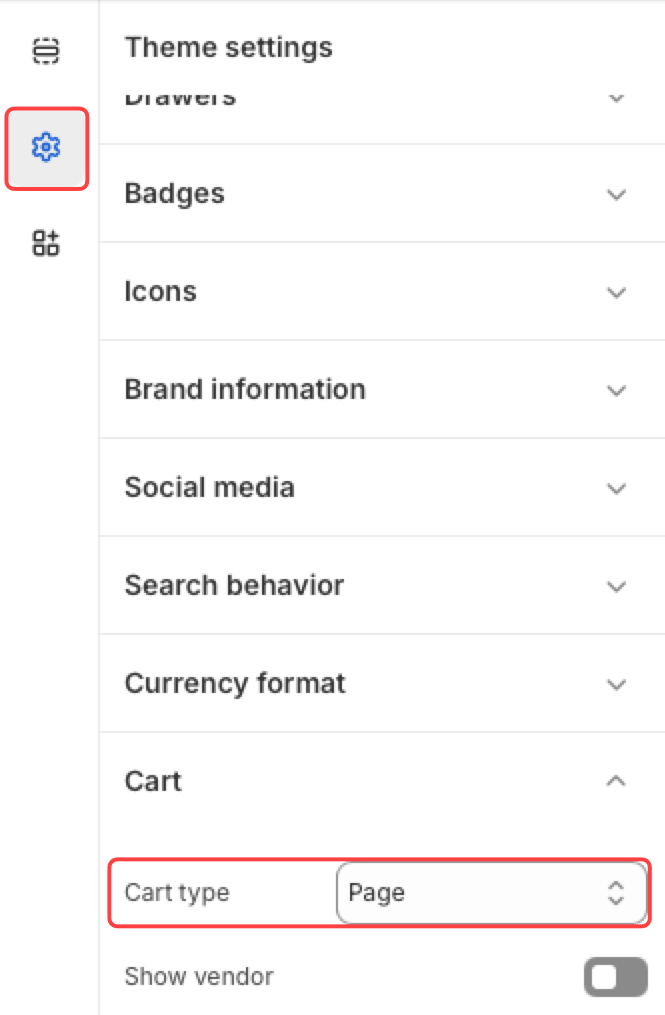
Additionally, make sure that the Shopify Theme cart type is set to: Page:
📋 Setting up delivery methods
Next, you need to set up delivery zones.
Required setup steps
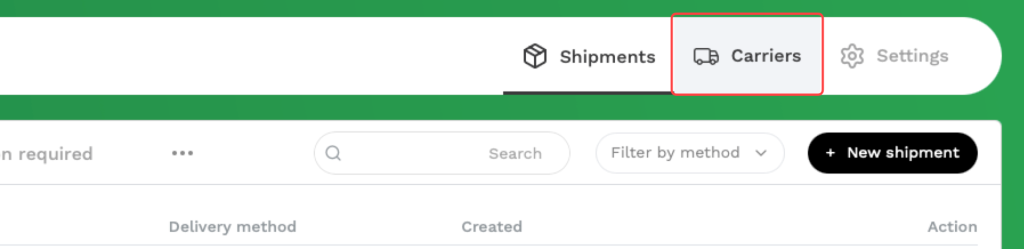
- Go to the Carriers section:
- Select the desired carrier:

- You can configure the settings you need:
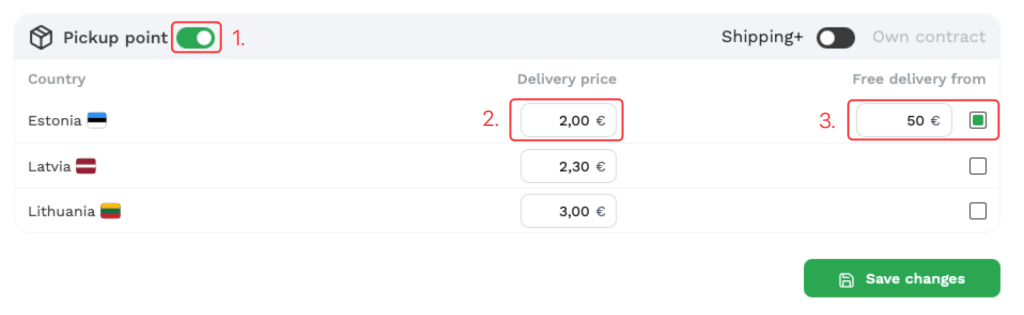
- Enable the delivery method
- Specify the delivery price
- Set free delivery from amount X
- Save the settings.
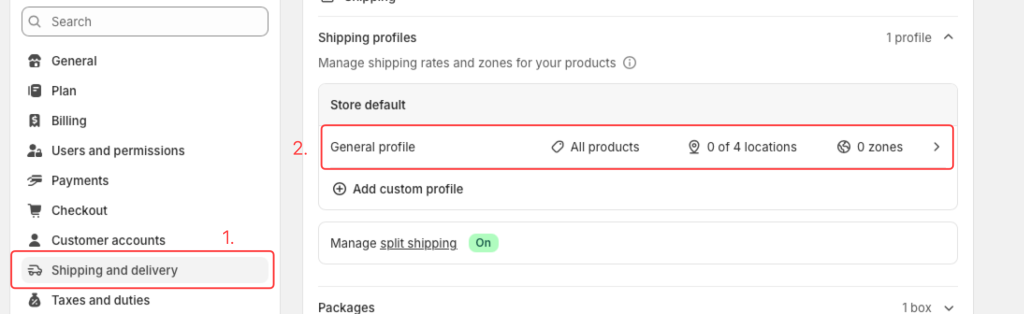
- Next, you need to open the Shopify settings:
- Open the Shipping and deliveries section. Then select the desired delivery profile.
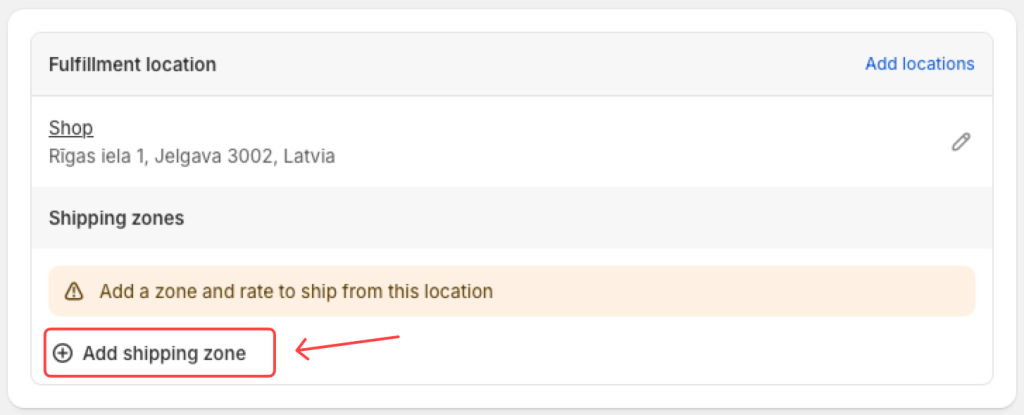
- Create a new Shipping Zone if needed; otherwise add a new Shipping Rate:
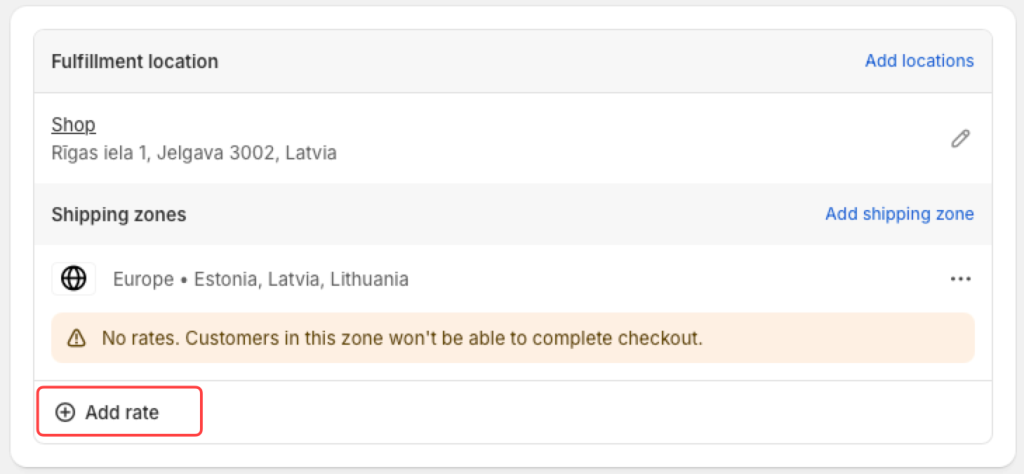
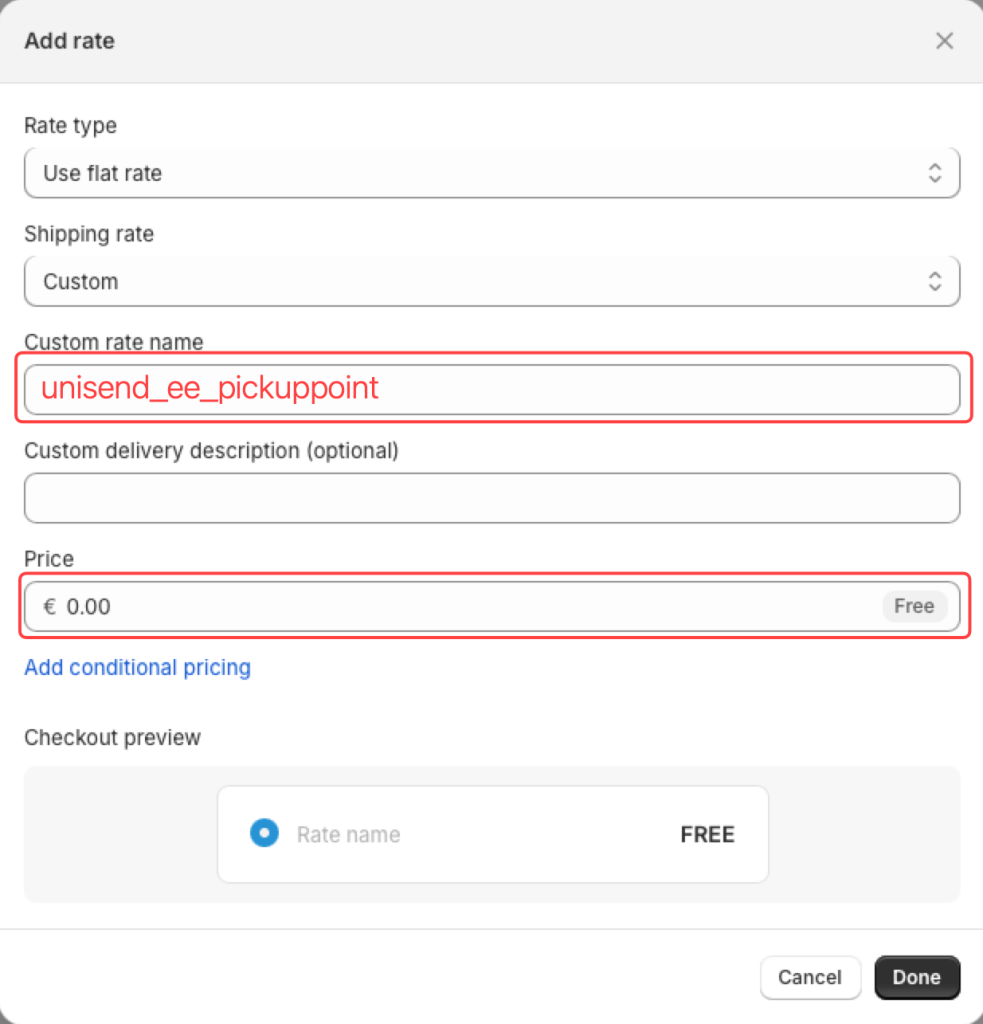
- You need to add a new Shipping Rate for each delivery method:
Carrier code examples
 Omniva
Parcel Locker
| 🇱🇻 Latvia | omniva_lv_pickuppoint |
| 🇱🇹 Lithuania | omniva_lt_pickuppoint |
| 🇪🇪 Estonia | omniva_ee_pickuppoint |
Courier
| 🇱🇻 Latvia | omniva_lv_courier |
| 🇱🇹 Lithuania | omniva_lt_courier |
| 🇪🇪 Estonia | omniva_ee_courier |
 DPD
DPD
Parcel Locker
| 🇱🇻 Latvia | dpd_lv_pickuppoint |
| 🇱🇹 Lithuania | dpd_lt_pickuppoint |
| 🇪🇪 Estonia | dpd_ee_pickuppoint |
Courier
| 🇱🇻 Latvia | dpd_lv_courier |
| 🇱🇹 Lithuania | dpd_lt_courier |
| 🇪🇪 Estonia | dpd_ee_courier |
 Unisend
Parcel Locker
| 🇱🇻 Latvia | unisend_lv_pickuppoint |
| 🇱🇹 Lithuania | unisend_lt_pickuppoint |
| 🇪🇪 Estonia | unisend_ee_pickuppoint |
Courier
| 🇱🇻 Latvia | unisend_lv_courier |
| 🇱🇹 Lithuania | unisend_lt_courier |
| 🇪🇪 Estonia | unisend_ee_courier |
 Venipak
Parcel Locker
| 🇱🇻 Latvia | venipak_lv_pickuppoint |
| 🇱🇹 Lithuania | venipak_lt_pickuppoint |
| 🇪🇪 Estonia | venipak_ee_pickuppoint |
Courier
| 🇱🇻 Latvia | venipak_lv_courier |
| 🇱🇹 Lithuania | venipak_lt_courier |
| 🇪🇪 Estonia | venipak_ee_courier |
 Smartposti
Parcel Locker
| 🇱🇻 Latvia | smartposti_lv_pickuppoint |
| 🇱🇹 Lithuania | smartposti_lt_pickuppoint |
| 🇪🇪 Estonia | smartposti_ee_pickuppoint |
Courier
| 🇱🇻 Latvia | smartposti_lv_courier |
| 🇱🇹 Lithuania | smartposti_lt_courier |
| 🇪🇪 Estonia | smartposti_ee_courier |
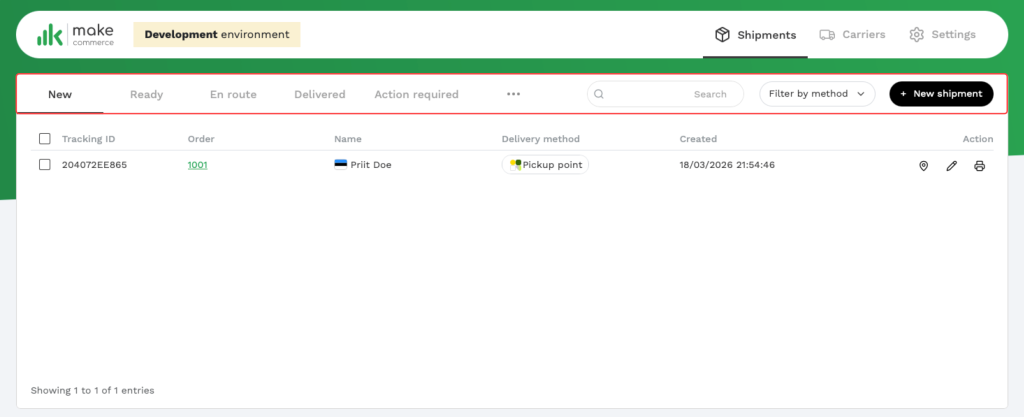
📦 Managing shipments
In the MakeCommerce shipping dashboard you have all the tools you need to manage your shipment processing.
Label printing & editing
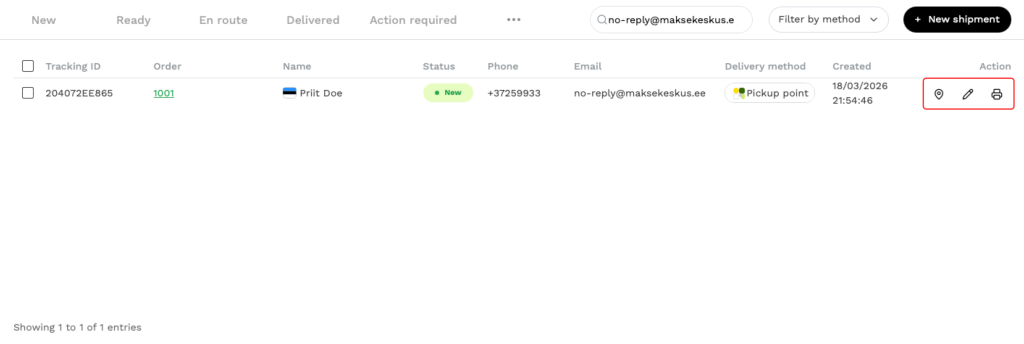
Filtering
- New – unprocessed shipments that have come in
- Ready – shipments that are ready to be shipped
- En route – shipping in progress
- Delivered – shipments that have already been delivered
- Action required – an issue has arisen with the shipment that requires your attention
- ⋅⋅⋅ – other shipment status filters
You can also search for shipments by Order ID, tracking number, email, phone number, and name.
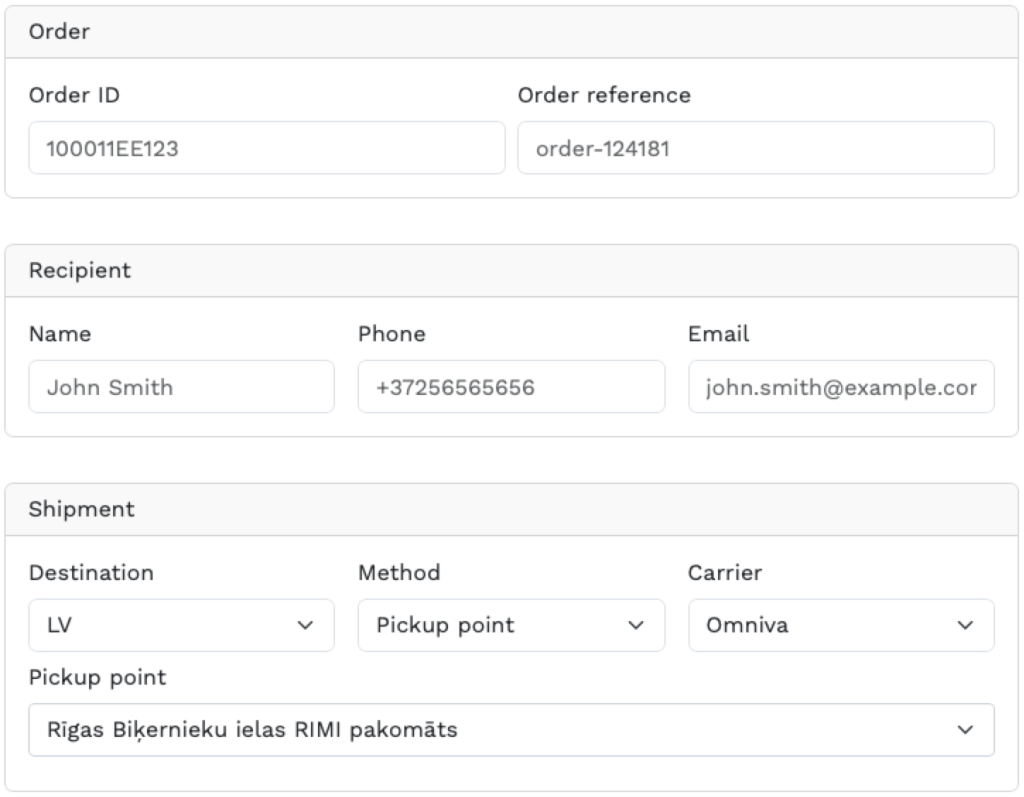
Manual shipment creation
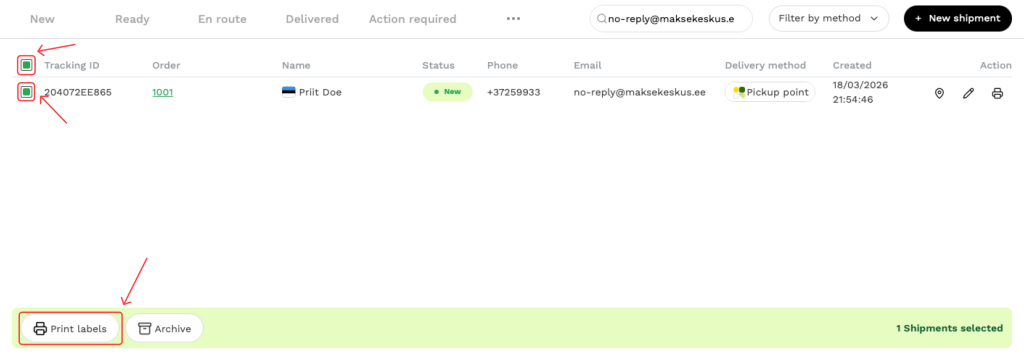
Bulk printing
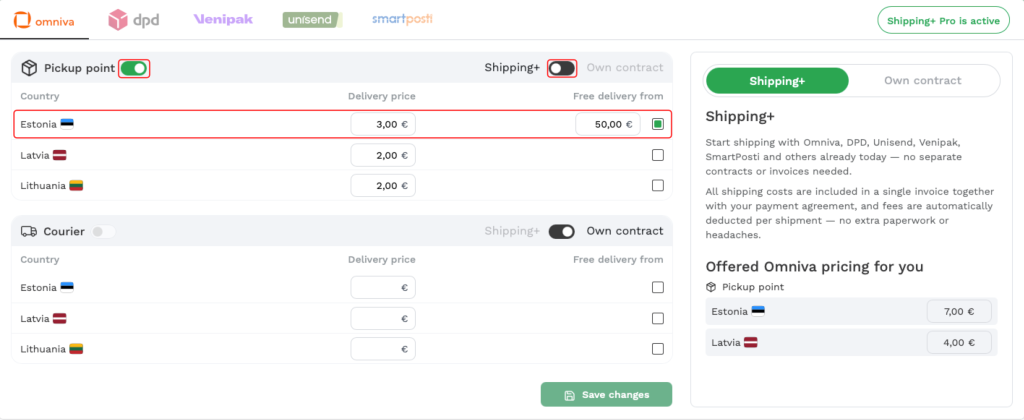
🚚 Carrier settings
In the Carriers page you can setup your carriers settings just the way you want.
Editing carriers
- Enable or disable carrier delivery methods
- Set up the pricing logic that is displayed in the snippet
- Switch between using Shipping+ and your own contract for a specific delivery method
Enabling courier delivery method
To enable the courier delivery method, you need to have Shipping+ Pro active.
Activate it by clicking the Activate Shipping+ Pro button.
Once Shipping+ Pro is active, you need to add your credentials to the Carrier settings:
After the credentials have been added successfully, you can enable couriers and switch to your own contract for the desired delivery methods.
What is Shipping+?
Shipping+ is MakeCommerce’s all-inclusive shipping service where you use MakeCommerce’s own delivery contracts and prices instead of signing contracts with each carrier yourself.
In practice, this means:
- You get access to local parcel machines out of the box: Omniva, DPD, Venipak, Unisend, and Smartposti
- You do not need separate contracts or credentials with each delivery company
- You get one unified pricing model from MakeCommerce: one price per parcel size per carrier, instead of each carrier having its own complex pricing tables
In short: Shipping+ gives you competitive shipping rates at any scale, avoids carrier negotiations, and helps you launch faster.
What is Shipping+ Pro and own contracts?
Shipping+ Pro is for merchants who want to keep using their own carrier contracts, but still want automation and MakeCommerce shipping tools.
Keep your existing terms with each carrier and get 100 delivery registrations included every month for 5 EUR, then 0.05 EUR per extra delivery registration.
In practice:
- You connect your own Omniva / DPD / Venipak / … credentials to MakeCommerce
- You keep your own negotiated shipping prices and conditions with carriers
- MakeCommerce handles automatic shipment registration after orders are paid, plus label creation and tracking
- You pay a small monthly subscription plus a per-label fee for that automation
In short: Shipping+ Pro lets you use your own carrier deals, automate shipping, and keep costs low with small fees.
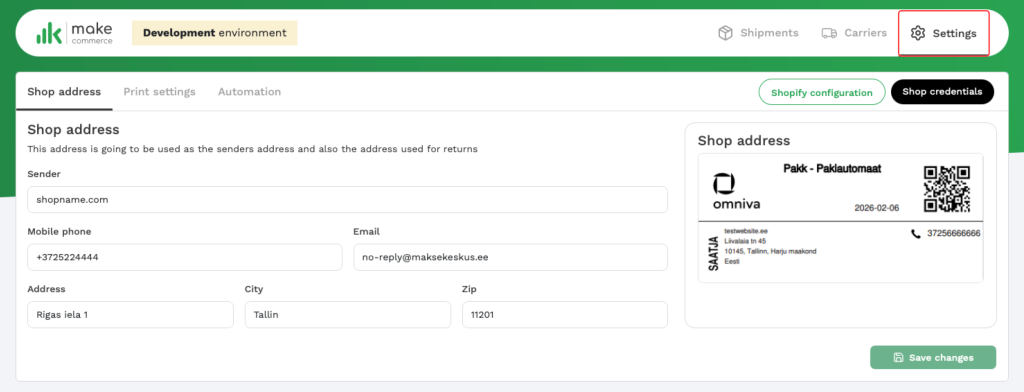
⚙️ Other settings (Editing Address, Label size)
Shop address
Here you can edit the address that will be used as the sender’s address and also the address used for returns. This is also what gets printed on the shipping label.
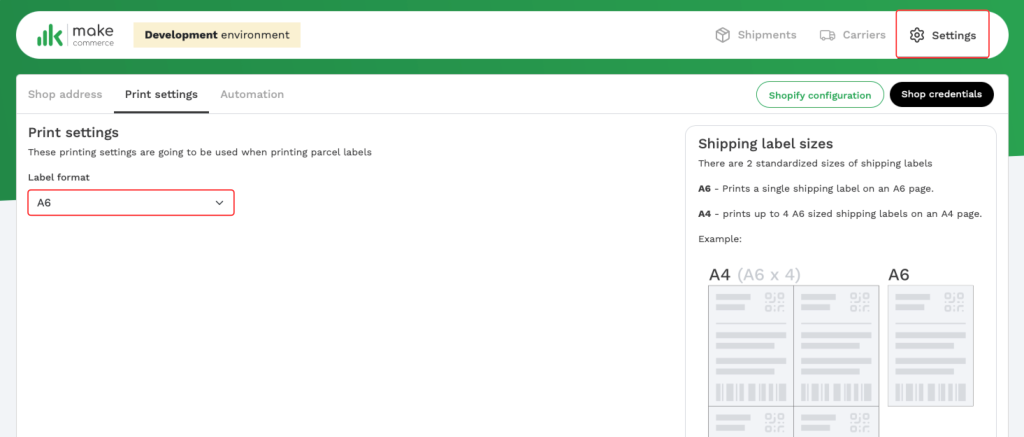
Print settings
Here you can choose the label size used by the system.
A6 – prints a single shipping label on an A6 page.
A4 – prints up to 4 A6-sized shipping labels on an A4 page.
Add MakeCommerce to your Shopify store
If you’re not our merchant yet, share your contact details and we’ll assist you with onboarding and help you complete the Shopify payment integration.