 Bank payments
 Card payments
 Apple Pay / Google Pay
 POS terminals
 Buy Now, Pay Later
 Shipping+ and Shipping+ Pro
 Refunds
 Recurring payments
 Payment link
 Payments for accommodation businesses
 Payments for service businesses
 Donations
 Kniks gift card
 Merchant financing
MakeCommerce plugin for WooCommerce
How to set up payment acceptance in your WooCommerce store? Our plugin allows you to easily integrate bank payments, card payments, Apple Pay, Google Pay, and payments from digital banks like Revolut, N26, and Wise. You can also add delivery options from Omniva, SmartPost, DPD, and LP EXpress to your store.
Setting up the MakeCommerce plugin
To start using our services, please fill out the registration form. The information you provide is necessary for creating your account, coordinating with partner banks, and forming the basis for the contract.
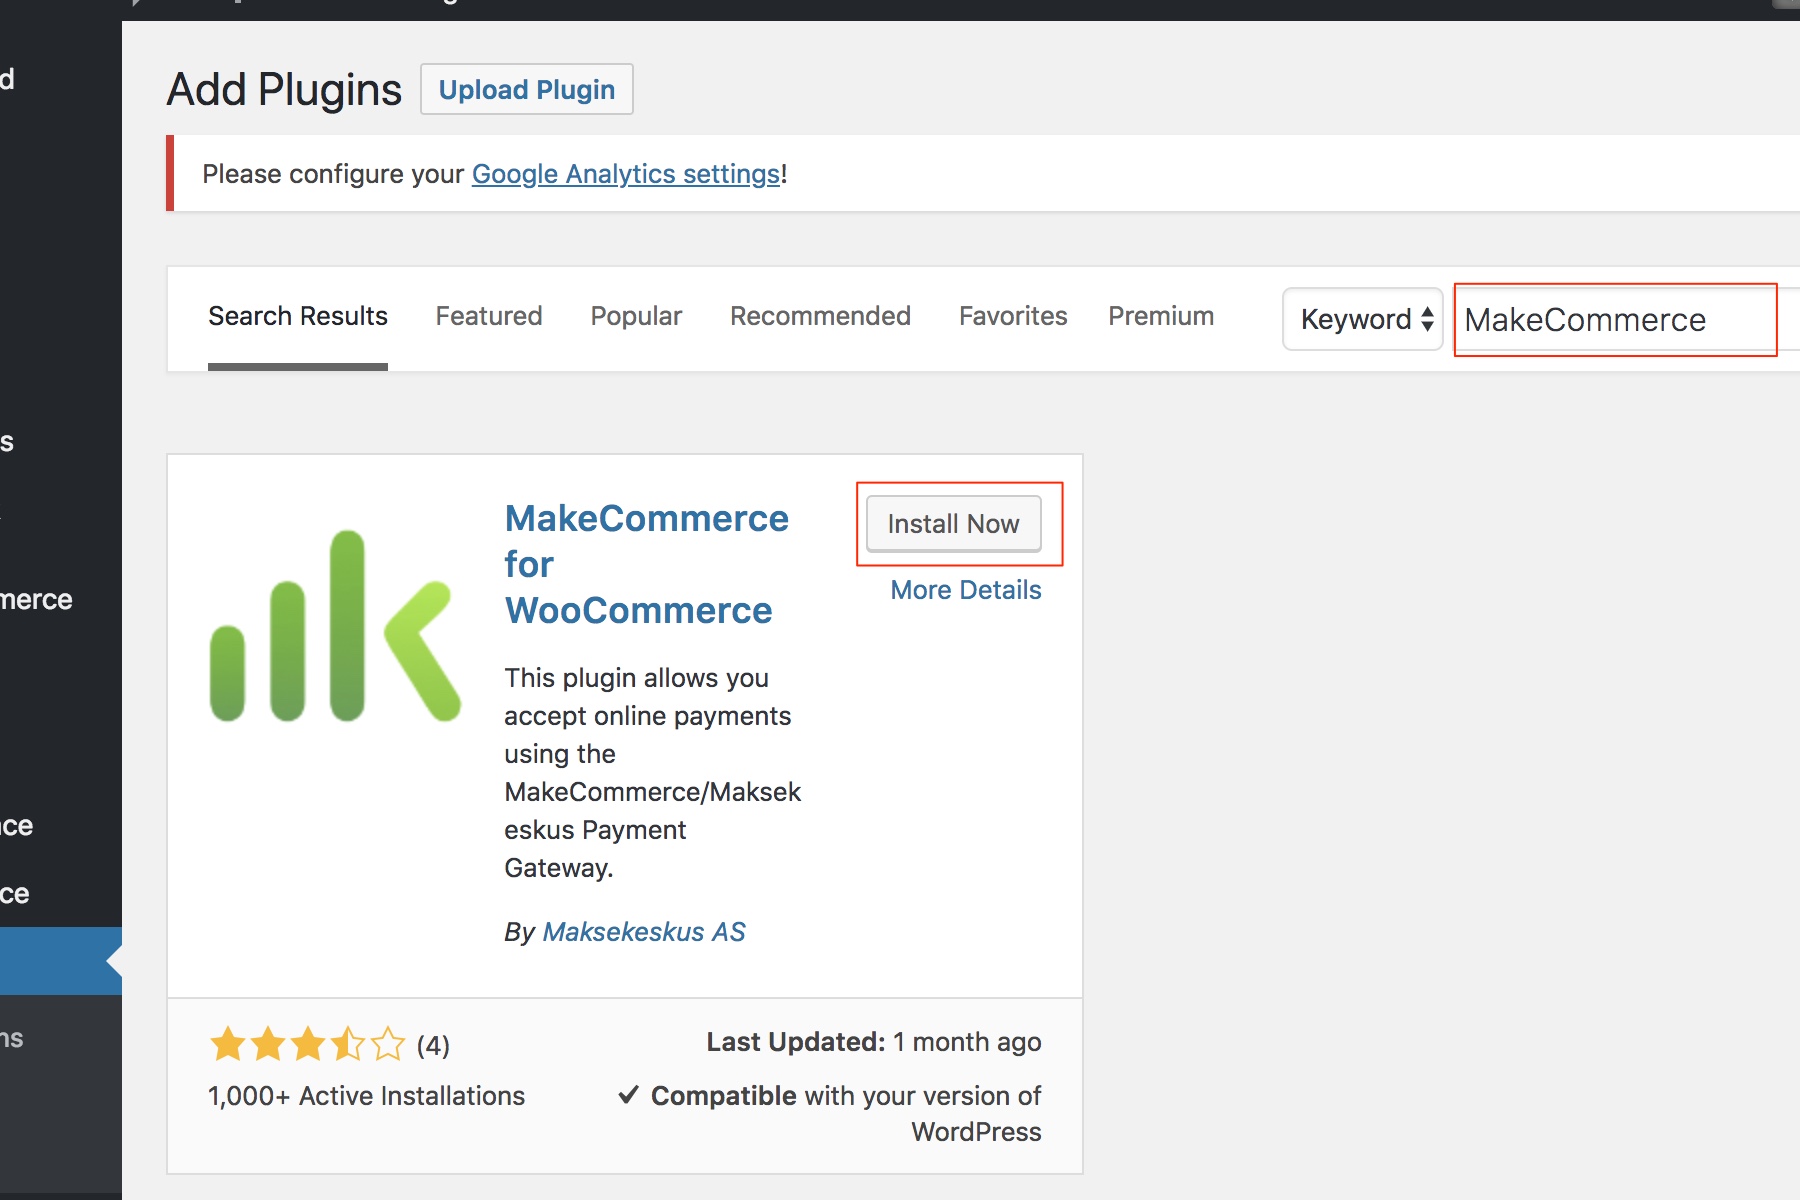
- You can install our plugin by searching for MakeCommerce in the plugins view. The plugin is also available in the WordPress plugin directory at wordpress.org/plugins/makecommerce/. Click Download to get started.
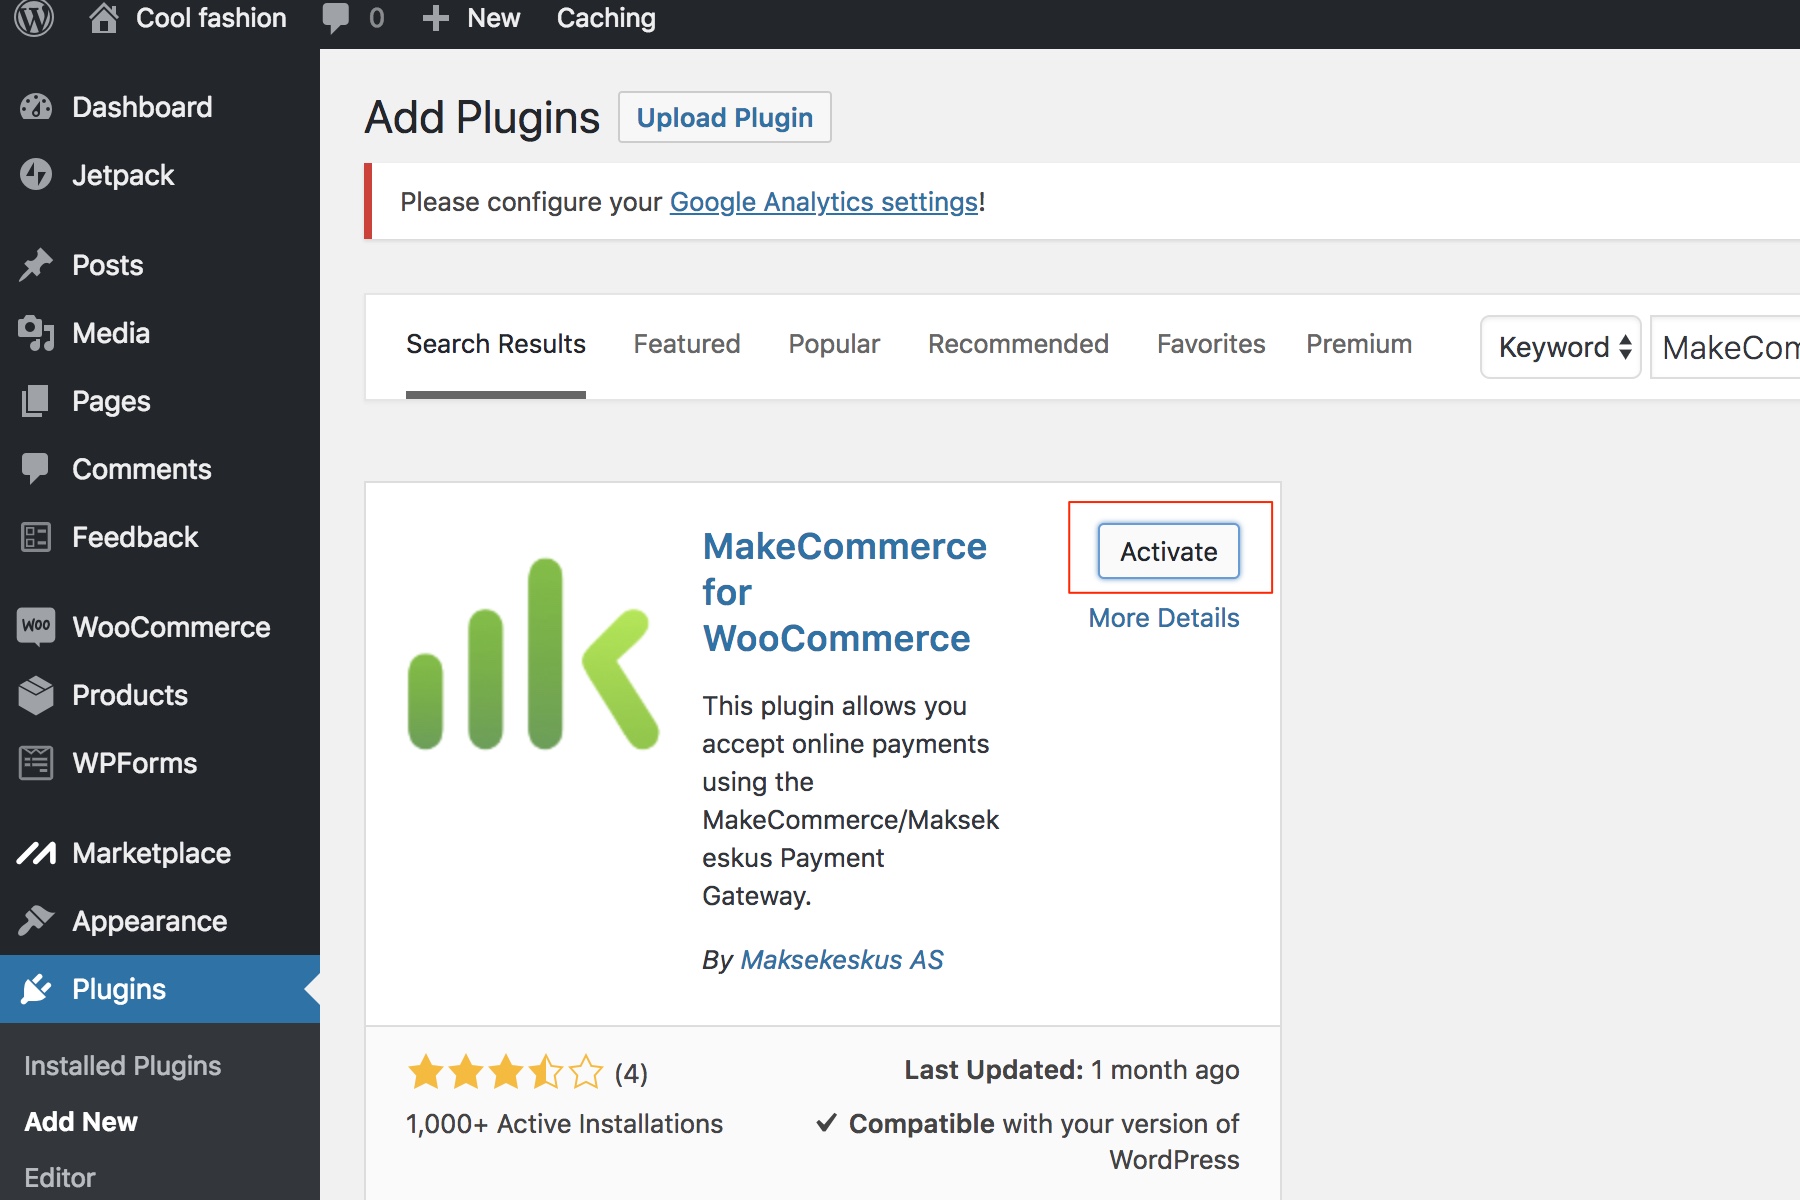
- Press Activate to enable the plugin.
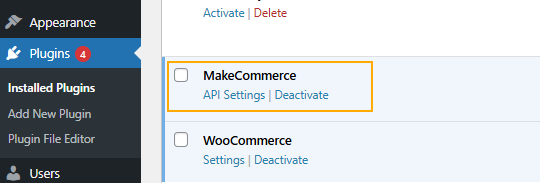
- In the Installed Plugins menu, find MakeCommerce and click API Settings to complete the setup and connect your online store to MakeCommerce payments.
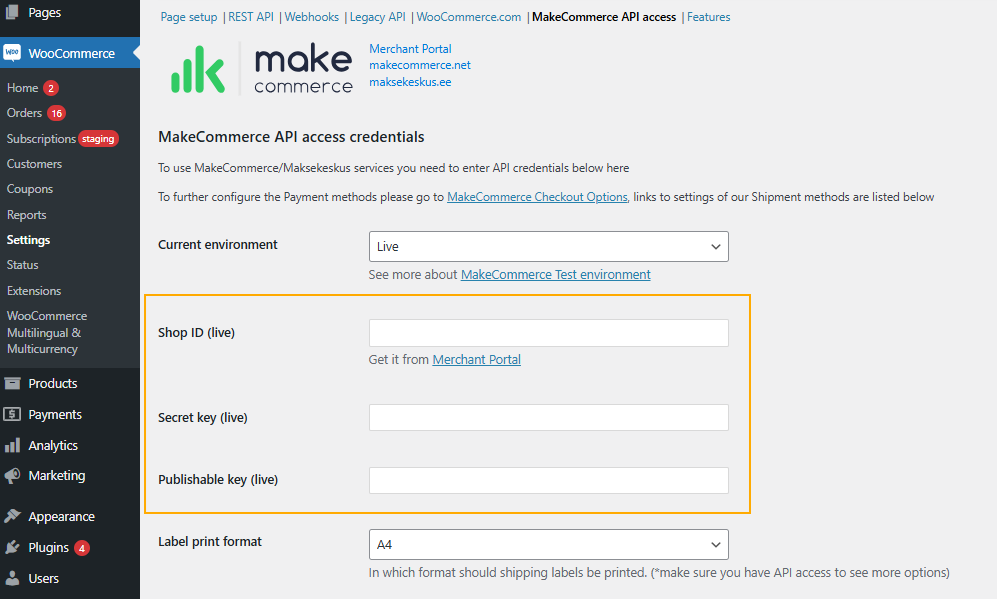
- To connect the MakeCommerce plugin, you’ll need to enter your API credentials: Shop ID, Secret key, and Public key. You can find these in our self-service portal under Settings > API.
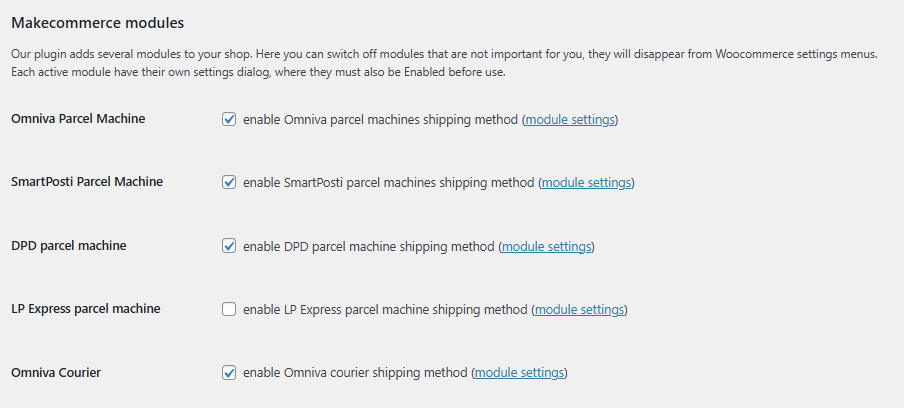
- In the plugin settings below, you can activate delivery services for parcel machines and courier shipments. If you are already a customer of a delivery company, you can use the terms of your existing contract.
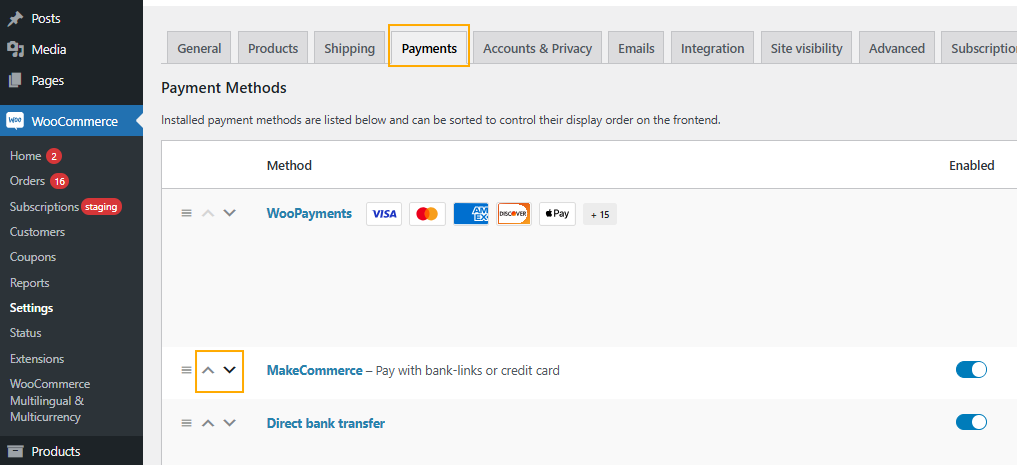
- In WooCommerce > Settings > Payments, you’ll find the MakeCommerce payment methods. By clicking the upward arrow, you can rearrange the order of the available payment options. Then click Enabled. By clicking Manage, you can further customize the MakeCommerce section to suit your needs.
- In the Manage section, you can perform the following actions:
- Enable or disable MakeCommerce payments with a single click;
- Edit the name displayed above the payment section when offering only bank payments or only card payments;
- Choose from three different bank logo sizes to better fit your store’s design. In this example, we’ll select Small.
- Hide the country flag if you’re offering payments in only one country, as in our example;
-
Set the display order of the available payment methods;
-
Autofill the card payment form with the customer’s details to save them from entering the information multiple times (note: in this example, we are not using card payments, so this option is left unchecked);
- Add or remove payment methods at any time. Once a payment method is activated by MakeCommerce, simply click Update to make it visible in the payment section for your customers.
Adding payment methods
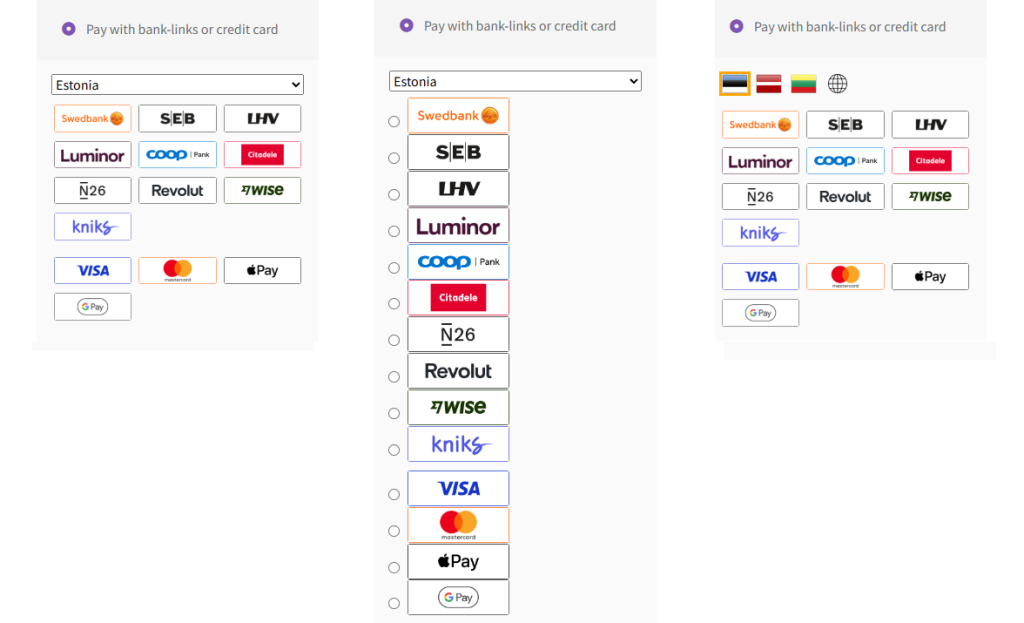
Next, you can configure how the payment methods are displayed. When joining MakeCommerce, the merchant selects which payment options they wish to accept in their online store.
There are several ways to display payment methods:
- Sorting by country, with selection via a flag icon or dropdown menu
- List view, showing available methods in a straightforward list
- Widget display, where bank logos can be shown in small, medium, or large sizes. The widget can also be given a title, which can differ for each language in a multilingual store.
After saving your changes, MakeCommerce payments will be available in your online store.
Adding shipping methods
In addition to accepting payments, the MakeCommerce plugin also enables registering and shipping orders through supported delivery services. The most convenient option is using the MakeCommerce Shipping+ service, available in Estonia and Latvia, which lets you send parcels via Omniva and DPD without the need to sign separate contracts with delivery companies. However, if you already have an existing agreement with a delivery provider, you can register shipments using your own contract terms.
Our plugin allows you to integrate Omniva, DPD, SmartPosti, and LP Express parcel machine and courier delivery options with your online store.
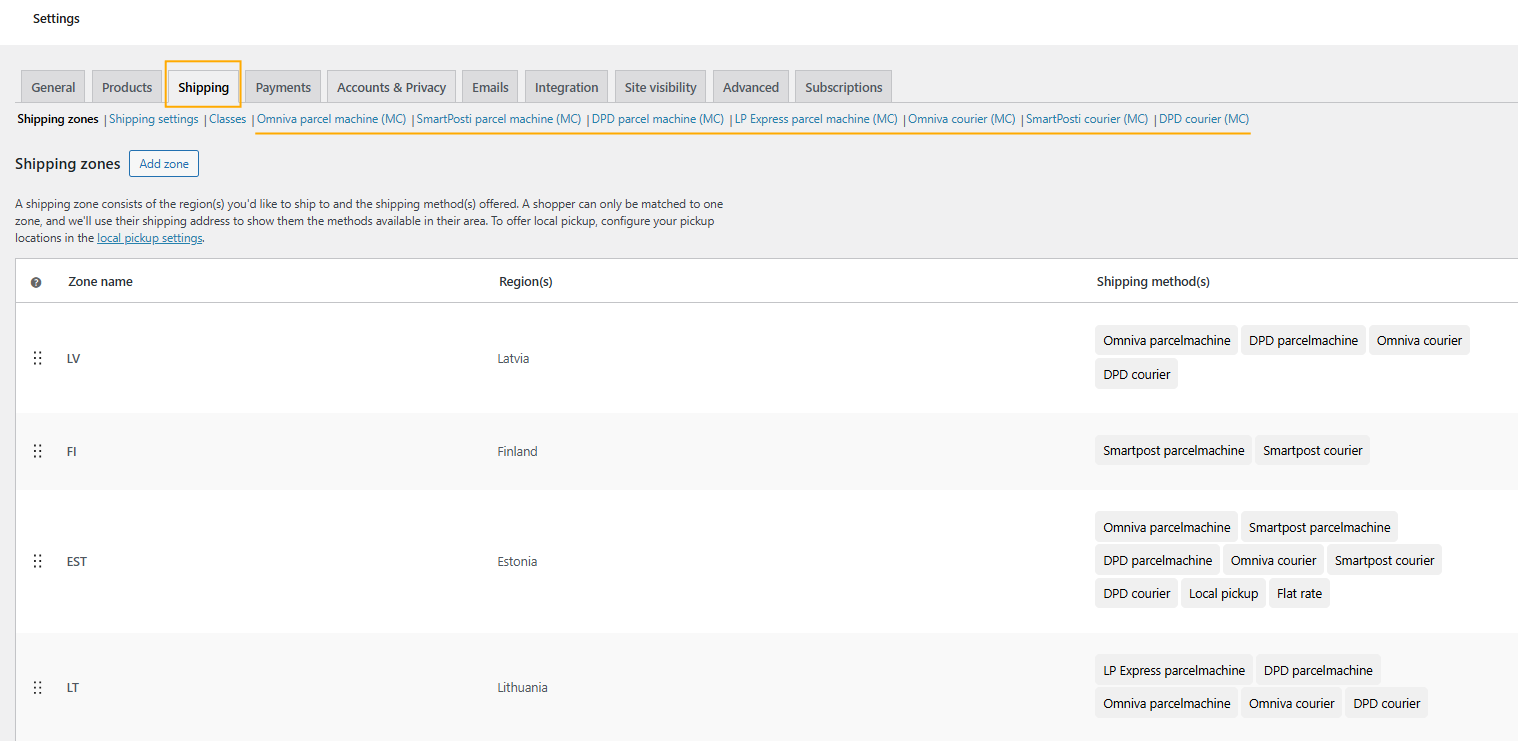
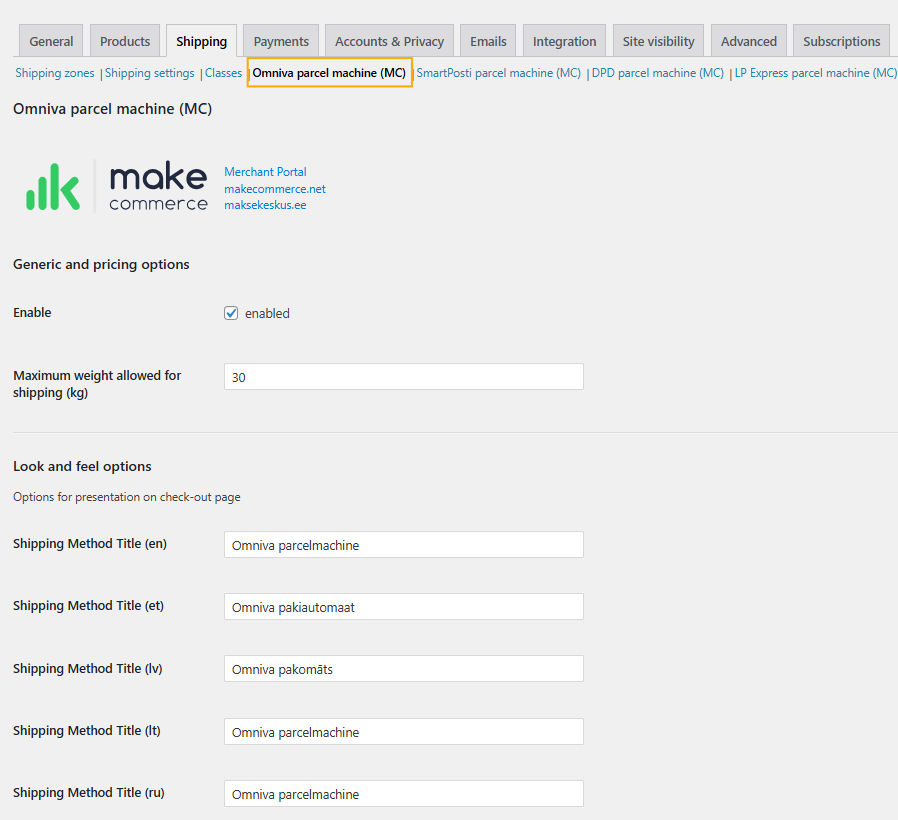
- In the plugin, each delivery method must be configured separately for each shipping zone. For example, if you want to offer delivery to Omniva, SmartPost, and DPD parcel machines for customers in Estonia, you’ll need to set up each of these options individually.
- By clicking Edit next to a shipping zone, you can define the delivery method’s price and set a free shipping threshold on the page that opens. You can also enable free shipping with a coupon code if desired.
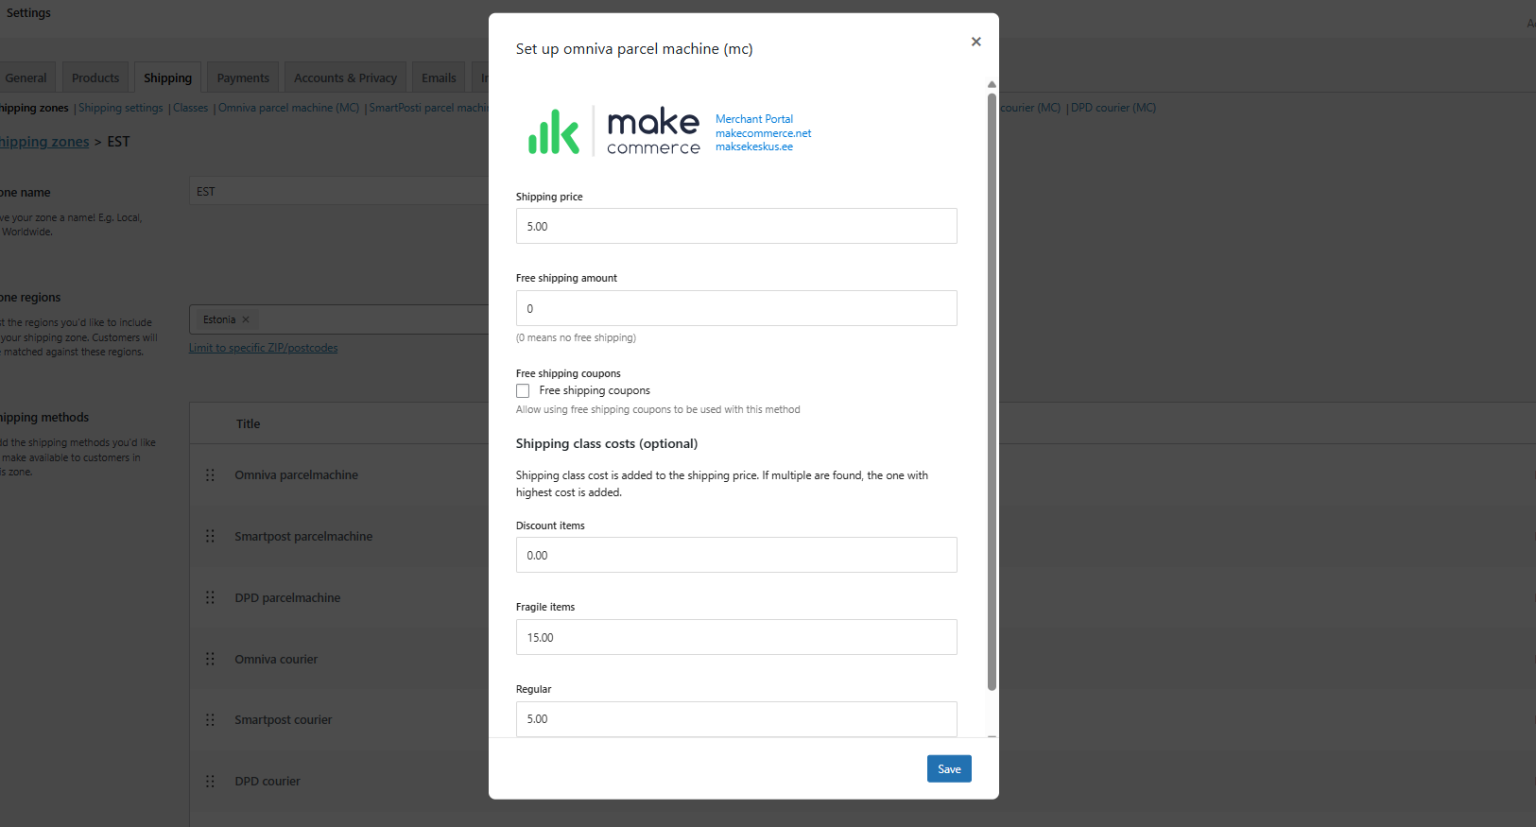
- When using shipping classes, you can create different pricing tiers—assigning different shipping rates to products—and also specify which delivery methods are available for each class.
- In the MakeCommerce plugin, shipping is calculated without VAT. This means that if you want to offer free delivery to an Omniva parcel machine starting from €12 (including 20% VAT), you should set the cart total to €10 in the plugin settings.
- When a delivery method is activated, an up-to-date list of parcel machines is automatically added to the checkout page. By opening the settings view for a specific delivery provider, you can configure how parcel machines are displayed in the list and, in the case of a multilingual store, translate the delivery method name and other related texts.
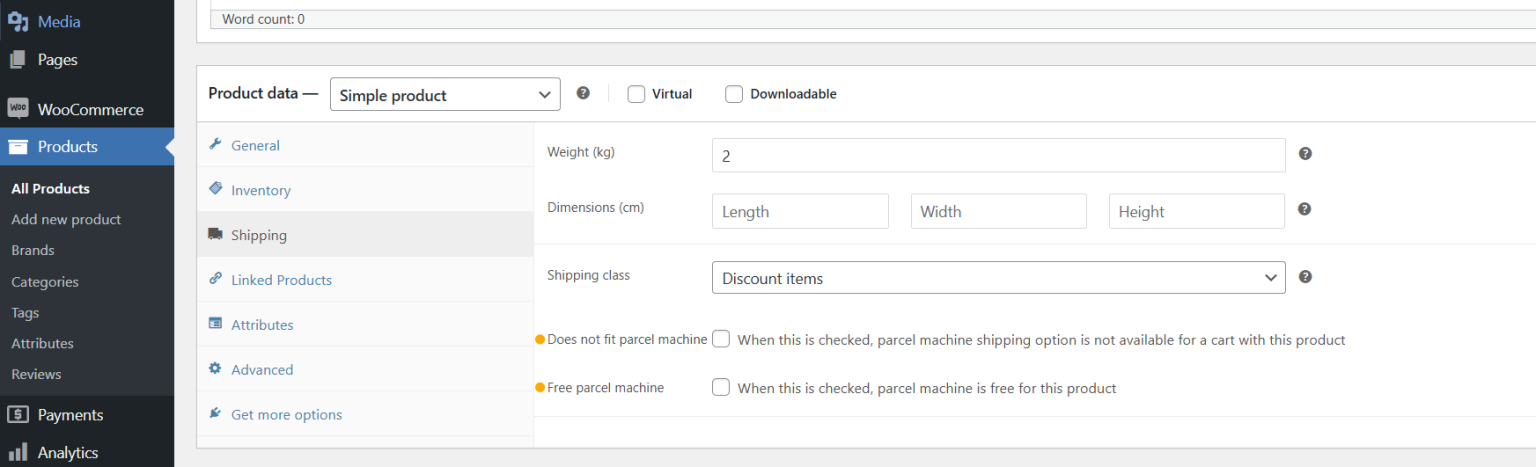
- If a product is not suitable for delivery via a parcel machine, you can mark it accordingly by selecting Not suitable for parcel machine. In that case, parcel machine delivery options will not be shown to the customer at checkout.
- It’s also possible to allow free shipping to parcel machines. In this case, if no other products are added to cart, then shipping cost is displayed as 0€.
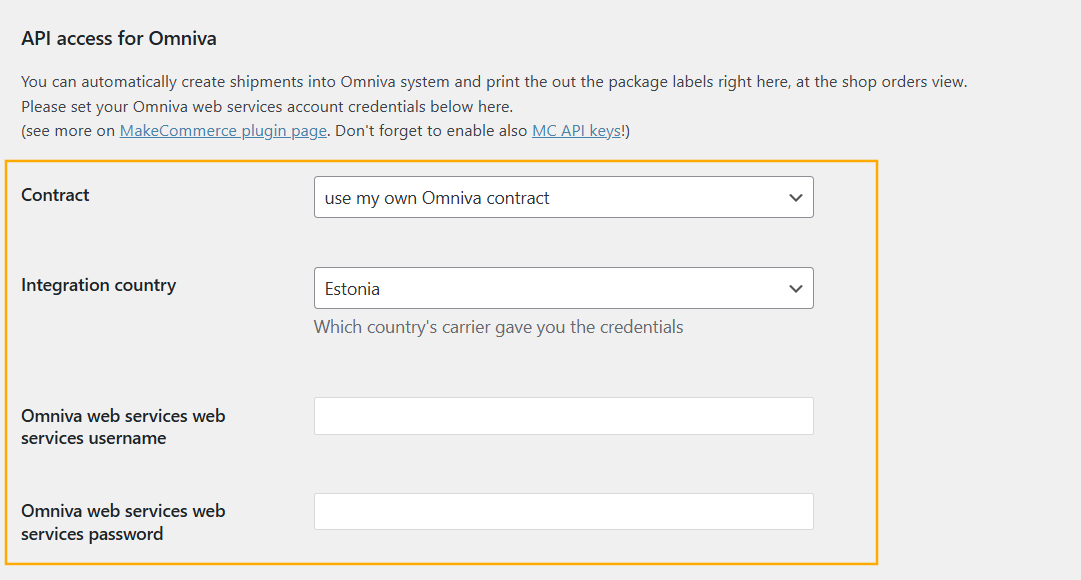
- If you have a contract with Omniva, DPD, Smartpost, or LP Express, you’ll need to enter the credentials provided by the delivery company—either an API key or a username and password—in the corresponding settings view. You’ll also need to fill in the return address fields.
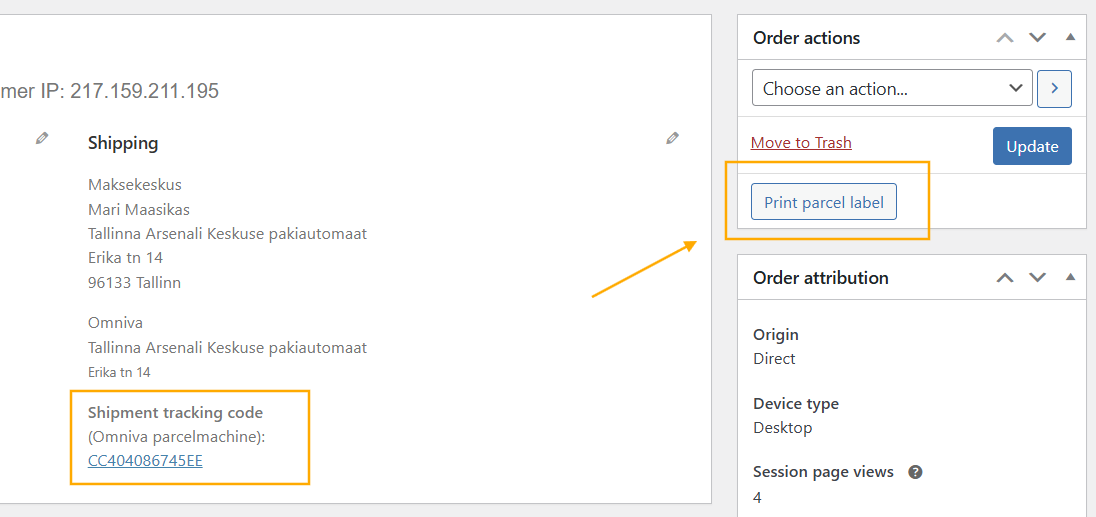
- All orders registered through the MakeCommerce plugin are automatically assigned a shipment tracking link. This link is included in the shipping confirmation email sent by WooCommerce.
- The shipment is registered with the delivery company’s system automatically once the customer completes the payment. You can print the shipping label from the order view in the store’s admin panel, or print labels for multiple orders at once from the order list view. Parcels can be handed over to the delivery company by dropping them off at a parcel machine or service center, or by scheduling a courier pickup—depending on the terms of your agreement with the delivery provider.
How to enable shipping+?
Shipping+ allows you to send parcels through MakeCommerce without signing separate contracts with delivery companies. The service is available for deliveries via Omniva and DPD parcel machines in Estonia and Latvia.
With Shipping+, all delivery-related fees are automatically deducted from your MakeCommerce account balance. The cost of a shipment does not depend on the size of the parcel. You can find full details about the service and pricing in our pricing list.
- To activate the Shipping+ service, go to the settings of the Omniva or DPD parcel machine delivery method and select Use the Shipping+ service.
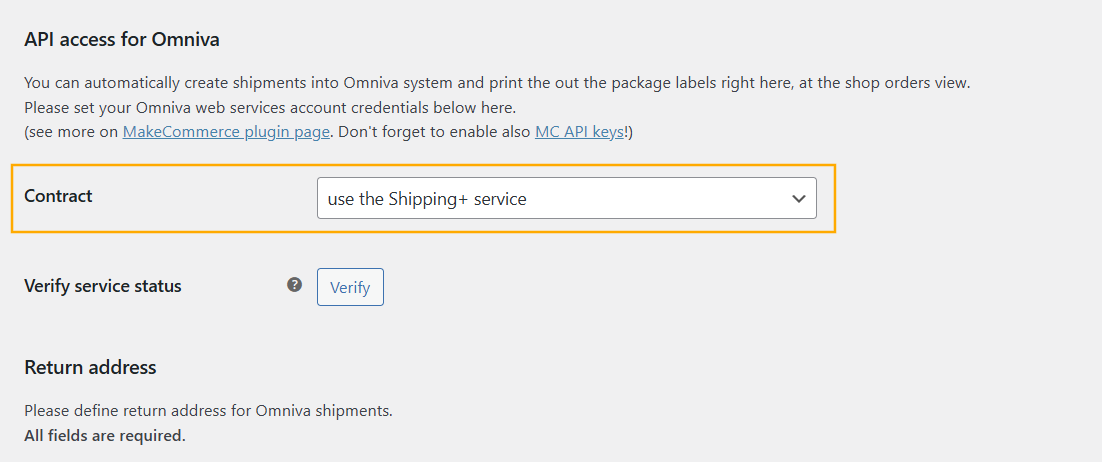
- You must also fill in the return address (sender’s address) when using the Shipping+ service. The phone number in the return address must be a mobile number, start with the country code (e.g. +372), and must not contain any spaces.
- The shipment is automatically registered in the Omniva or DPD system once the customer completes the payment. Parcels can be handed over to Omniva or DPD by dropping them off at a nearby parcel machine.
- You can find detailed information about the shipment’s progress in our self-service portal under the Transport section. In addition, the MakeCommerce system generates a tracking link, which is included in the order confirmation email sent to the customer.
- With the Shipping+ service, Omniva notifications to the customer automatically include a return code (this feature cannot be disabled). If the buyer returns the item, the parcel will be delivered by an Omniva courier to the return address specified in the WooCommerce plugin settings. For DPD, a return code is not included automatically, and the return must be arranged manually by the customer. In this case, the return process should be agreed upon between the merchant and the customer.
- As long as the parcel has not been handed over to Omniva or DPD, no cost is incurred by the merchant. Once the parcel is accepted by Omniva or DPD, the shipping fee is automatically deducted from the store’s account in the MakeCommerce system. The same applies when a shipment is returned by the customer.
- If you joined MakeCommerce before 2022, please also check whether the Shipping+ service is active for your online store in the MakeCommerce self-service portal (Settings→ Services).
Printing Shipping labels
- After successfully registering shipments, you can print shipping labels from the WooCommerce order view and easily attach them to your parcels. The MakeCommerce plugin generates labels in various formats and sizes compatible with most label printers.
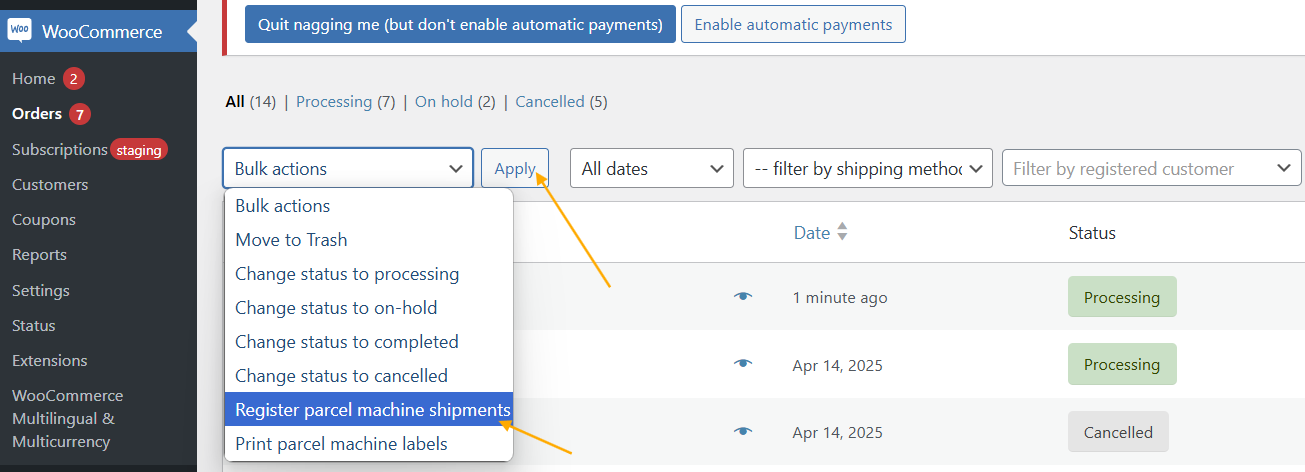
- You can print shipping labels for individual orders or multiple orders at once by selecting all Processing orders and applying the bulk action Print shipment labels. This works even if the orders include a mix of Omniva, DPD, or other delivery provider shipments. You can also use the same method to re-register a shipment if there was an error during the initial registration.
LP Express
- LP Express parcel machine delivery is available in Lithuania. The overall functionality is similar to other parcel machine carriers with the only difference being a parcel machine size that has to be chosen by the merchant.
- In the WooCommerce module admin settings, the merchant can choose a default size for all the orders that are registered. Each order can be manually registered again with a different size, but a default setting is required for the initial registration. This template size determines the box which is used in the parcel machine.
Map view for the selection of parcel machines
The MakeCommerce plugin allows you to enable a feature that lets customers select a parcel machine from a map interface.
- To use the map selection feature, you’ll need to obtain an API key from Google. You can find more information about Google API pricing here: https://mapsplatform.google.com/pricing/. Google offers $200 worth of free credits each month, which is usually enough to cover the costs as long as your usage stays within that limit.
- Geocoding allows the customer’s entered address to be used to center the map around their location. The main purpose of this feature is to make the parcel locker selection more user-friendly.
- We recommend using two separate API keys: one for loading the map and another for handling geocoding requests. This ensures that the API key used for initializing the map is restricted to your store’s domain, preventing unauthorized use by others on external websites.
- Since the map is loaded via JavaScript, the map initialization API key is visible in the page’s source code and therefore publicly accessible. To enhance security, you can set daily or monthly usage limits for the key. This helps prevent malicious activity—such as attempts to generate excessive requests with the goal of increasing your costs.
- The API key used for geocoding is not public and is stored securely in the WordPress database. All geocoding requests are performed server-side, meaning this key is not exposed to anyone—unlike the map initialization API key, which is visible in the page source.
- You can use a single API key for both functions (map loading and geocoding), but in that case, domain restrictions cannot be applied. This means that someone else could potentially misuse your API key, so this approach is not recommended.
Processing refunds
- E-store owners should be aware that customers have the right to withdraw from a purchase and return the goods. The MakeCommerce refund solution is one of the most convenient on the market, allowing you to issue both full and partial refunds directly from the store’s admin interface. If needed, you can also issue multiple partial refunds for a single order.
- To issue a refund, select the relevant order, enter the refund amount, and click Refund via MakeCommerce. In this case, the refund will be processed by MakeCommerce using the funds available in your MakeCommerce account.
- If you click Refund manually, only the order status will be updated—you will need to handle the actual payment transfer to the customer yourself.
Recurring payments
- One possible solution for managing recurring payments is the WooCommerce Subscriptions plugin.
- This is likely one of the most cost-effective ways to launch a recurring payments program: WordPress and WooCommerce are essentially free, and WooCommerce Subscriptions costs less than €200.
- WooCommerce Subscriptions offers the following functionality:
- Customizable billing schedules tailored to your business needs, including options for setup fees and free trial periods;
- Automatic payment processing with various payment methods, including recurring card payments via MakeCommerce;
- Automated emails and invoicing, along with customer notifications;
- Automatic retries if a recurring payment fails for any reason;
- Automatic membership suspension if payments continue to fail;
- Support for manual renewals, where the customer logs in and initiates the payment themselves;
- Comprehensive reports to track subscribed customers, recurring revenue, and more.
- Recurring payments are set up within the WooCommerce Subscriptions plugin. You can configure details such as the subscription duration, price, billing interval, free trial length, and more to suit your business model.
- To successfully accept recurring payments, the functionality must also be enabled in your MakeCommerce account. Our customer support team will assist you with activating the feature.
- For card payments, the MakeCommerce solution is designed so that the entered card details are sent directly from the iFrame to our backend systems. The card data does not pass through your online store’s systems, which means you are not subject to PCI DSS compliance requirements—we handle that on your behalf.