Bank payments
 Card payments
 Apple Pay / Google Pay
 POS terminals
 Buy Now, Pay Later
 Shipping+ and Shipping+ Pro
 Refunds
 Recurring payments
 Payment link
 Donations
 Kniks gift card
 Merchant financing
 Payments for accommodation businesses
 Payments for service businesses
MakeCommerce module for Magento 2
How to set up payment acceptance in your Magento store? Our plugin allows you to easily integrate bank payments, card payments, Apple Pay, Google Pay, and payments from digital banks like Revolut, N26, and Wise. You can also add delivery options from Omniva, SmartPost, DPD, and LP Express to your store.
With the MakeCommerce extension, you can add payment and delivery options to your Magento 2 store.
The module has been released on Adobe Marketplace. To install the latest version of the module, please follow the guide here.
- Setting up the MakeCommerce module
- Adding payment methods
- Adding shipping methods
- Processing refunds
- In order to use the services you need to sign up at https://makecommerce.net/. After sign-up your shop is given credentials for API integration that are needed for the module to work (you can also test out the module without signup, using test-shop credentials).
- Downloading the extension is free of charge, as are all version updates.
- Install Magento 2 extension by following the regular procedure, for example by following this tutorial link: installing-extensions.
Setting up the MakeCommerce module
Prerequisites
Before you begin, make sure you have the following:
- A working installation of Magento 2.
- Access to the Adobe Marketplace.
- The extension package file or the extension key.
Step 1: Access the Adobe Marketplace
- Find the extension: https://commercemarketplace.adobe.com/makecommerce-module-ecommerce.html.
- Sign in with your Adobe ID or create a new account if you don’t have one.
Step 2: Get the Extension Key
- On the extension’s page, extension requires a purchase (price is 0.00), make sure to complete the purchase process before proceeding.
Step 3: Install the Extension
There are two methods to install the extension: using Composer or manually.
Method 1: Using Composer
- Open a terminal or command prompt and navigate to your Magento 2 installation directory.
- Run the following command to install the extension using Composer:
composer require makecommerce/module-ecommerce.
Wait for the Composer to download and install the extension. Once completed, proceed to the next step.
Note: Ensure that you have the correct Composer auth keys in your auth.json file before installing the extension. This is necessary to authenticate and download extensions from the Adobe Marketplace via Composer.
Method 2: Manual Installation
- Download the extension package file from the Adobe Marketplace.
- Extract the package file.
- Upload the extracted extension files to the app/code/Makecommerce/Ecommerce directory of your Magento 2 installation.
- Open a terminal or command prompt and navigate to your Magento 2 installation directory.
- Run the following command to install the extension dependency using Composer: composer require guzzlehttp/guzzle:”>=6.5.0″.
Next Step:
- Open a terminal or command prompt and navigate to your Magento 2 installation directory.
- Run the following command to enable the extension:
php bin/magento module:enable Makecommerce_Ecommerce. - Run the following command to update the database and clear the cache:
php bin/magento setup:upgrade. - Wait for the process to complete.
Step 4: Verify the Installation
- After the installation process is complete, run the following command to verify the extension installation:
- Copy code php bin/magento module:status.
- You should see the installed extension listed with its status set as “Enabled”.
You have successfully installed a MakeCommerce Payment Gateway extension from the Adobe Marketplace. You can now configure and use the MakeCommerce Payment Gateway to enhance the functionality of your Magento 2 store.
Updating
- How to update a MakeCommerce Payment Gateway makecommerce/module-ecommerce:
- composer update makecommerce/module-ecommerce
Composer will check for the latest version of the package available in the repositories specified in your composer.json file and install the updated version if it exists. - It’s worth noting that Composer will update the package to the latest version allowed by the version constraints defined in your composer.json file. If you want to update to the latest version regardless of the version constraints, you can use the composer update makecommerce/module-ecommerce –with-dependencies command.
Adding payment methods
The module installation adds a payment method MakeCommerce that you can enable and configure.
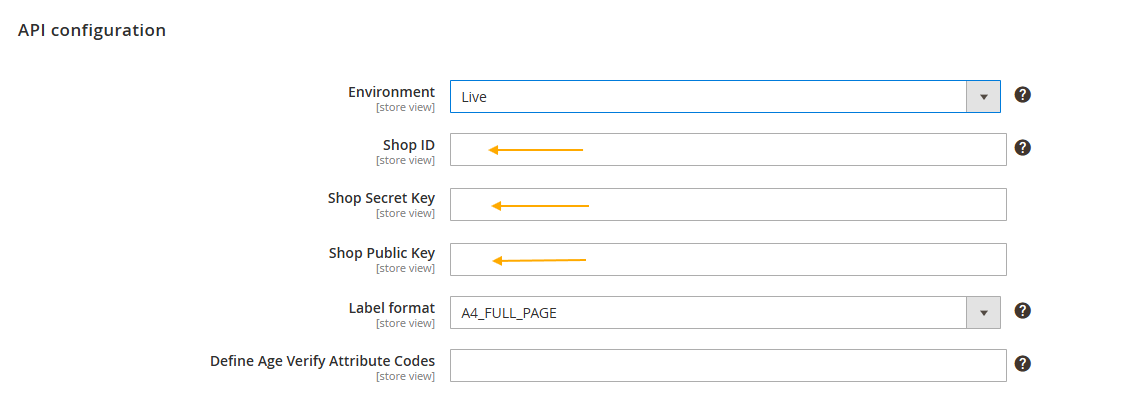
- First you need to add MakeCommerce API credentials for your Shop. Go to Stores > Configuration > Sales > MakeCommerce API. The API credentials are made available for you in MakeCommerce merchant self-service portal (Settings > API).
- If you want to test payments first, you need to enter the TEST API keys and set the environment to TEST. You can use either the public TEST API keys or a personal test account. To add a personal test account, please contact support@maksekeskus.ee.
- When you are ready to start accepting real payments, set the environment to LIVE and enter the LIVE API keys.
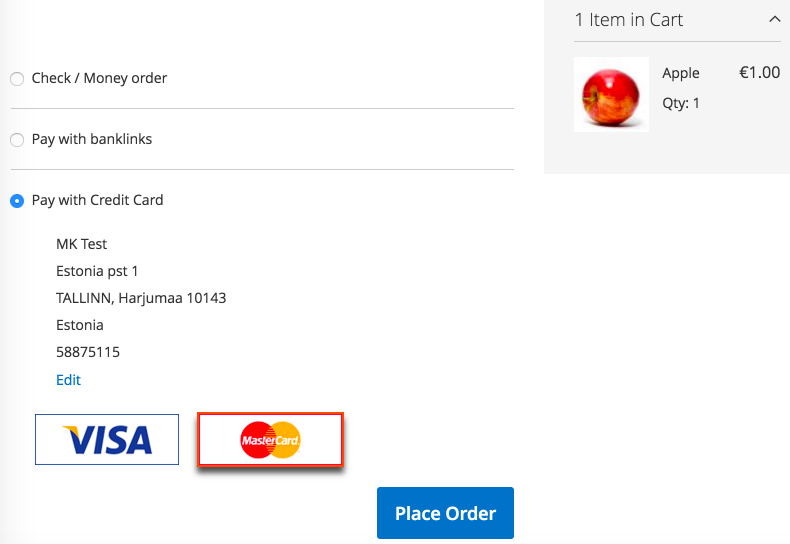
- Once the API keys have been entered, go to Stores > Configuration > Sales > Payment Methods, where you can further configure the display of payment methods at checkout.
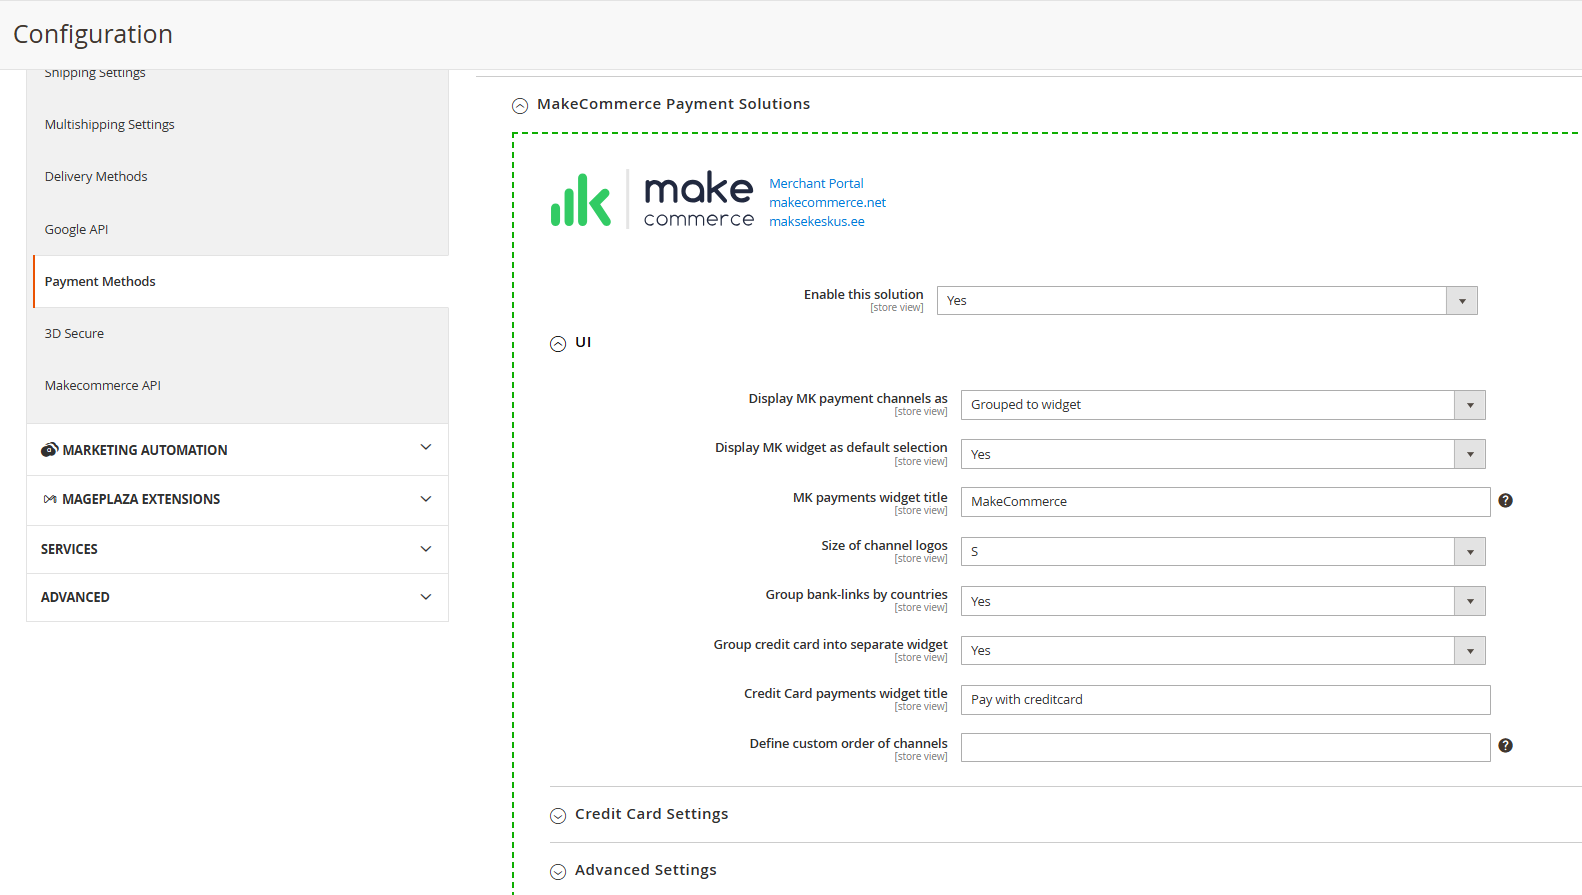
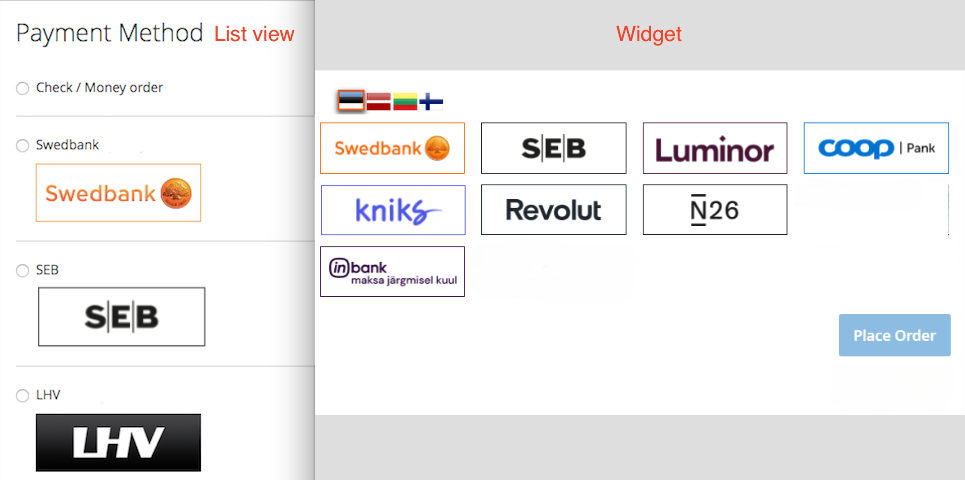
- There are 2 different ways for displaying the payment methods:
- Widget – all payment methods are displayed in a compact multi-line block (this is the default option).
- List – each payment method is displayed on a separate line. We recommend using this option if you are only using a few of the payment methods provided by MakeCommerce and want them to appear equally alongside other payment methods available in your store.
- When using the widget display, the logo sizes adjust dynamically based on the available space. You can also manually influence the logo size by selecting S, M, or L.
- You can also configure the settings so that credit cards are displayed separately from bank links. In this case, the checkout will appear as follows (display widget as default selection = no):
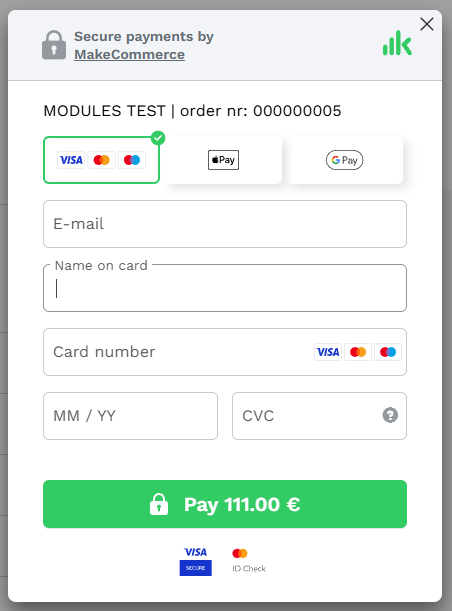
- For card payments you could use either our redirect approach or iframe js to collect card payments data on your webshop environment. Iframe use is a more advanced type of integration and not mandatory for card payments.
You can find both Regular Payment Flow guide for redirect method or Iframe js for Card Payments in our developer portal.
Adding shipping methods
The module installation adds a shipping method MakeCommerce that you can enable and configure. For Omniva and DPD parcel machine deliveries, we offer a solution where it is not necessary to sign a contract with the shipping companies – see the Shipping+ service.
For integrating other delivery methods (SmartPosti and LP Express, Omniva and DPD courier services), it is necessary to sign a business customer agreement with the respective delivery provider. To conclude a business customer agreement, please first contact the relevant shipping company.
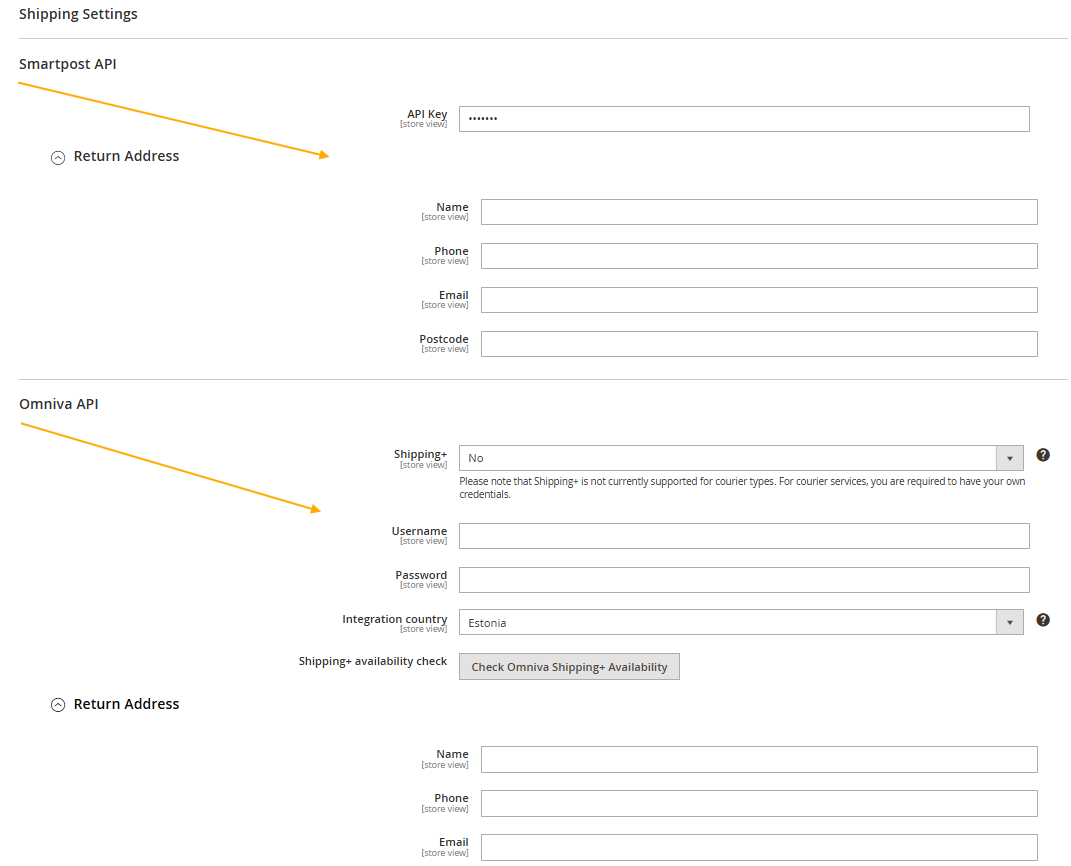
- To set up deliveries, you need to add the API credentials or the username and password you received from the shipping company or from the respective provider’s self-service portal after concluding the agreement. To add the credentials, navigate to the menu: Stores > Configuration > Sales > MakeCommerce API.
- Open the view for the desired shipping company, enter the required information, and make sure to fill in the return address (sender’s address) as well. Note: The return address must include a valid mobile phone number with the country code (e.g., +372) and without any spaces.
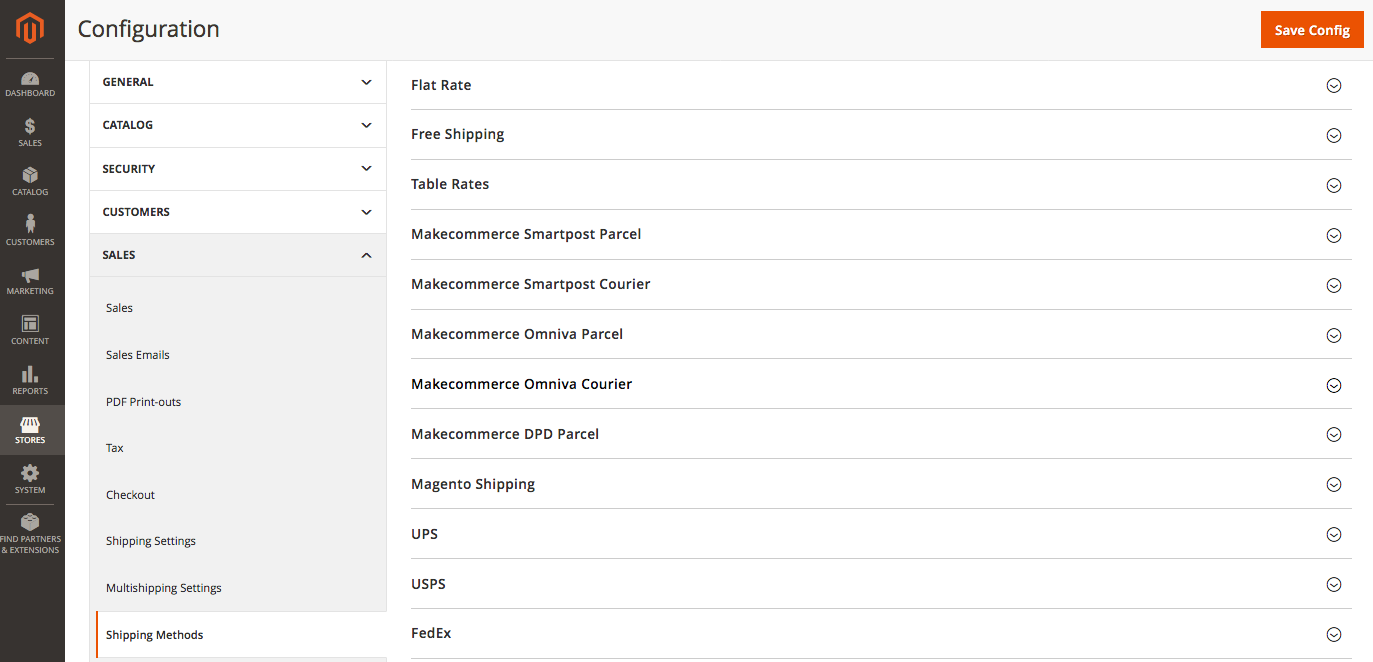
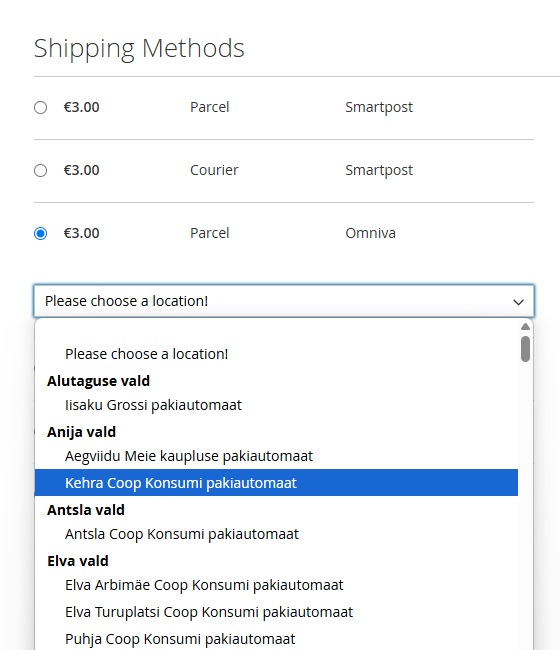
- After completing the integration, you can activate and further configure the shipping methods from the menu: Stores > Configuration > Sales > Shipping Methods.
- After that, the list of parcel machines will be displayed in your online store.
If necessary, you can update the list from the menu: Stores > Configuration > Sales > MakeCommerce API > Update Shipping Locations.
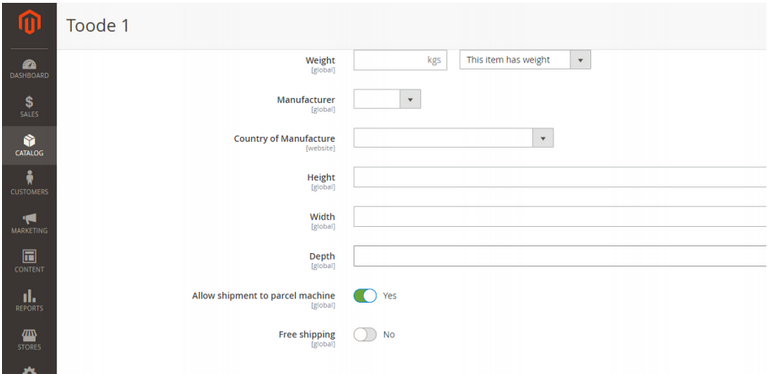
- You can also specify that certain products are not suitable for delivery to parcel machines. In such cases, parcel machine options will not be displayed at checkout for those products. Additionally, it is possible to mark certain products as eligible for free shipping. If such a product is the only item in the shopping cart, the shipping cost will be displayed as €0.
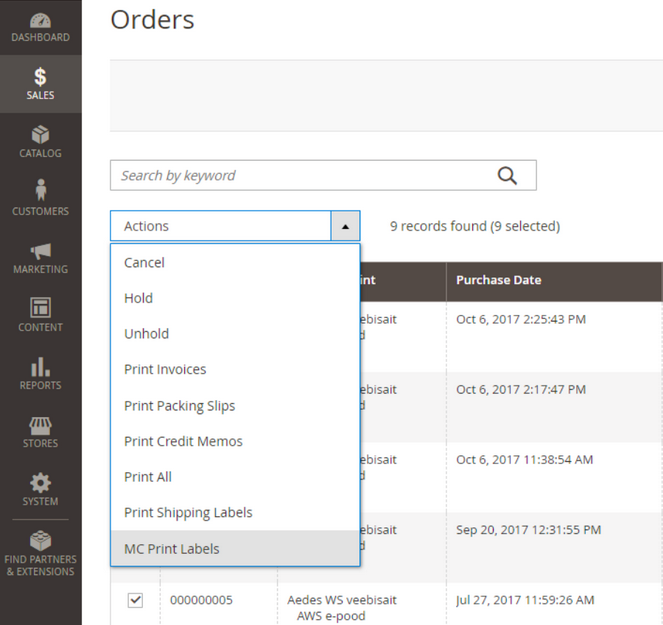
- Our module is capable of registering shipments in the Omniva, SmartPosti, LP Express, and DPD systems, and it does so automatically as soon as the order is paid (when it reaches the “Processing” status).
- At that point, it is also possible to print shipment labels directly from the store’s order view. For example, you can select all orders that are in the Processing status and apply the mass action MC Print Labels (Omniva, SmartPost, LP Express, and DPD shipments can be mixed together).
Shipping+
In Estonia and Latvia, we offer the Shipping+ service, allowing you to ship goods to Omniva and DPD parcel machines via MakeCommerce without the need to sign separate contracts with the shipping companies. In this case, all shipping-related service fees are automatically deducted from the merchant’s MakeCommerce account.
This is also convenient because there is no need to process and pay Omniva or DPD invoices separately in accounting. See the Shipping+ pricing.
- To activate the service, navigate to the menu: Stores > Configuration > Sales > MakeCommerce API.
- When configuring the Omniva and DPD parcel machine delivery methods, select Yes from the Shipping+ dropdown menu and fill in the return address fields.
- After that, the list of parcel machines will be displayed in your online store. If necessary, you can update the list from the menu: Stores > Configuration > Sales > MakeCommerce API > Update Shipping Locations.

If you joined Maksekeskus before 2022, please also check whether the Shipping+ service is active for your store in the Maksekeskus self-service portal (Settings → Services).
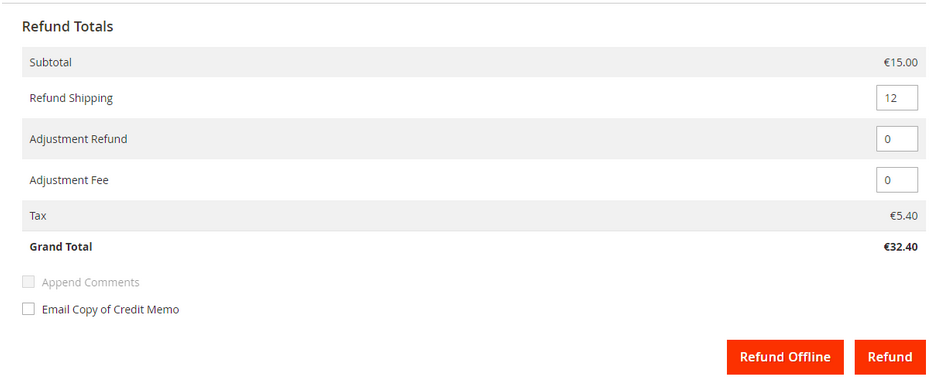
Processing refunds
All payments made through MakeCommerce can be conveniently refunded directly from the online store’s admin panel. You can find the Refund button next to the Order Invoice, within the Credit Memo dialog.