Bank payments
 Card payments
 Apple Pay / Google Pay
 POS terminals
 Buy Now, Pay Later
 Shipping+ and Shipping+ Pro
 Refunds
 Recurring payments
 Payment link
 Donations
 Kniks gift card
 Merchant financing
 Payments for accommodation businesses
 Payments for service businesses
Setting up MakeCommerce Shipping+
Send packages to parcel machines without the necessity of a business client contract with shipping companies
How to add shipping to your online store without having to sign individual contracts with shipping companies?
In Estonia and Latvia we offer a solution that allows you to send packages to Omniva and DPD parcel machines without having to sign a business client contract with the carriers. When using Shipping+ service, the delivery costs are automatically calculated from the store’s MakeCommerce account. The prices for shipping via MakeCommerce are not dependent on package size. See the pricing
If you would also like to add courier delivery to your e-shop a contract is needed with the delivery service provider. Instructions for activation can be found here.
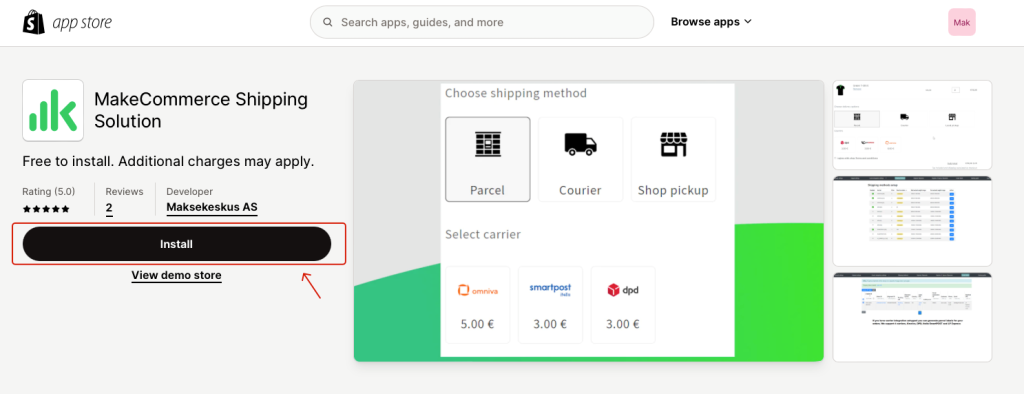
MakeCommerce Shipping Solution is a separate app that should be installed to set up shipping options.
- To install the shipping app, click the Open button below.
- The Shopify page opens, where you need to click on the Install button:
- Next, click Install
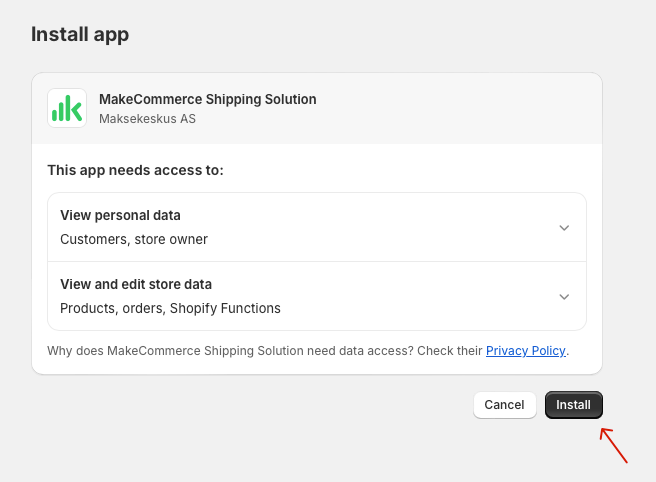
- Once the module is installed, it should open automatically:
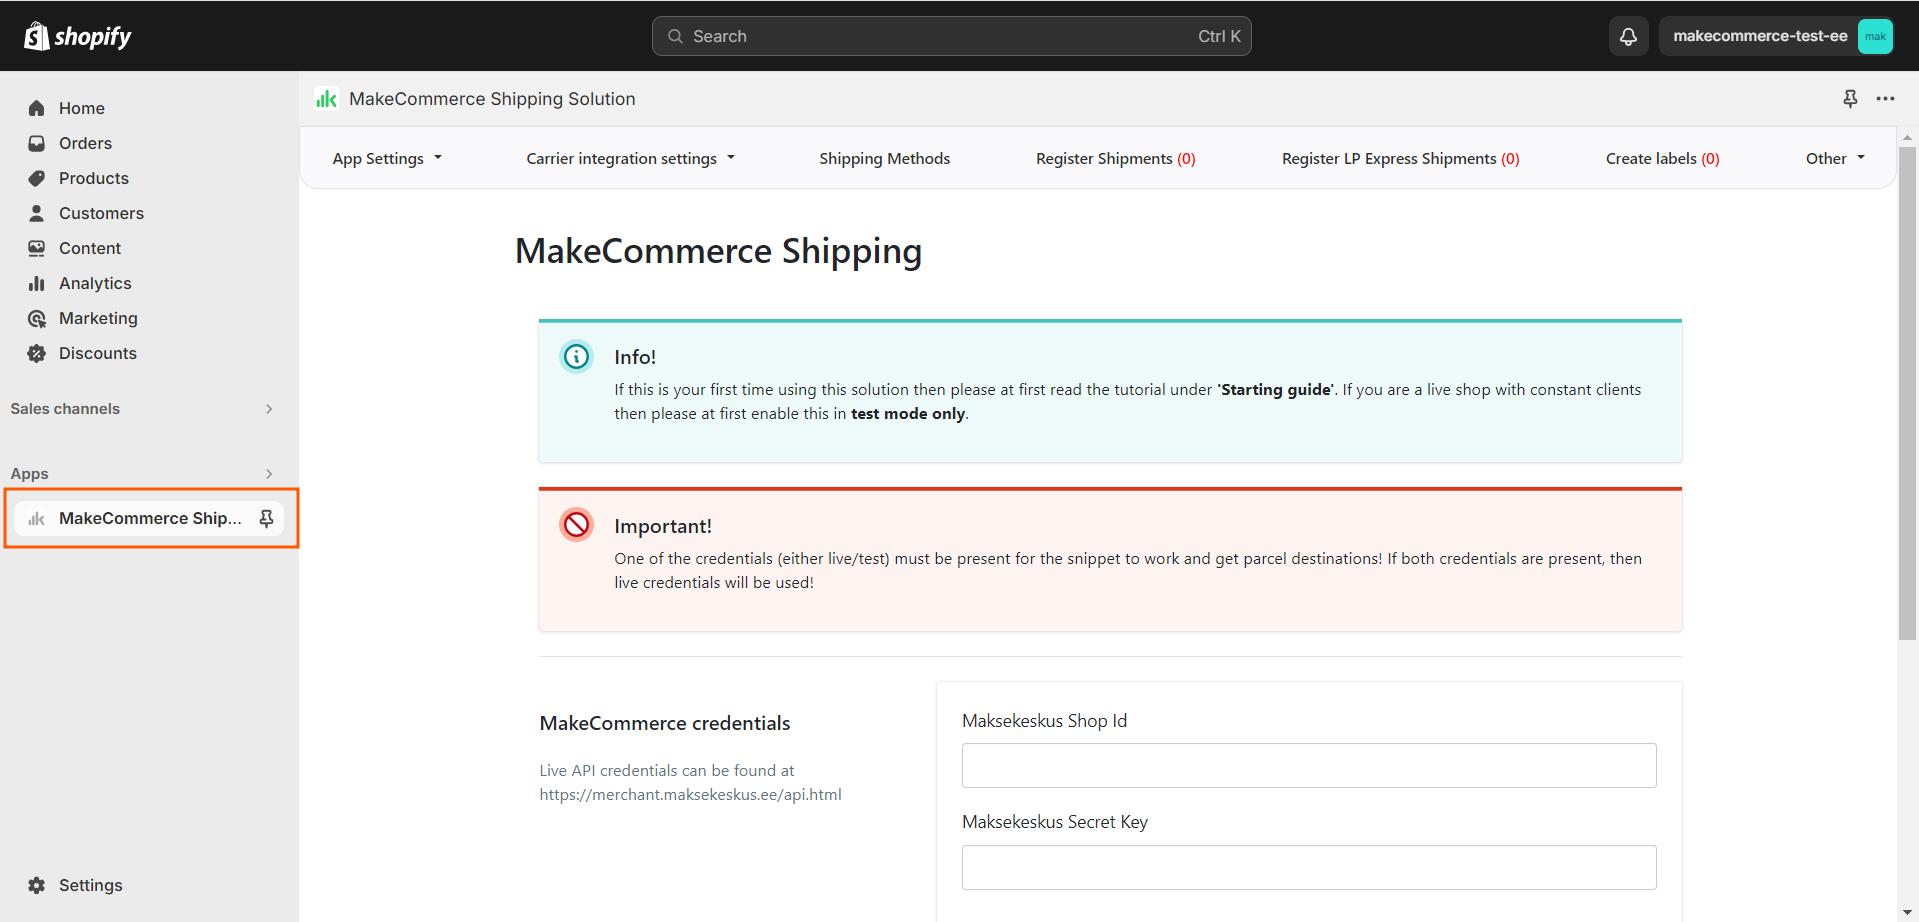
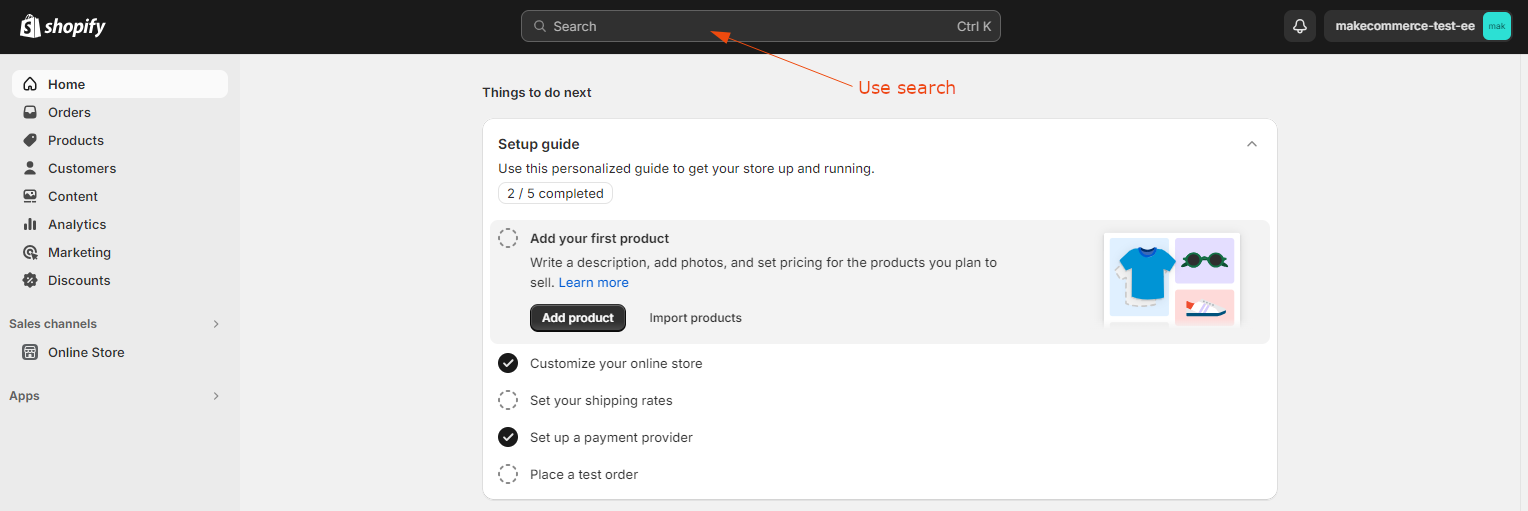
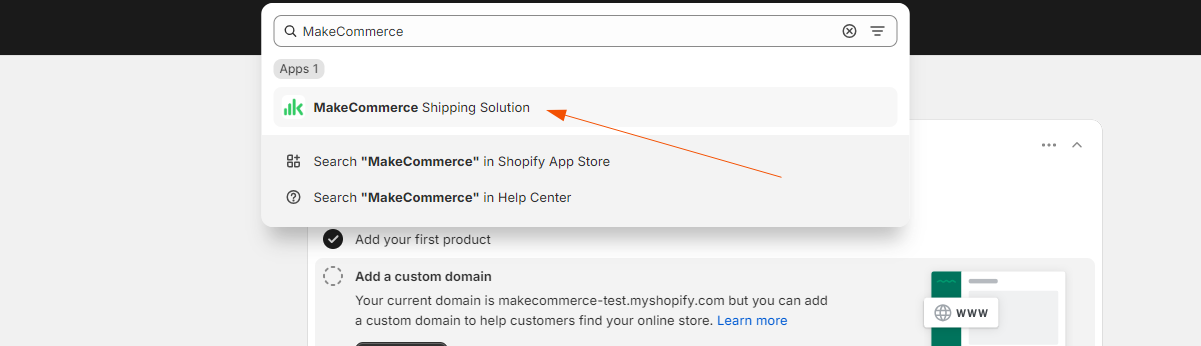
If it still doesn’t open, open the Shopify search engine and enter MakeCommerce Shipping Solution:
- When you open the module, you will see the first section App Settings. Here you need to enter API keys for the test or live environment. As with the payment module, the API keys are available at Merchant Portal under Settings > API. Insert the API data in the module. You then need to save the changes.
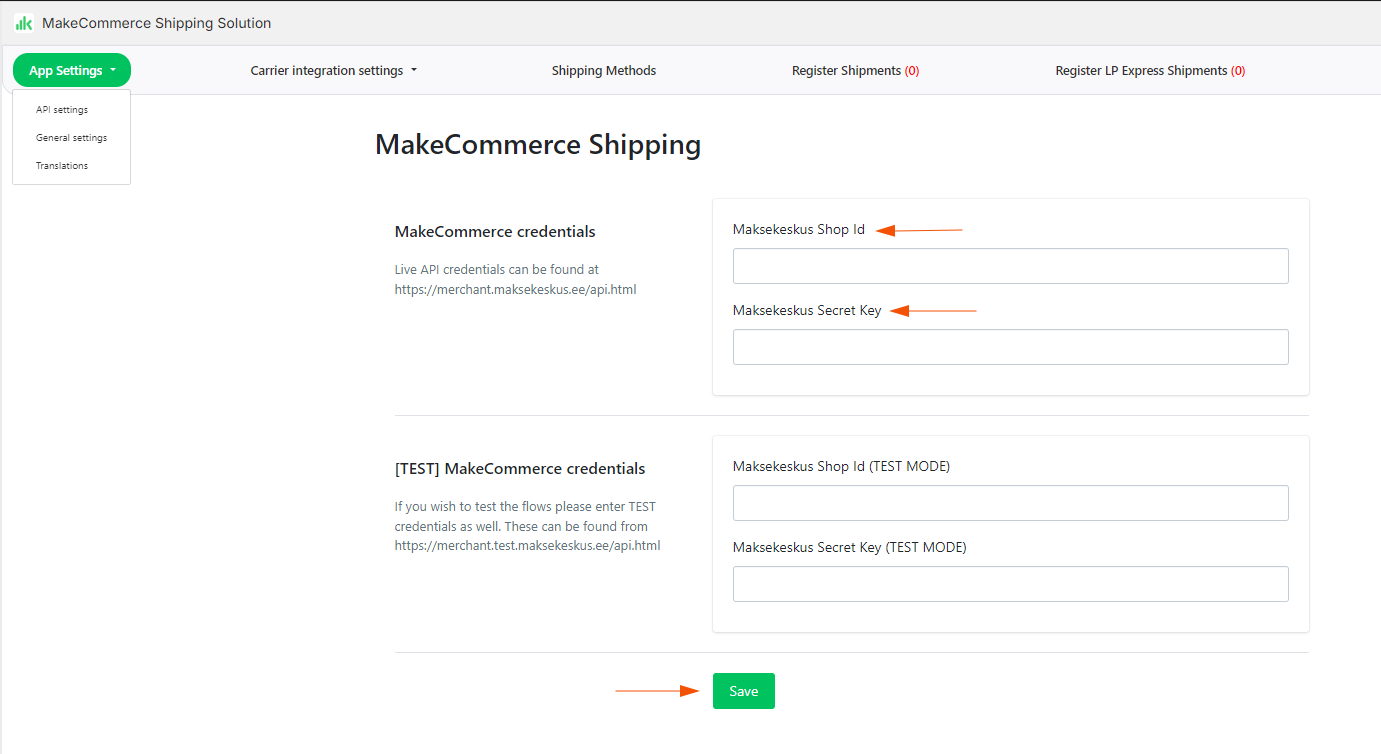
- For the next steps, select App Settings- General settings:
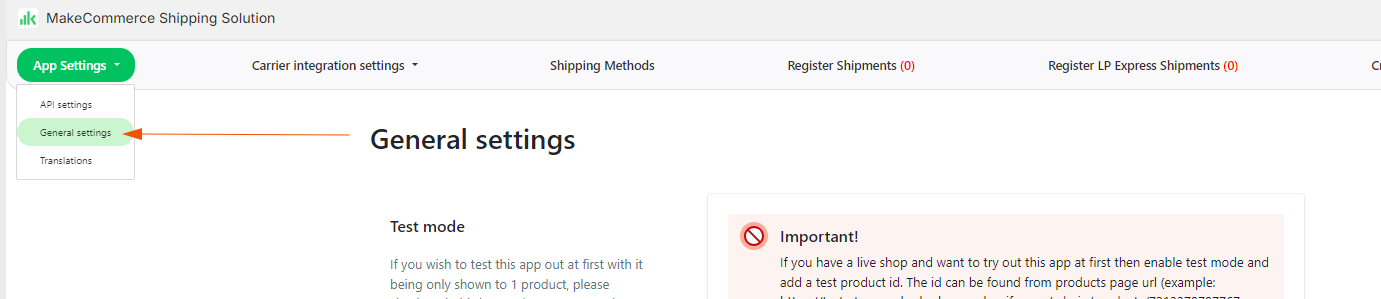
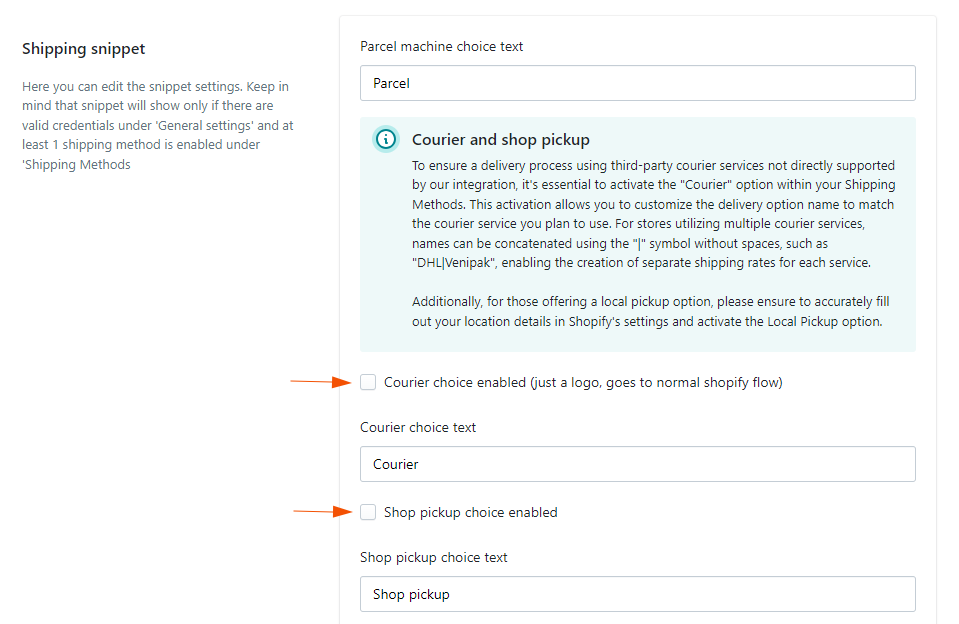
- Mark whether the goods need courier delivery or in-store pickup. If you are using only one language in your e-shop, you can change texts here. If you have multiple languages in your e-shop then you can add the translations selecting App Settings- Translations and ticking checkbox for Multi-language functionality enabled.
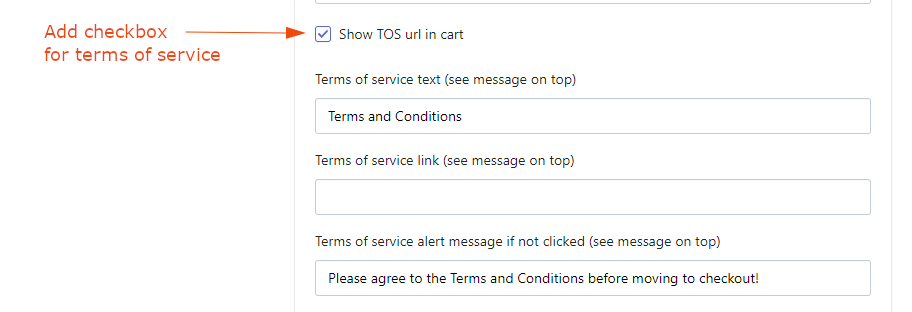
- It is also possible to note that the customer is asked to agree to terms of use etc. before going to the checkout page. All three fields must be filled for TOS to appear in cart.
- The last step is to activate a module at the workpiece/design level. To do this, go to Sales channels > Online Store > Themes > Customize
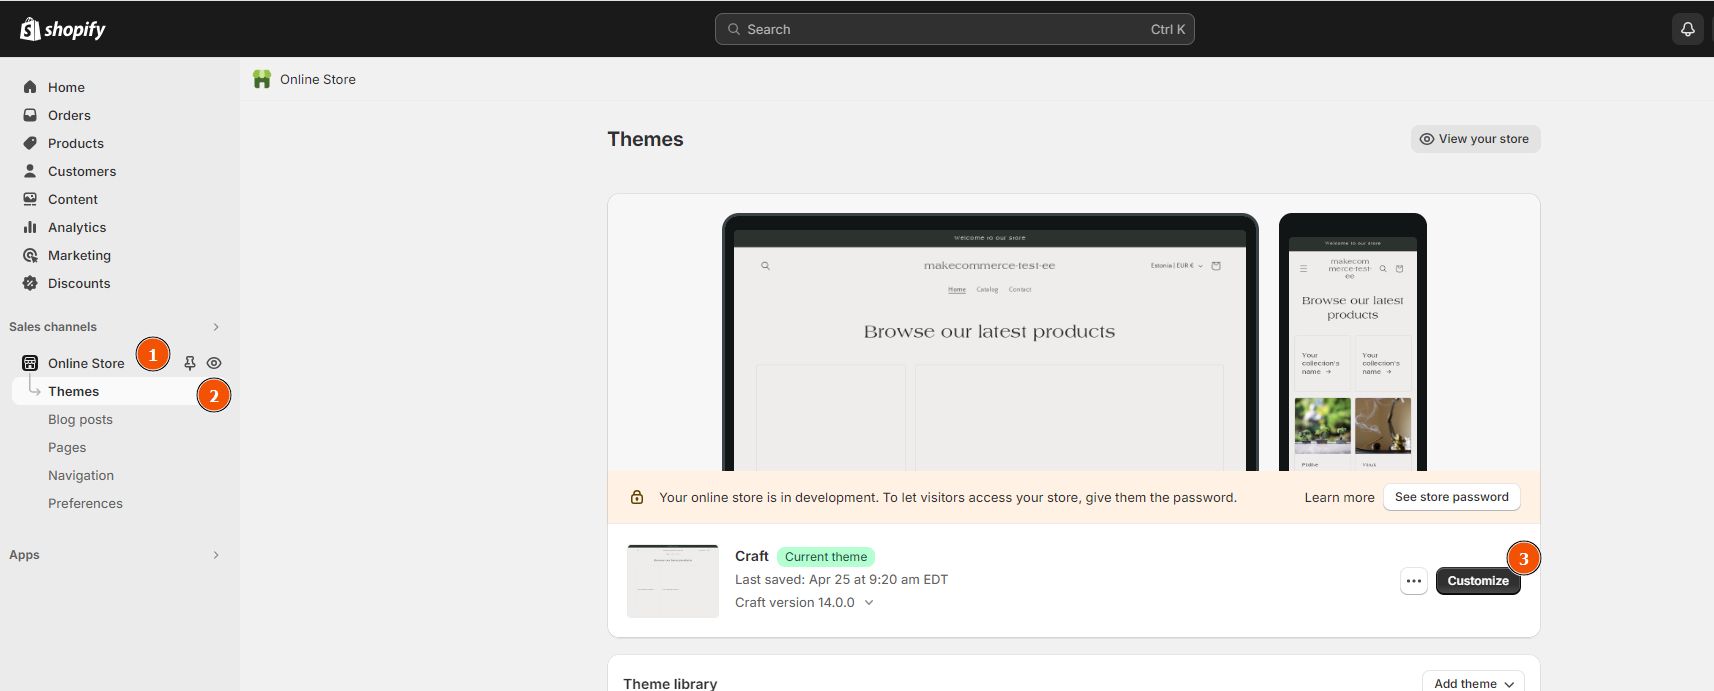
- Open the third option in the side menu bar:
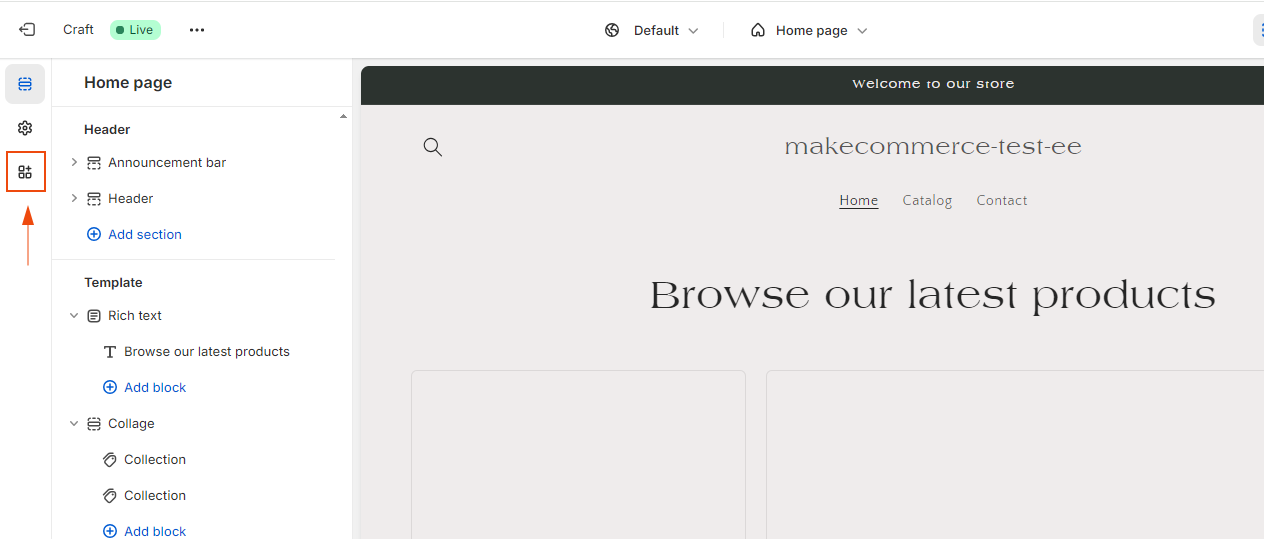
- Enable MK Hide Modal Buy Now & MakeCommerce Shipping. After that press Save.

MakeCommerce Shipping – activates a submenu on the shopping cart page. MK Hide Modal Buy Now – hides the Buy now/Checkout buttons in the Add to cart view and adds a 1 second delay to the Checkout button in the cart page. In this way, the checkout button doesn’t appear until the user has viewed the parcel machine selection. - The plugin is now activated, but for now it has nothing to output since no delivery method has been enabled. This will be done in next steps.
Activating shipping carriers
The merchant must have a valid service contract with MakeCommerce and use our Shopify shipping app.
Open the Carrier Integration settings section and select the service provider (Omniva or DPD):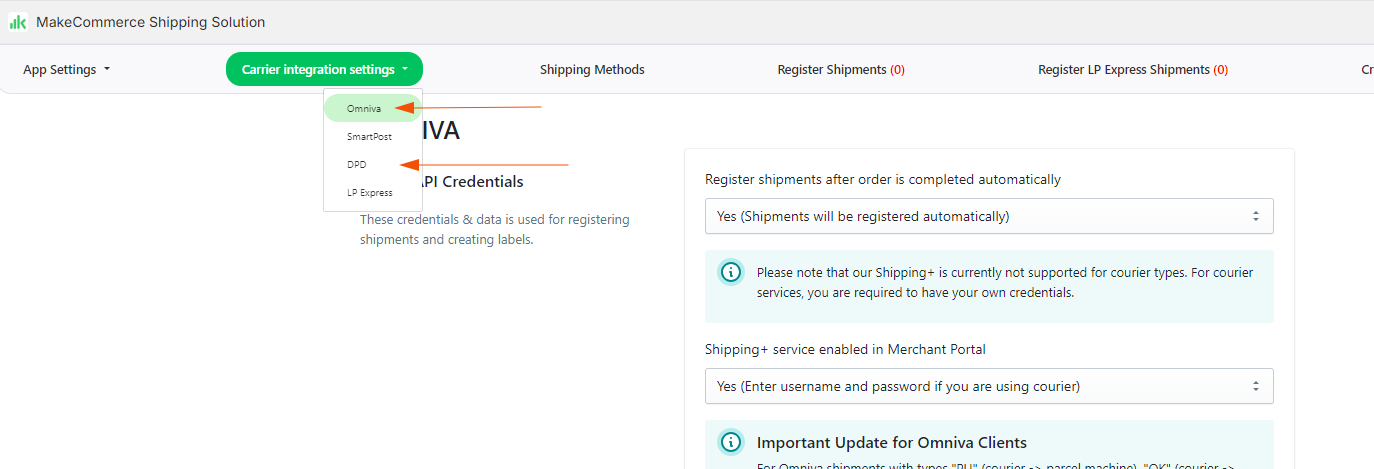
Important! Currently in Latvia, Shipping+ works only with Omniva parcel machines.
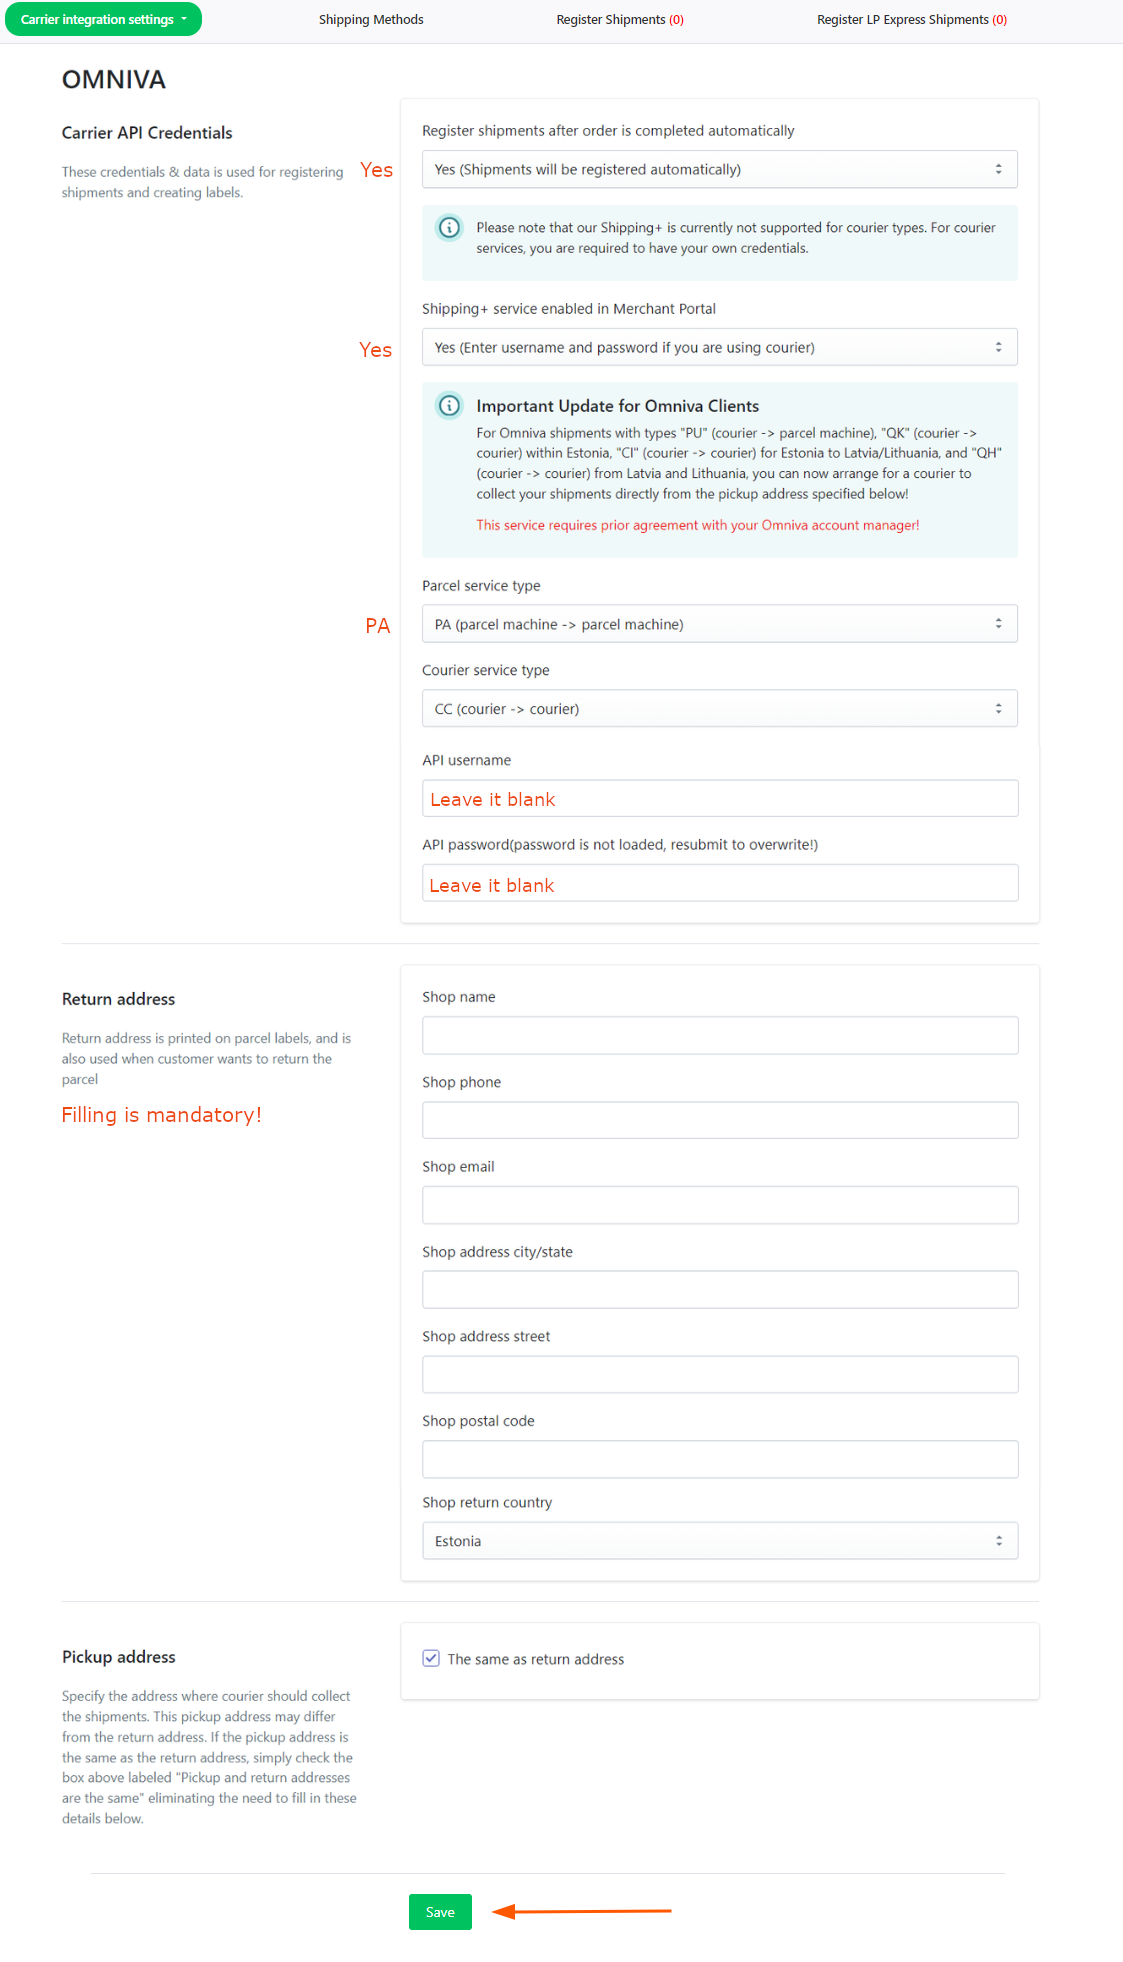
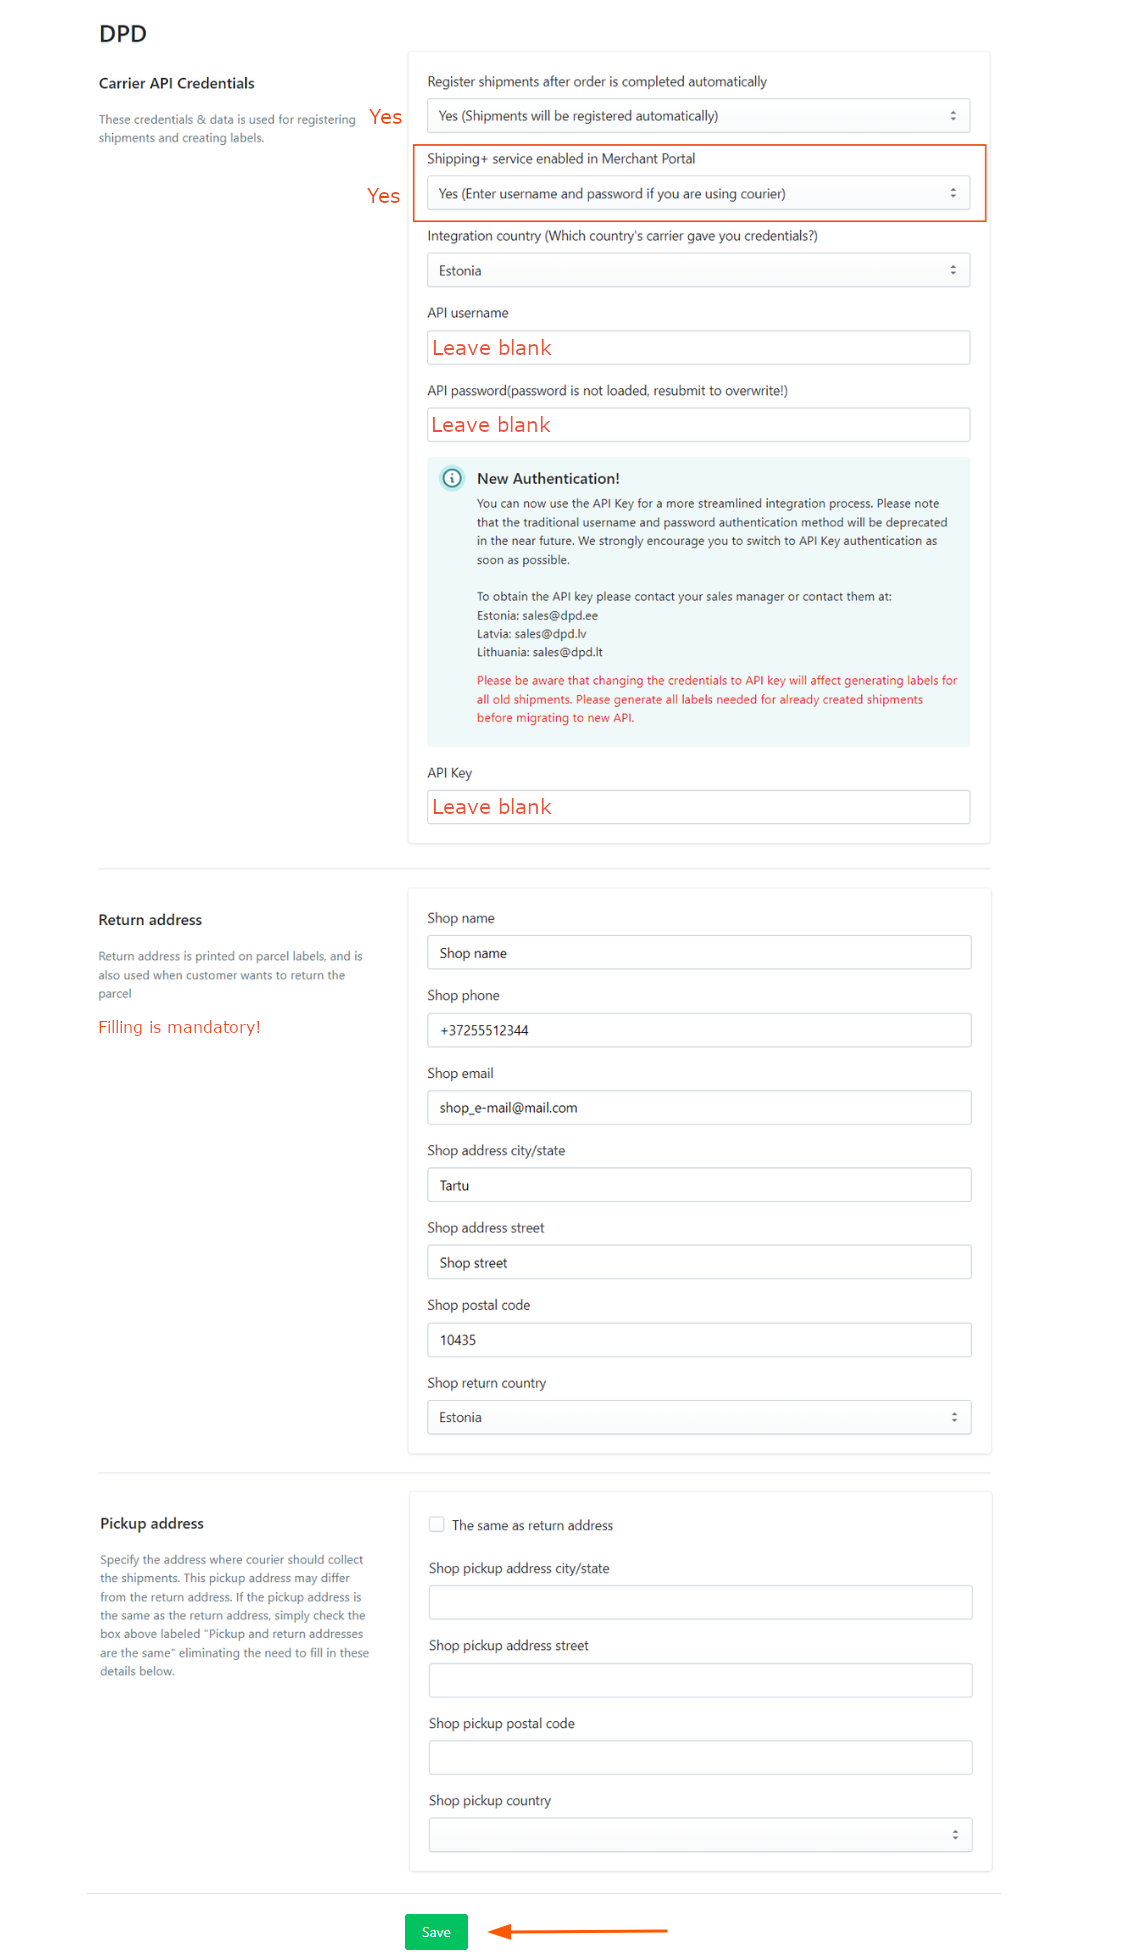
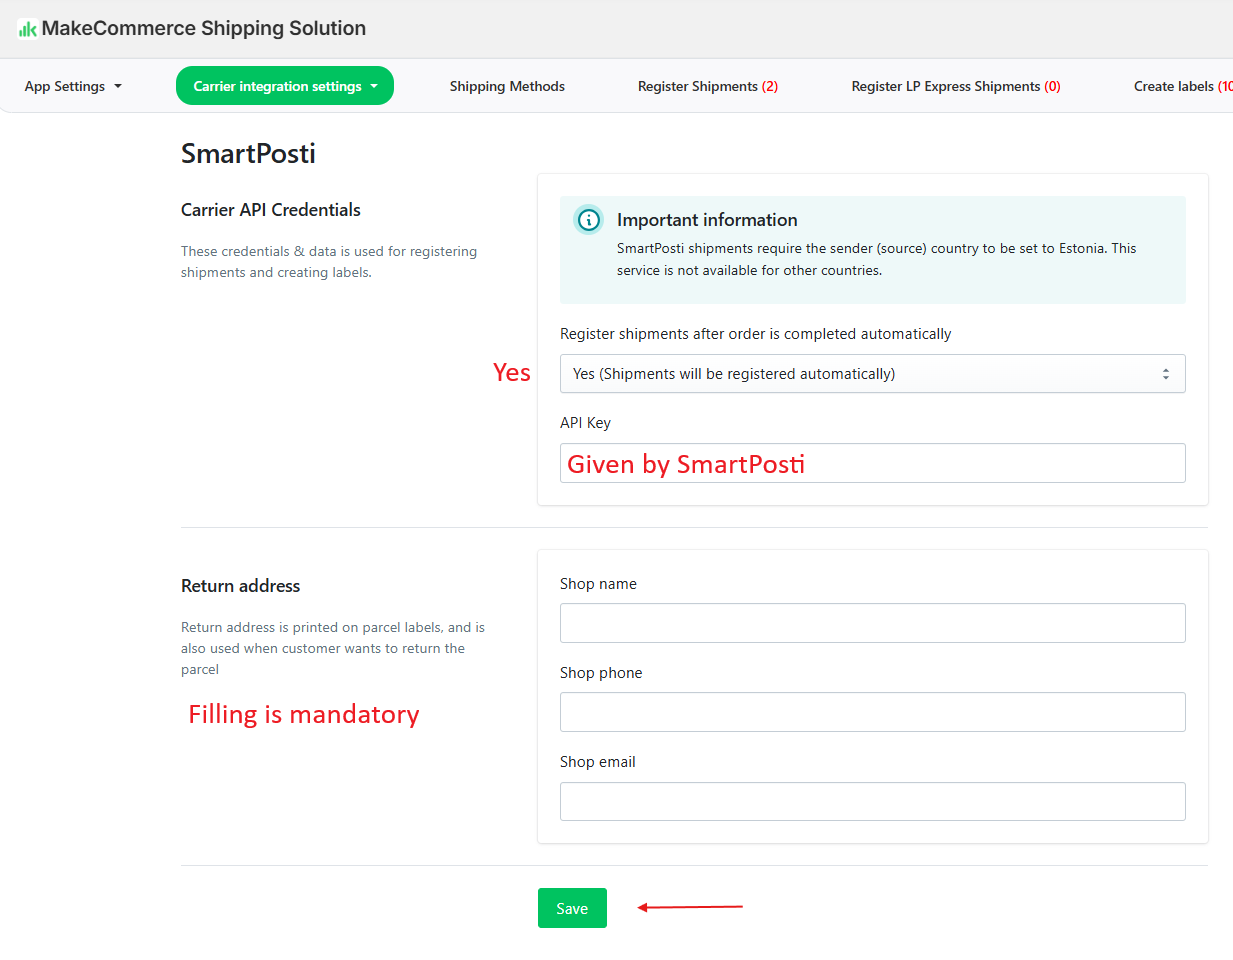
Fill in the configuration of the selected shipping company according to the example below. It is important to select Shipping+ service enabled in Merchant Portal – Yes. Then enter the return address (your address that will appear on the address card and will be used if the customer wants to return the items) and finally click Save Changes:
OMNIVA
DPD
SmartPosti
Activating shipping methods
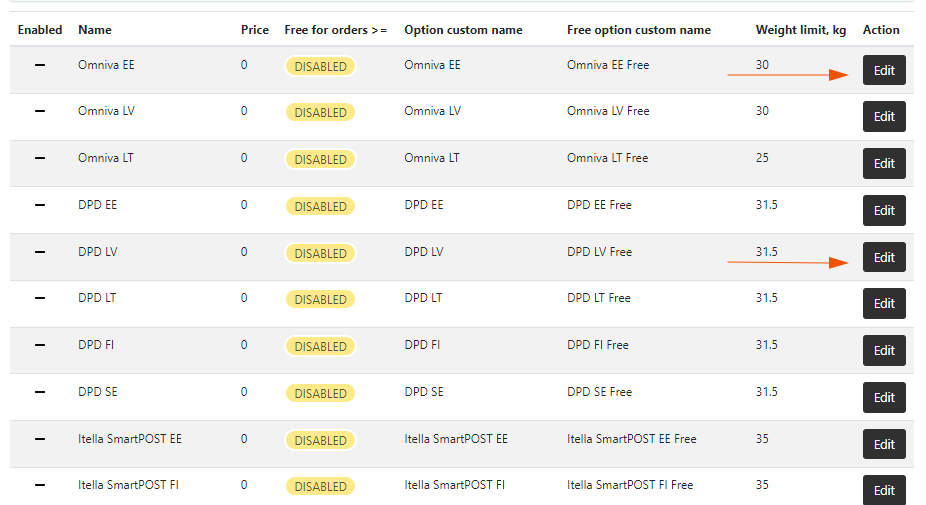
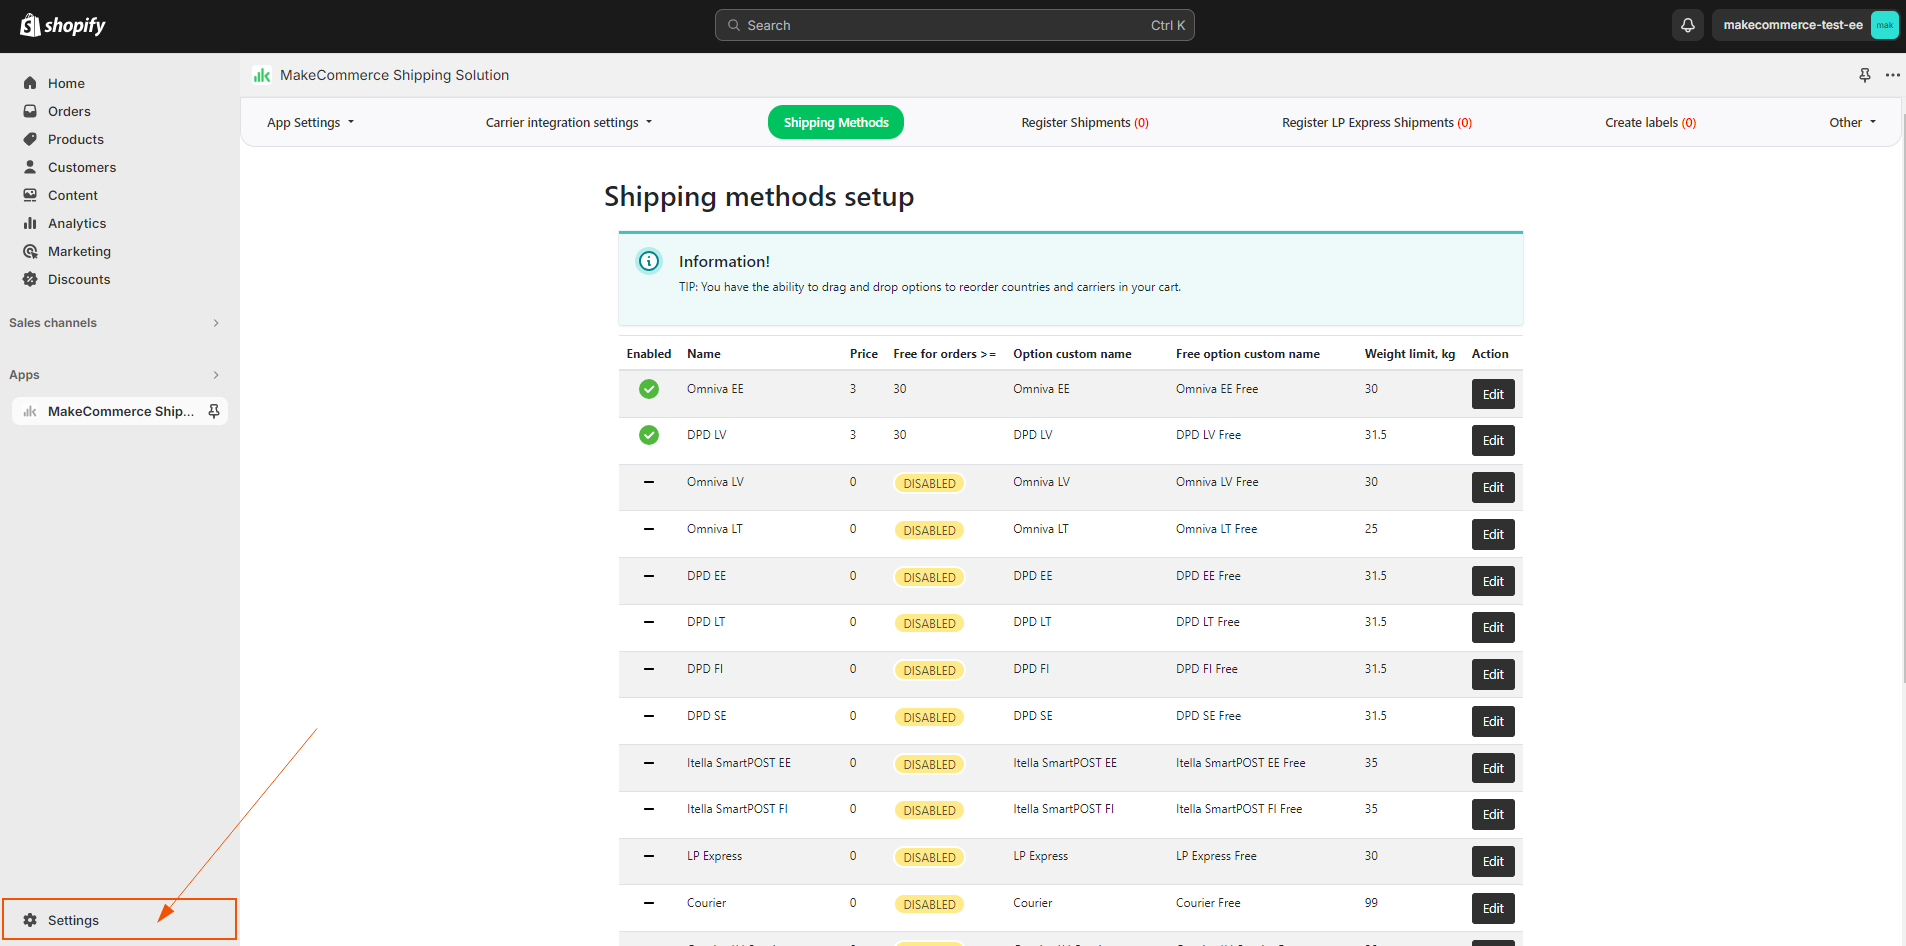
- Go to section Shipping Methods:

- Choose which delivery methods you want to activate. In this example we will activate Omniva parcel machine delivery in Estonia and DPD parcel machine delivery in Latvia. The further process is the same for all methods. Click the Edit button for the selected method:
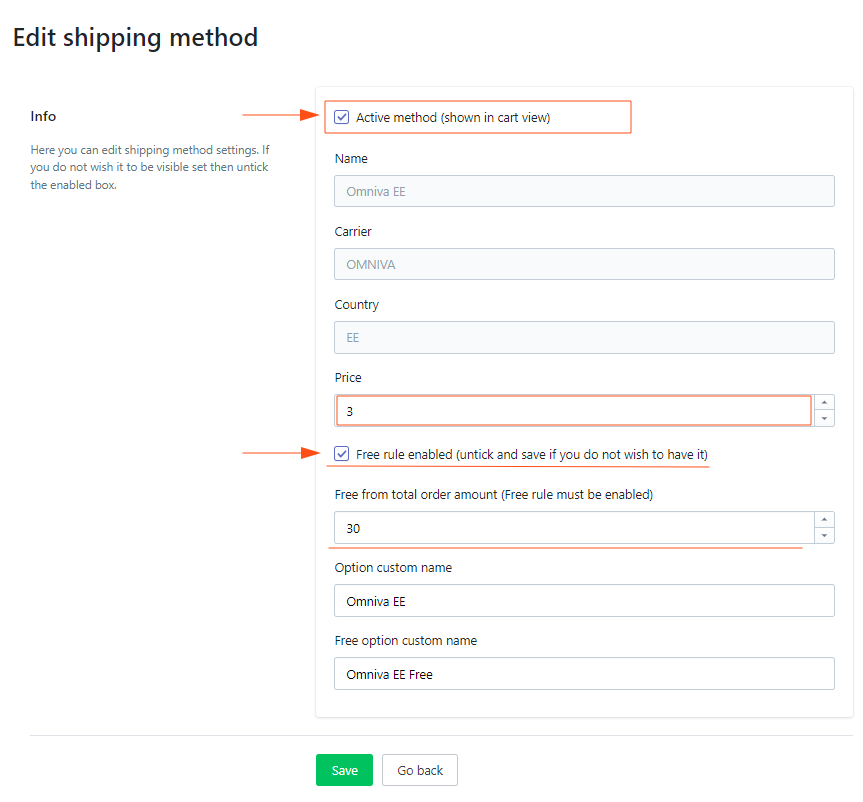
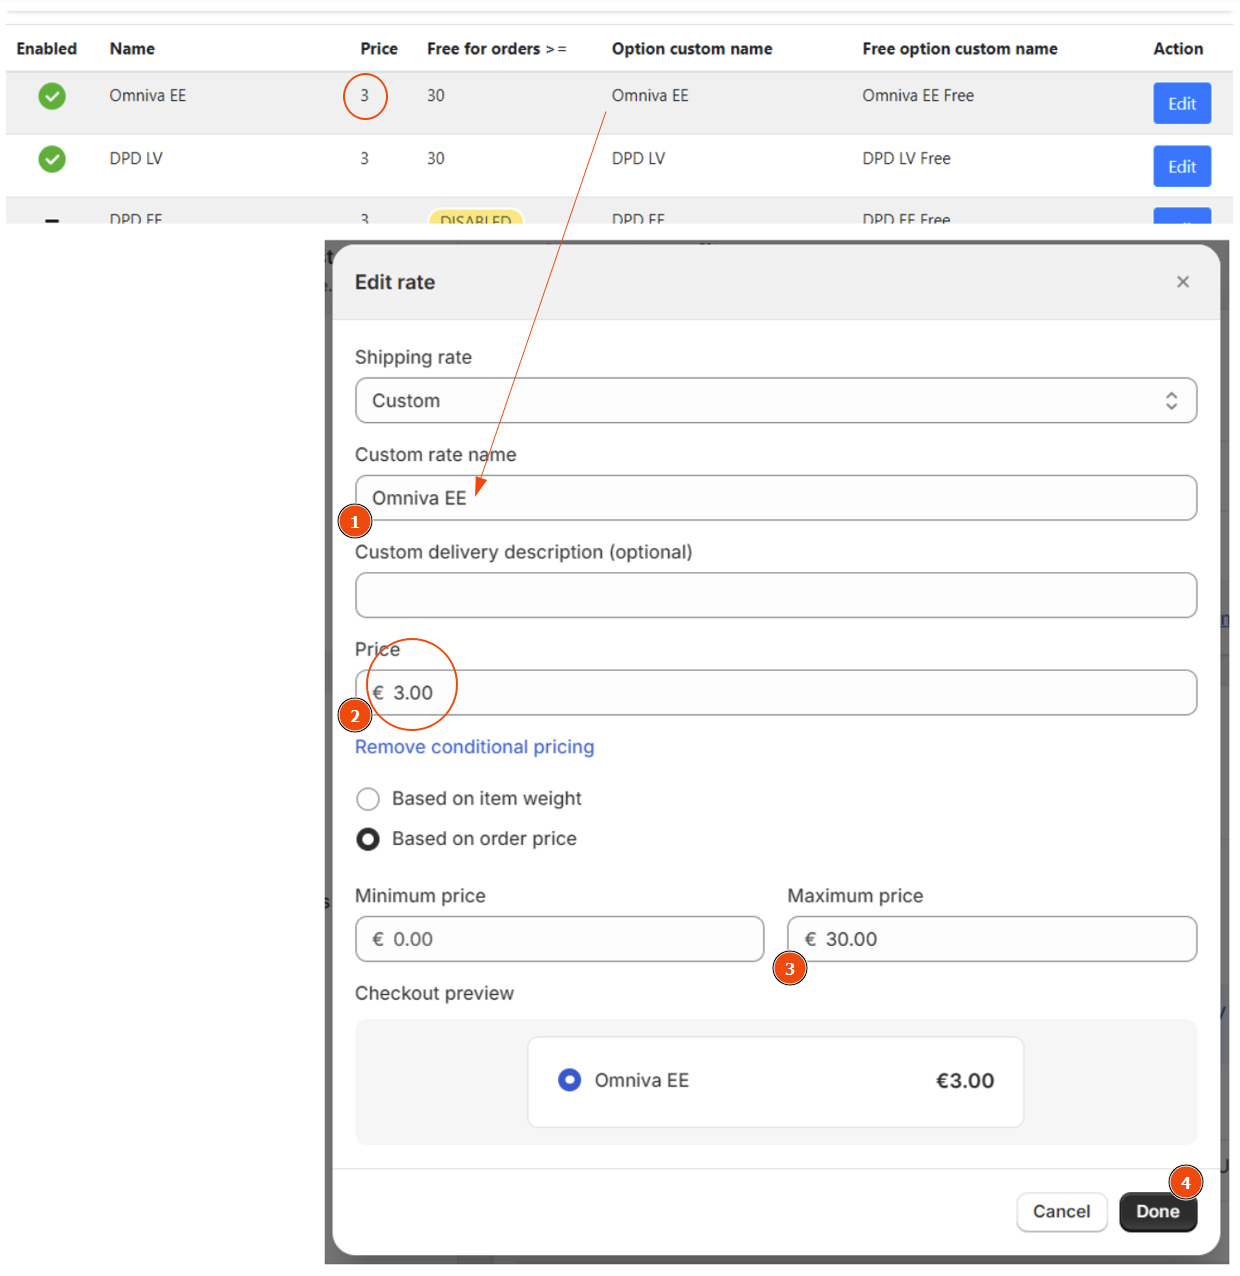
- Next steps:
- Activate the method,
- enter the price,
- select whether free delivery will be available,
- select the free delivery threshold,
- Enter the names that will be shown to the customer for this method. You can also leave these unchanged.
- Save
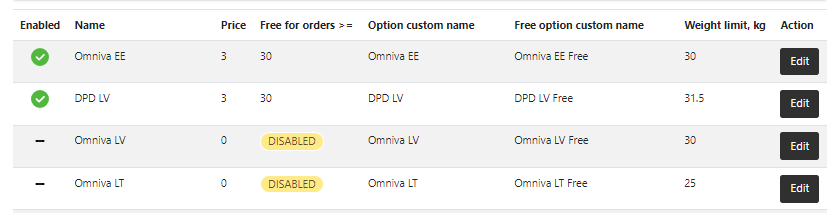
- Two delivery methods are now activated:
- Next, go to Shopify settings:
- Open Shipping and delivery section in the side menu and click on General shipping rates:

- You can add other countries zones by clicking Edit Zone.
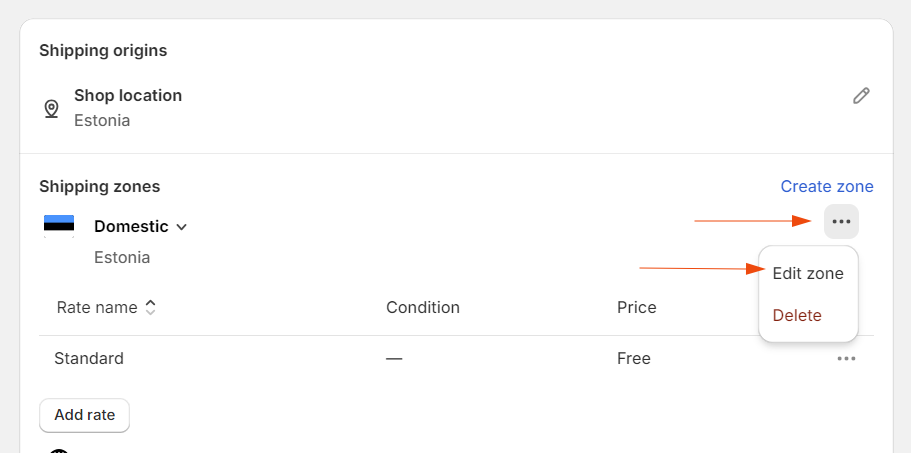
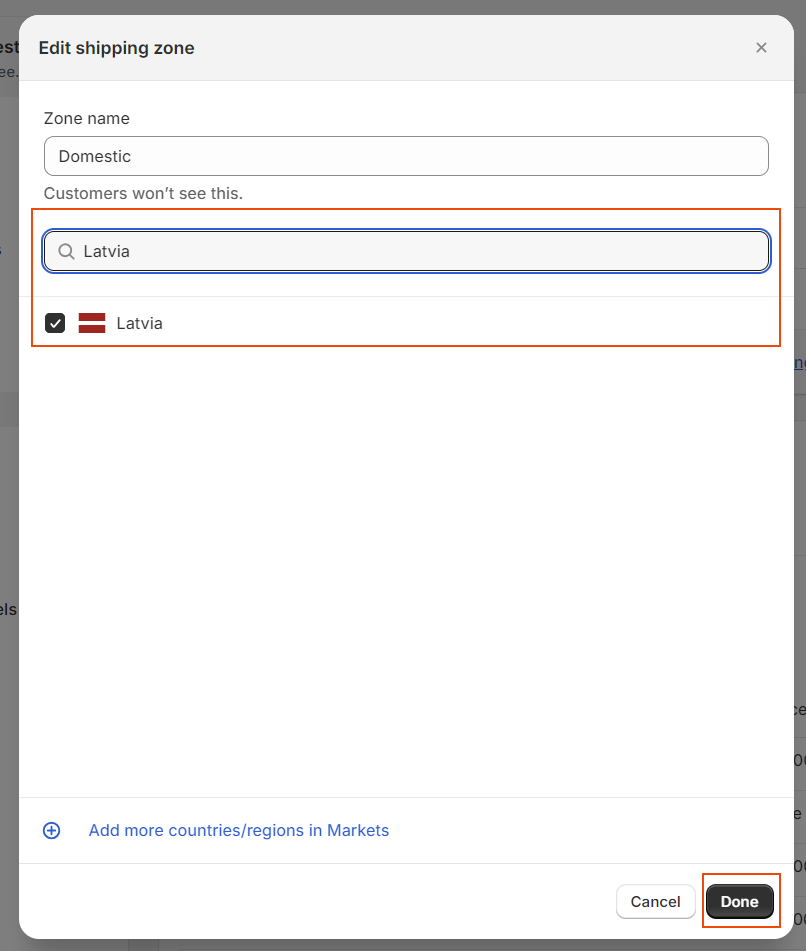
If there is no delivery zone at all, click Create Zone. - If necessary, use the search engine to find and select the countries you want to add, and click Done.
- In the MakeCommerce module, the configuration was already done previously, and now the configuration should be done in the Shopify settings according to the information previously configured in the module.
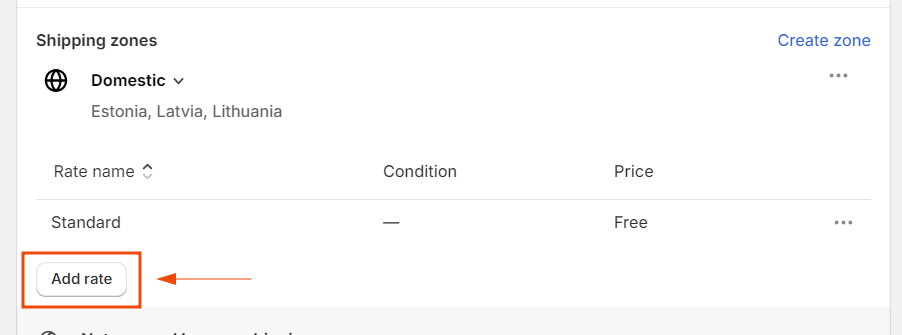
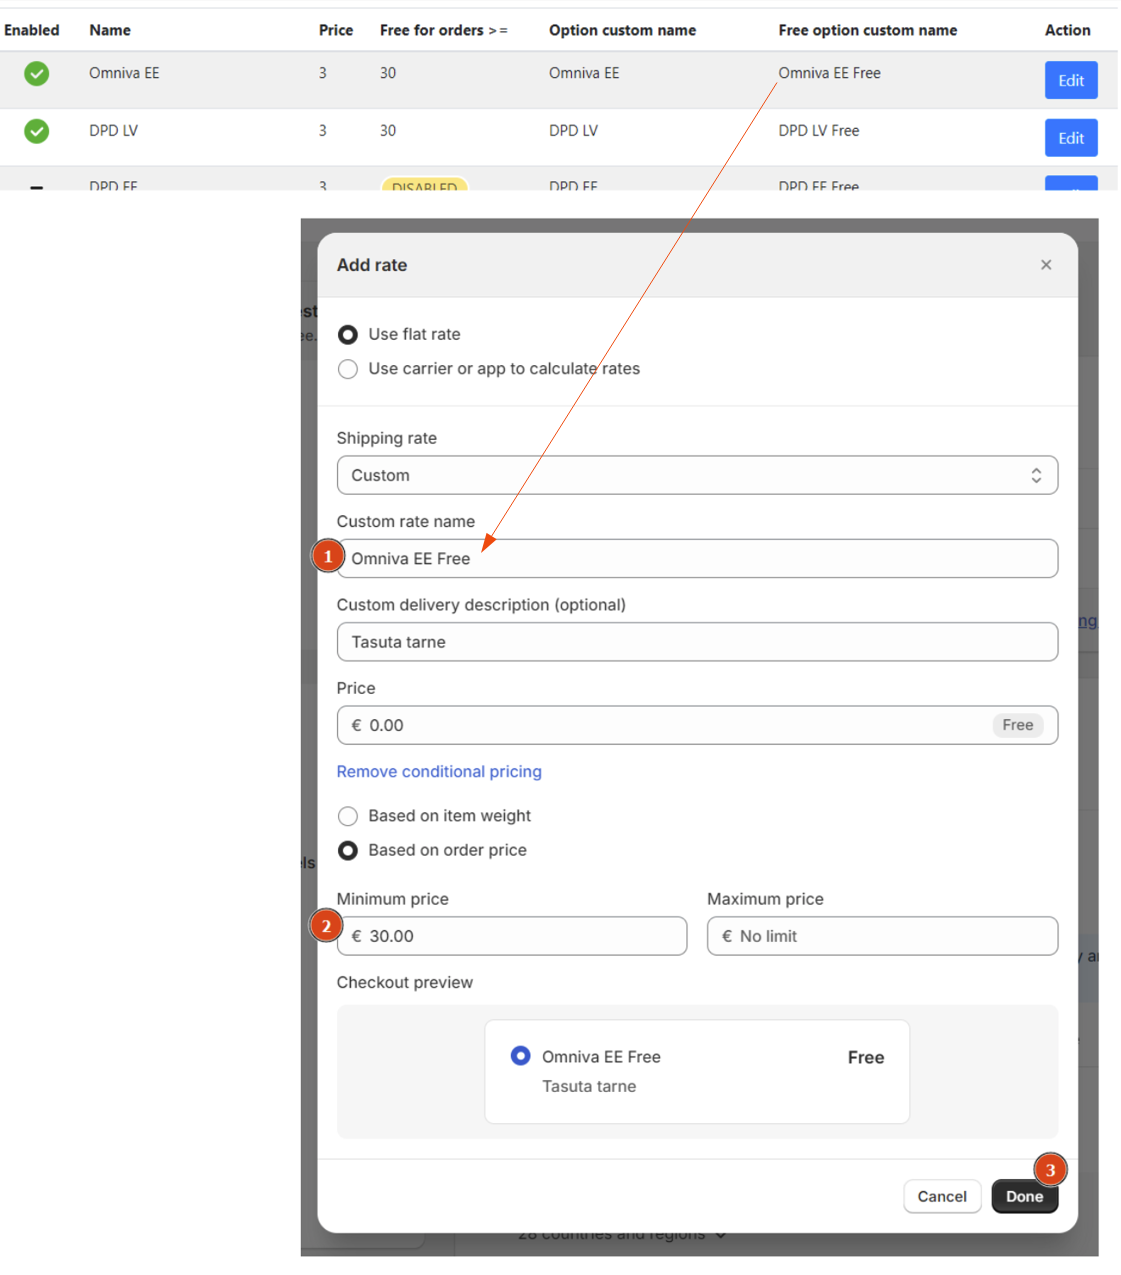
- For each activated shipping method in the MakeCommerce module, a Shopify setting (Add rate) must be made + a separate setting if you also wish to offer free delivery. Additionally, for free delivery, you must specify the amount (condition) from which it is activated. For everything to work correctly, the same shipping method name must be used everywhere (including Free in case of free delivery).
 And adding it to the free delivery method:
- The same principle should be repeated for Latvian suppliers. Finally, there should be 4 shipping tariffs:
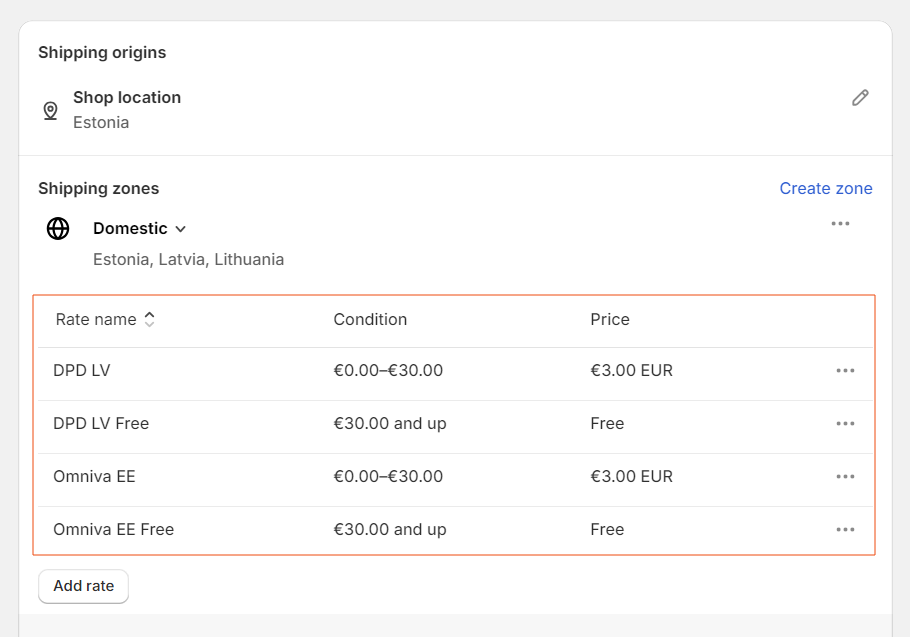
Important! Remove unnecessary shipping rates. In this case, the system default is Standard.
The shipping should now appear in your shopping cart and accordingly in the customer’s checkout menu:
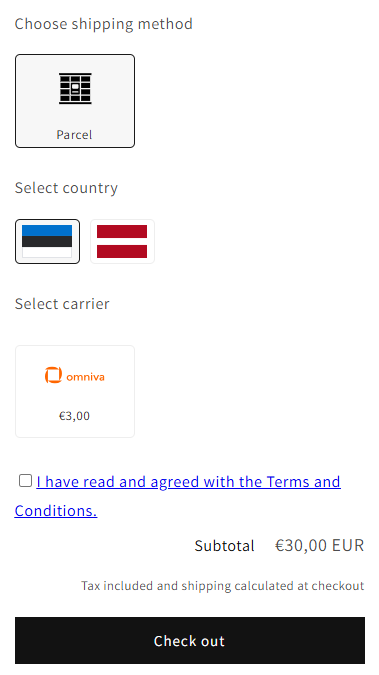
Important! It is necessary to use the Cart Page configuration (the cart opens on a separate page) instead of Cart Drawer (appears as a slide-out cart).
Automatic registration of shipments and creation of parcel cards
If you have done the Omniva/DPD integration correctly, the registration of parcel-to-parcel orders is activated and all parcels will be automatically registered with the selected shipping company. You can view the registered orders and create a parcel label to send to the customer by clicking the Create labels button in our app.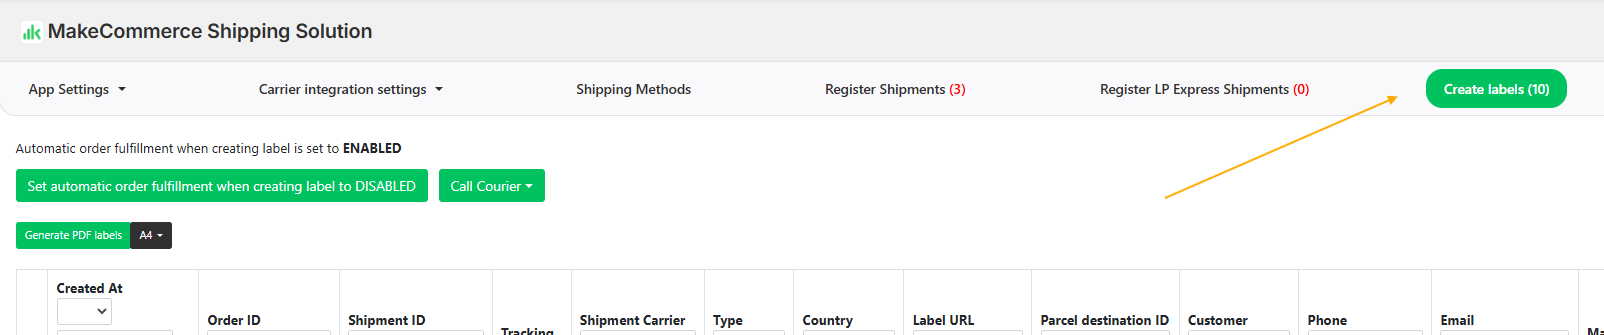
If your shipment is not in this section, it is worth checking the Register shipments section, there may have been an error and you will need to register the shipment again.
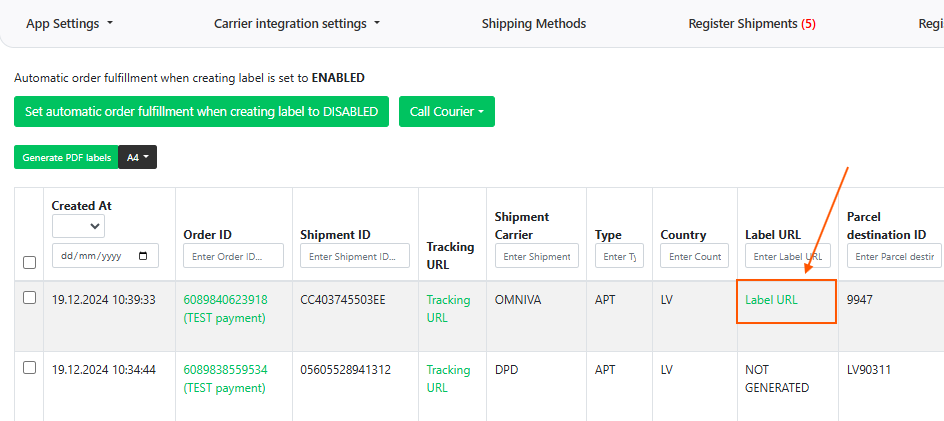
Initially, all registered shipments will have the Label URL status NOT GENERATED. On the left side you can select the shipments for which you want to create a label and click the Generate PDF Label button. The Label URL link will be created and the generated PDF address card will open.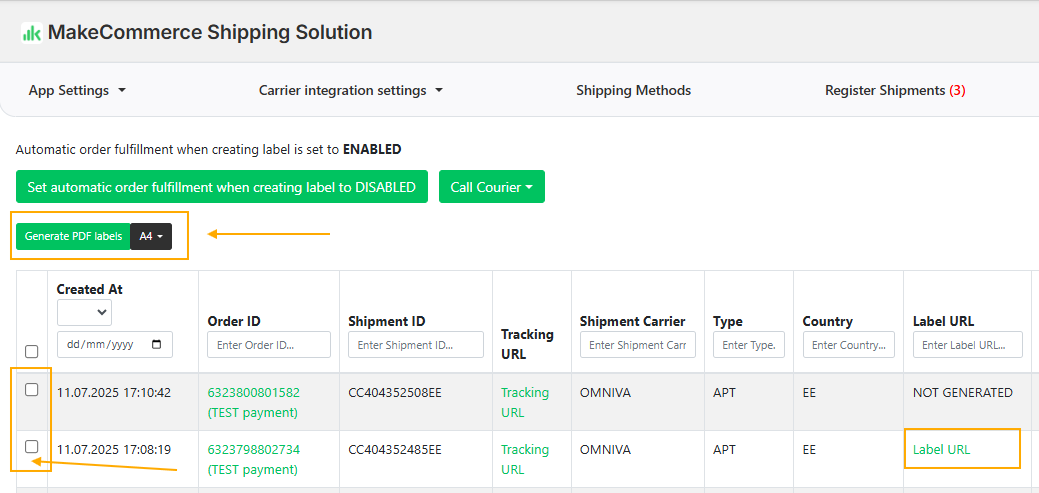
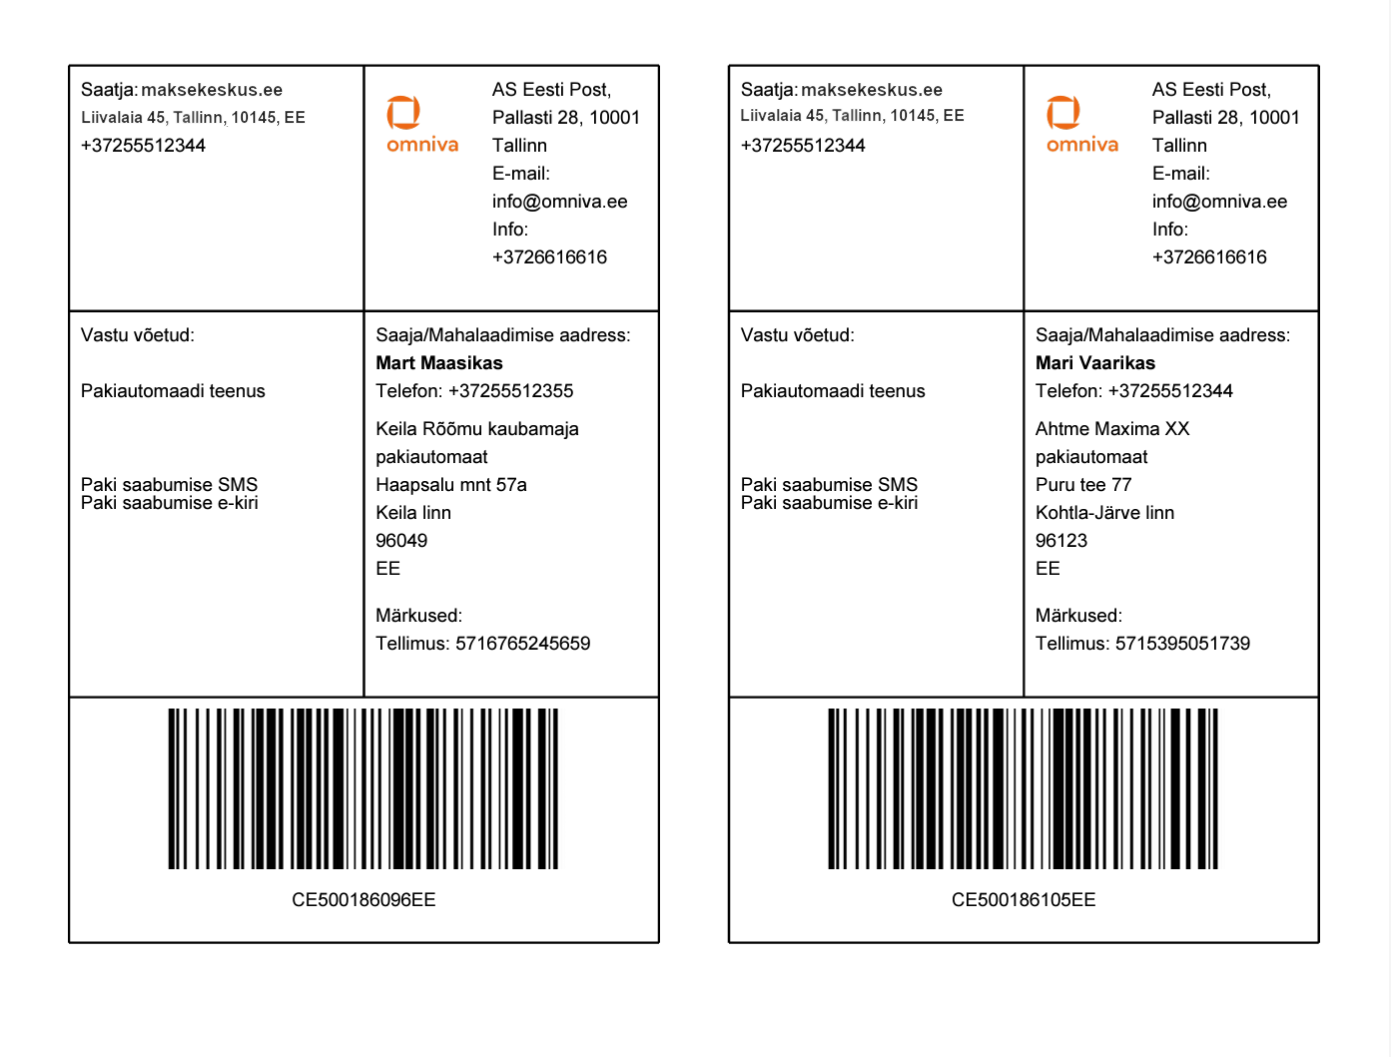
You can create an address label for each order individually or select multiple orders and multiple address labels will be created together on one page. Similarly, if you use multiple shipping companies, you can create multiple address cards from both Omniva and DPD on the same page. Then all you have to do is print, add to the parcel and send.
Additional settings
Phone number
Phone number has to be a required field if you use parcel machines as that is where the info is usually sent.
- Go to your shops admin page.
- From bottom left choose Settings then -> Checkout
- Customer contact method = Email.
- Shipping address phone number = Required
Calling a courier
If you are sending large shipments or it is not possible to take the packages to the parcel machine, then you can use our call courier service. Omniva/DPD courier will pick up the shipments and deliver them to the parcel machine. This is a paid service(the fee is 4€+VAT).
- To request a courier pick up service, you need to go to the Create Labels section:
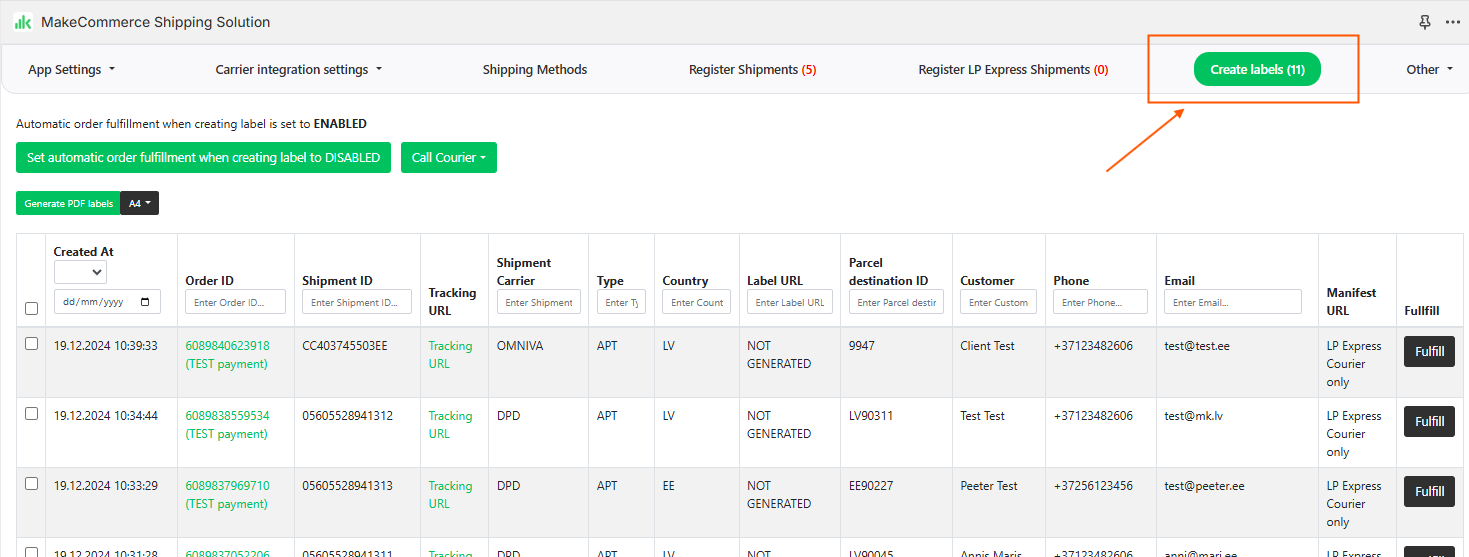
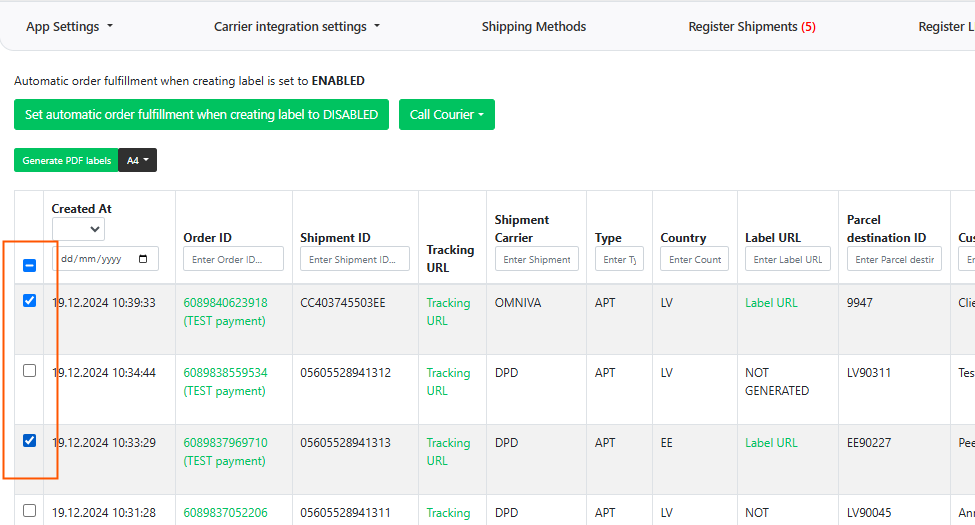
- Check if a label has been generated for needed orders:
- Below mark the orders you want to hand over to the courier. The courier will not accept un-registered orders!
- Select which delivery company the shipments are registered with:
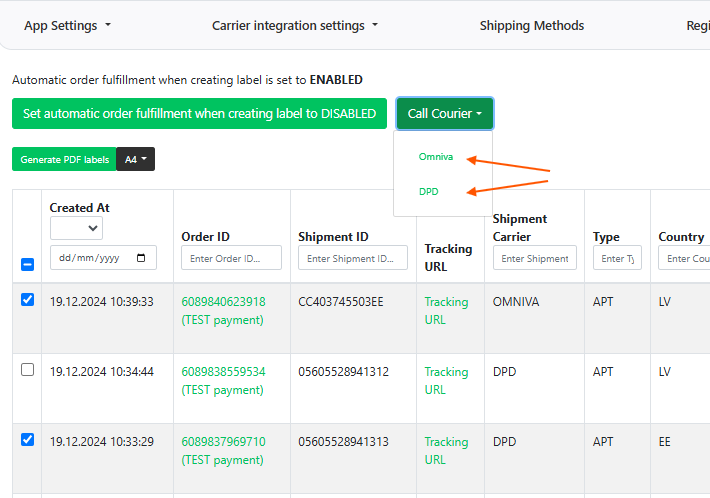
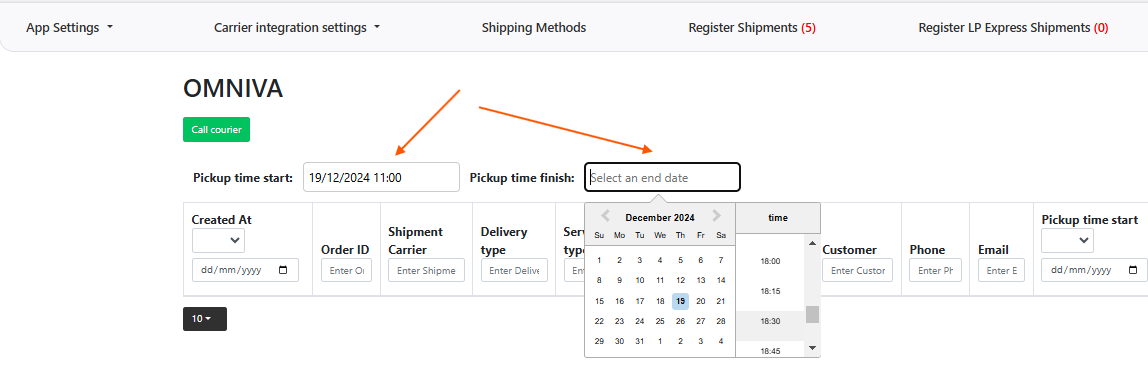
- Choose the most convenient time period for the courier to arrive. Press the Call Courier button and if everything is correct then the selected time will appear in the Pickup time columns:
Setting up additional delivery methods
Shop pickup:
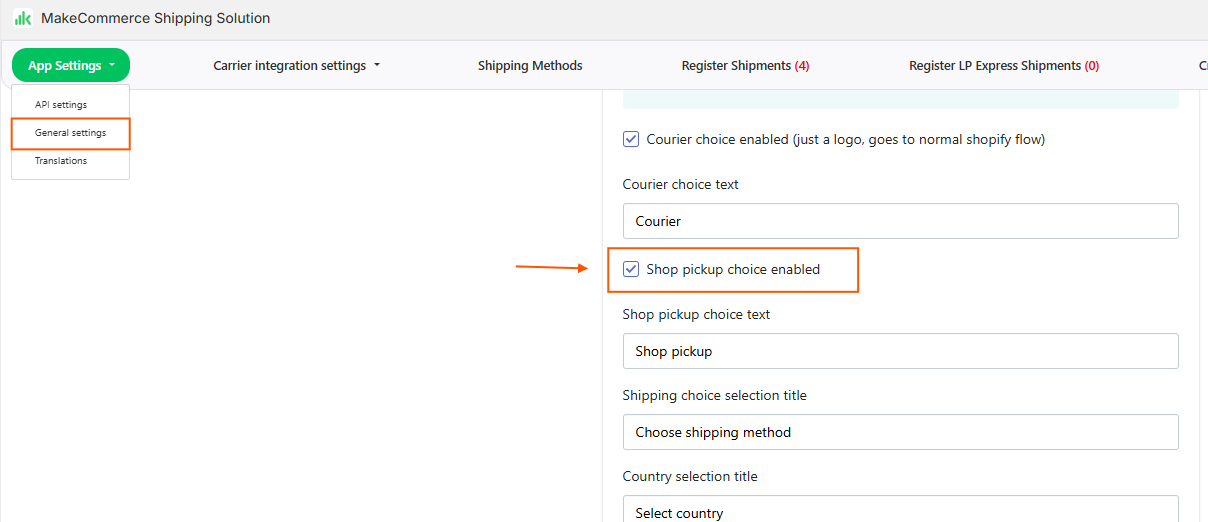
- In App Settings -> General Settings, enable Shop pickup choice and save the changes. In the field below you can change the Shop pickup text. For multilanguage store use the Translations section:
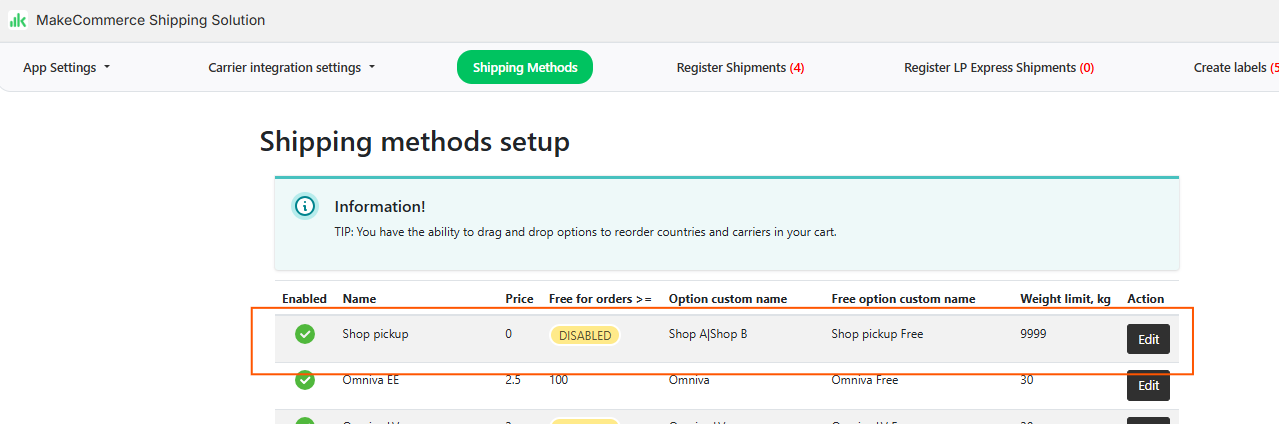
- In the Shipping Methods section find the Shop pickup option and click Edit:
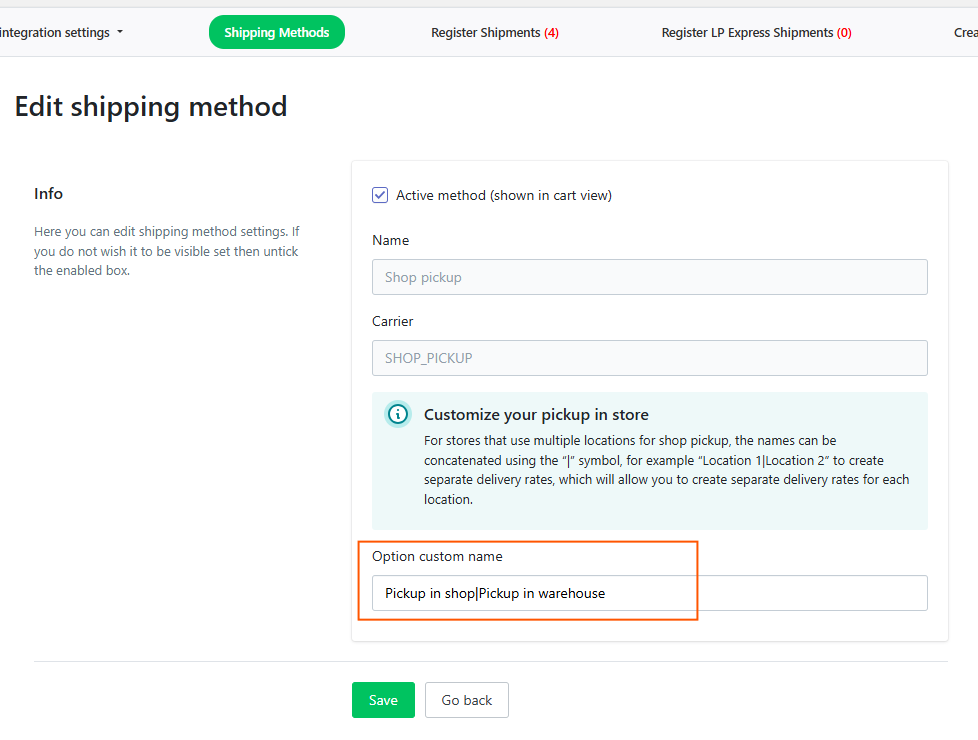
- A new page opens where you can enter a name for the delivery option. For example, Store Pickup. For multiple locations use “ | ” symbol as shown on the picture. Save your changes:
- Next open Shopify shipping zones settings and create the necessary zones. The zone names must match what you entered in the previous step. If in the previous step you entered two different locations you need to create two different zones with the same names.
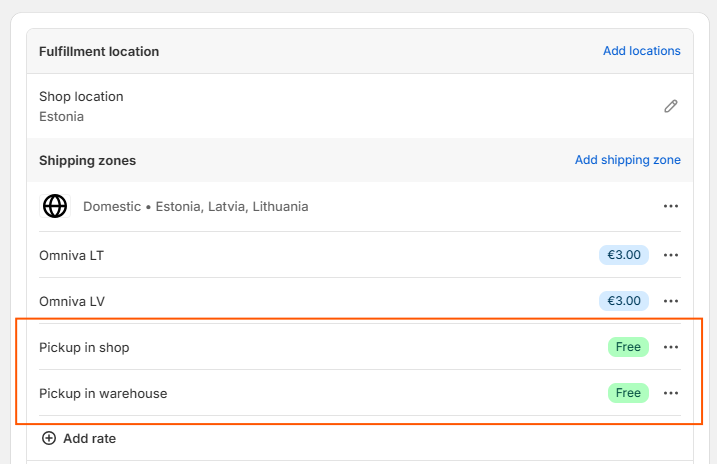
- When shop pickup method is chosen in cart view, then the created locations will be displayed in checkout.
Activating Test Mode for Specific Product
If you wish to test this app out at first with it being only shown to 1 product (in case you have a live store already with active traffic).
- Go to App Settings and select General settings to mark Test mode enabled – you also need to provide test product id, example is in the General settings tab!
- You can also configure the messages inside General settings menu and if you wish to show TOSt to customers (if it’s enabled then they have to click that they accept before they can continue).
Configuring Multi-Country Parcel Locations in Shopify
If you wish to offer parcel locations to multiple countries you also need to have markets configured for each country in Shopify settings.
- If you only offer your primary country then no changes needed here!
- Go to your shops admin page.
- From left choose Settings -> Markets.
- There you see Primary market, this is what you only accept at the moment.
- If you wish to have parcel locations to other countries as well, create a new market and add those countries just like in a video.
Implementing Additional Shipping Methods Outside the App
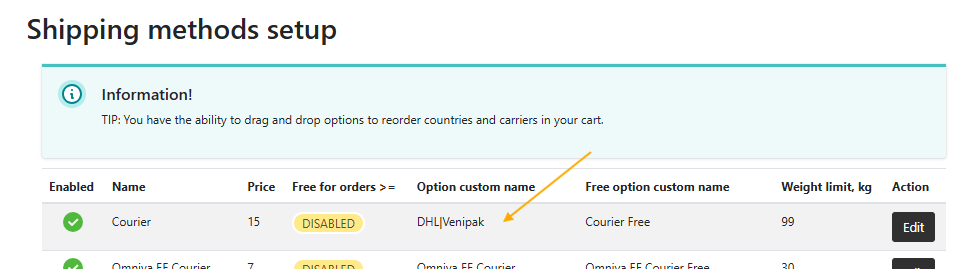
If you wish to use additional delivery methods for courier services that are not integrated into our system, you can do so using the dedicated option. You need to activate the Courier option (General settings) and the Courier method (Shipping methods) by changing the name to the appropriate one. If you want to use multiple delivery methods that we do not support, you can change the Option Custom name to “DHL|Venipak” for example.
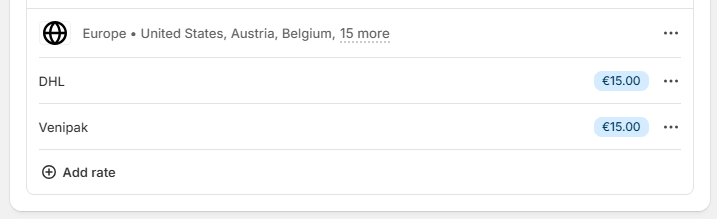
Also add the names separately under Shopify settings- Shipping and delivery rates.
The text in cart is configurable under General settings. If you are using multilanguage then open Translations in our app and find section Other shipping methods.

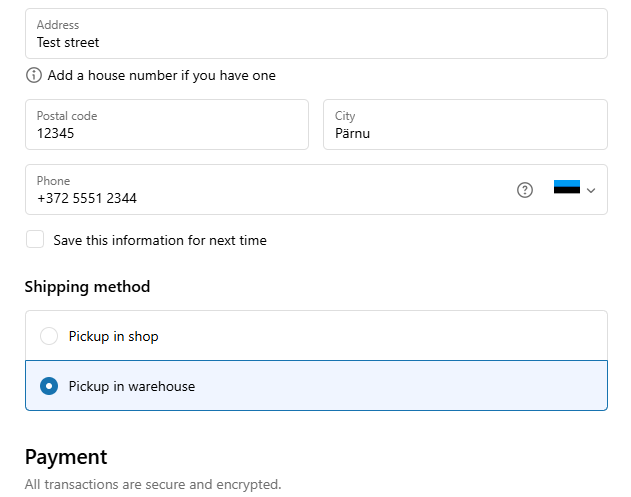
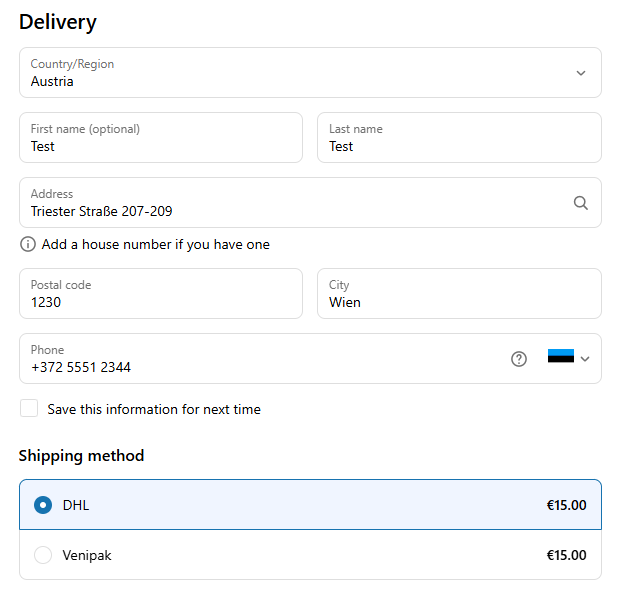
In checkout customer can choose the preferred shipping method.
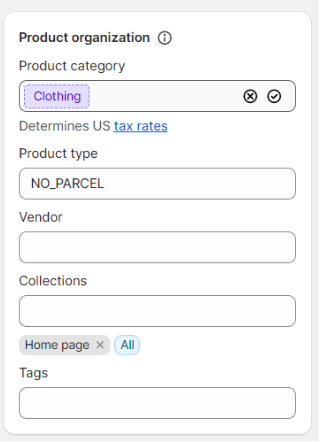
Special shipping considerations
You might have products that necessitate special shipping considerations. These could be items that cannot be shipped through standard parcel services due to their size, weight, or handling requirements, or items restricted to adults, such as alcohol or tobacco, which are subject to age verification.
Instruction for Shopify Store Admin:
- Log in to your Shopify admin panel.
- Navigate to the “Products” section.
- Click on the product you want to mark as non-parcel shippable.
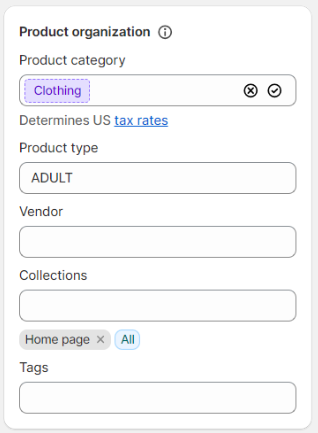
- In the “Product type” field, input “NO_PARCEL”, “COURIER_ONLY” or “ADULT”.
- Click “Save” to update the product details.
When “ADULT” products are in the cart, only shipping methods such as SmartPosti parcel machines and courier (EE) and Omniva parcel machines and courier (EE, LV, LT) that support age verification will be shown to the customer. Also Shop pickup is available.
With product type “COURIER_ONLY” the shipping methods that are shown are Courier and Shop pickup. Parcel machines are not visible. With “NO_PARCEL” only Shop pickup is available.